Amazon KDP guide, KDP book publishing
Book Writing Template Google Docs: Cloud Authors
Mar
okay so here’s what I’ve been doing with Google Docs templates for like the past year
So you wanna set up book writing templates in Google Docs and honestly it’s one of those things I wish I’d figured out way earlier in my publishing career. I was literally formatting everything manually for like 3 years before I got smart about this and now I’m gonna walk you through exactly how I do it.
First thing – Google Docs isn’t Word. Stop trying to make it work like Word because you’ll just get frustrated. The whole point here is that everything’s in the cloud, you can access it from your phone when you’re stuck at the DMV or whatever, and multiple people can collaborate without that nightmare of emailing files back and forth with names like “book_final_FINAL_actualfinal_v3.docx”
setting up your master template
Start with a blank Google Doc. Don’t use one of their built-in templates because they’re honestly pretty useless for actual book writing. Go to Format > Paragraph styles and this is where you’re gonna set up your heading hierarchy. I use:
- Title – for the book title (18pt, bold, centered)
- Heading 1 – for chapter titles (16pt, bold, left-aligned)
- Heading 2 – for major sections within chapters (14pt, bold)
- Heading 3 – for subsections (12pt, bold)
- Normal text – body copy (11pt, left-aligned, 1.5 line spacing)
The line spacing thing is important because 1.5 makes it way easier to read on screen while you’re writing. You can always change it later when you’re formatting for actual publication.
Oh and another thing – set your margins right from the start. Go to File > Page setup and I usually do 1 inch all around. Some people like wider margins for notes but I find that just wastes screen space when you’re drafting.
the font situation nobody talks about
Look, everyone’s gonna tell you to use Times New Roman or Garamond or whatever. For your template just use something readable on screen. I use Arial or Google’s own Roboto because serif fonts honestly make my eyes tired when I’m staring at a screen for 4+ hours. You can always change the font when you export for publishing.
My client canceled last Tuesday so I spent like three hours testing different fonts and here’s what I found – it literally doesn’t matter for the drafting phase. What matters is that YOU can read it comfortably. I’ve written entire books in Comic Sans when my eyes were tired (don’t judge me) and then switched fonts during export.
creating chapter templates with auto-numbering
This is gonna sound weird but don’t manually number your chapters. Use the heading numbering feature because if you decide to move chapters around or split one chapter into two, you don’t wanna manually renumber everything.
Go to Format > Bullets & numbering > List options > Restart numbering. Set up your Heading 1 style to include automatic numbering. I usually do “Chapter 1” format but you can customize it however you want.
Here’s the structure I use for each chapter in my template:
- Chapter heading with auto-number
- Blank line
- Optional chapter summary or epigraph in italics
- Blank line
- Body text starts here
The blank lines matter more than you think. They give visual breathing room and make it easier to see where chapters start and end when you’re scrolling through a 50,000 word document.
page breaks are your friend
After each chapter, insert a page break (Insert > Break > Page break or just hit Ctrl+Enter on Windows, Cmd+Enter on Mac). This keeps chapters separated and makes it easier to navigate. Plus when you eventually export to PDF or convert to ebook format, your chapters will automatically start on new pages.
I forget this all the time and then I’m scrolling through a massive document trying to find where Chapter 7 starts and it’s just a nightmare.
setting up front matter and back matter sections
Your template needs sections for all the stuff that goes before and after the main content. I create these as separate headings at the top and bottom of my template:
Front Matter:
- Title Page
- Copyright Page
- Dedication (optional)
- Table of Contents (more on this in a sec)
- Preface or Introduction (if applicable)
Back Matter:
- Acknowledgments
- About the Author
- Other Books by Author
- References or Bibliography (for non-fiction)
Leave these sections in your template with placeholder text so you don’t forget them. I can’t tell you how many times I’ve finished writing a book and then realized I forgot to include a copyright page or about section.
automatic table of contents setup
This is one of the best features in Google Docs that most people don’t use. Once you’ve set up your heading styles properly, you can insert an automatic table of contents that updates itself.
Go to Insert > Table of contents. You get two options – with page numbers or with blue links. For drafting, I prefer the blue links version because you can click on any chapter and jump straight to it. Super helpful when you’re working on a 300 page document.
The TOC will automatically update when you add or rename chapters. Just click on it and hit the refresh button. Don’t manually type out a table of contents like some kind of caveman.
using comments and suggestions for editing workflow
Okay so this is where Google Docs really shines compared to Word. The commenting system is just better, especially if you’re working with an editor or beta readers.
When you’re self-editing, highlight any section you’re unsure about and add a comment to yourself (Ctrl+Alt+M). I use comments for things like:
- “Need to fact-check this statistic”
- “This transition feels awkward, fix later”
- “Maybe move this paragraph to chapter 3?”
- “Research more examples here”
The comments stay in the margin and don’t interrupt your writing flow. You can also assign comments to specific collaborators if you’re working with other people, which is honestly a game-changer.
There’s also Suggesting mode (top right corner, click the pencil icon). When you turn this on, any edits you make show up as suggestions instead of direct changes. I use this when I’m doing my second draft pass so I can see what I changed and decide later if I wanna keep those changes.
version history is underrated
File > Version history > See version history shows you every save point of your document. Google Docs auto-saves constantly so you’ve got basically unlimited undo. I’ve rescued entire deleted chapters from version history when I accidentally deleted stuff or decided my edits were actually worse than the original.
You can also name specific versions. When I finish a complete draft, I go to version history and click the three dots next to the current version and select “Name this version.” I name them like “First Draft Complete – Jan 2024” or “After Editor Review” so I can easily jump back to major milestones.
organizing multiple books and projects
Don’t just have random Google Docs floating around in your Drive. Set up a folder structure that makes sense. Mine looks like:
- KDP Projects folder
- Then subfolders for each book or series
- Inside each book folder: manuscript, research notes, cover ideas, marketing copy, etc.
I also keep a “Templates” folder with my master book template, chapter template, and templates for other stuff like book descriptions and author bios.
Wait I forgot to mention – use the star feature. Click the star icon in the top menu bar of any document you’re actively working on. Then you can access it quickly from the “Starred” section in Google Drive. I star my current work-in-progress and unstar it once the book is published.
collaboration features for co-authors or editors
Click the blue Share button in the top right. You can share with specific people using their email or create a shareable link. The permission levels are:
- Viewer – can only read, can’t edit or comment
- Commenter – can read and add comments but can’t edit the actual text
- Editor – can change anything
For beta readers, I give Commenter access. For professional editors, I usually give Editor access but ask them to work in Suggesting mode. For co-authors, obviously Editor access.
One thing that’s kinda annoying – you can see everyone who’s currently viewing the document in real-time (their cursor shows up with their name). Sometimes my editor and I are working on the same document at the same time and it’s actually pretty cool to see edits happening live, but other times I just wanna write alone and seeing someone else’s cursor is distracting.
You can work in offline mode though. Go to Google Drive settings and enable offline access. Then you can edit without internet and it’ll sync when you’re back online.
protecting your work
Google Docs is pretty secure but don’t be stupid about sharing. Use “Restricted” link sharing instead of “Anyone with the link” unless you’re specifically trying to make something public. And never share Editor access with someone you don’t completely trust.
I also download backup copies every week. File > Download > Microsoft Word (.docx) and save it to an external hard drive or Dropbox or whatever. Cloud storage is great until it isn’t, and I’ve heard horror stories of people losing access to their Google accounts.
formatting tricks that’ll save you hours
Okay so here’s some stuff I learned the hard way over the past few years that you should just build into your template from the start.
Smart quotes: Google Docs automatically converts straight quotes to curly quotes which is what you want for proper book formatting. But double-check in Tools > Preferences that “Use smart quotes” is checked.
Scene breaks: For scene breaks within chapters, don’t just hit Enter a bunch of times. Insert a centered line with three asterisks (* * *) or a decorative symbol. Make this a custom paragraph style so you can reuse it consistently.
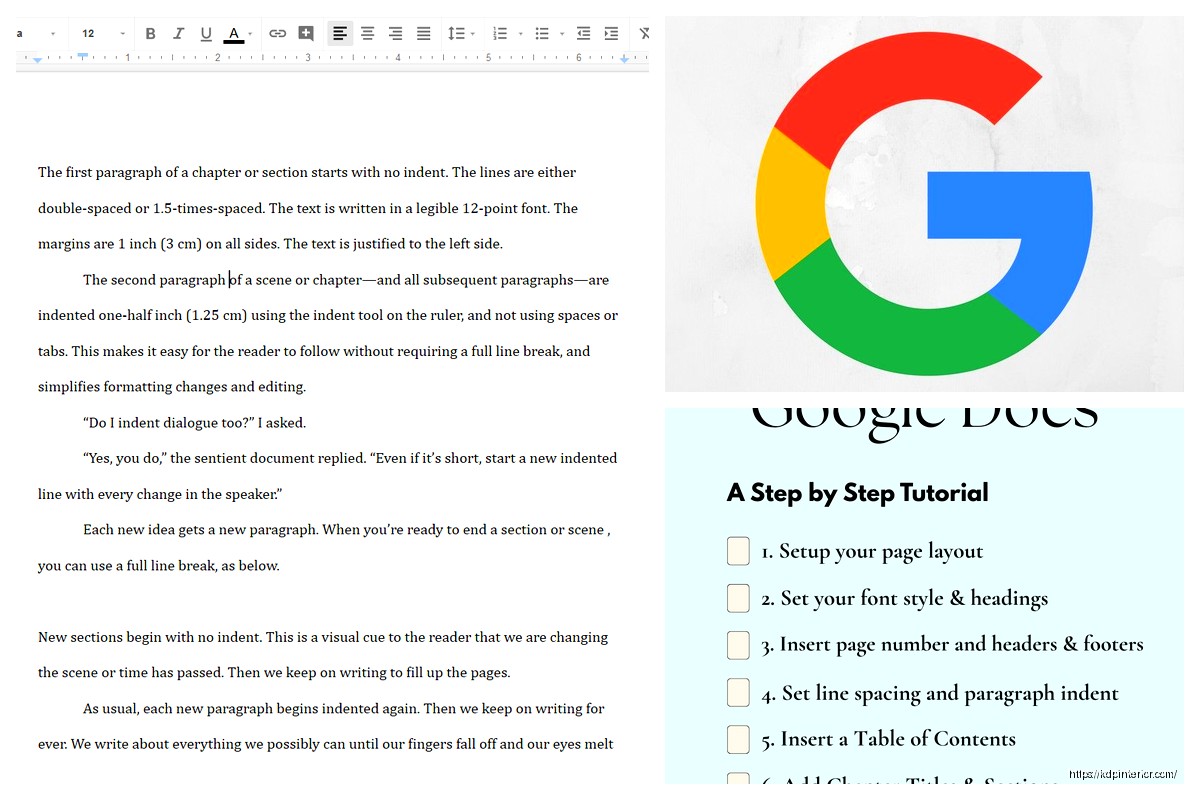
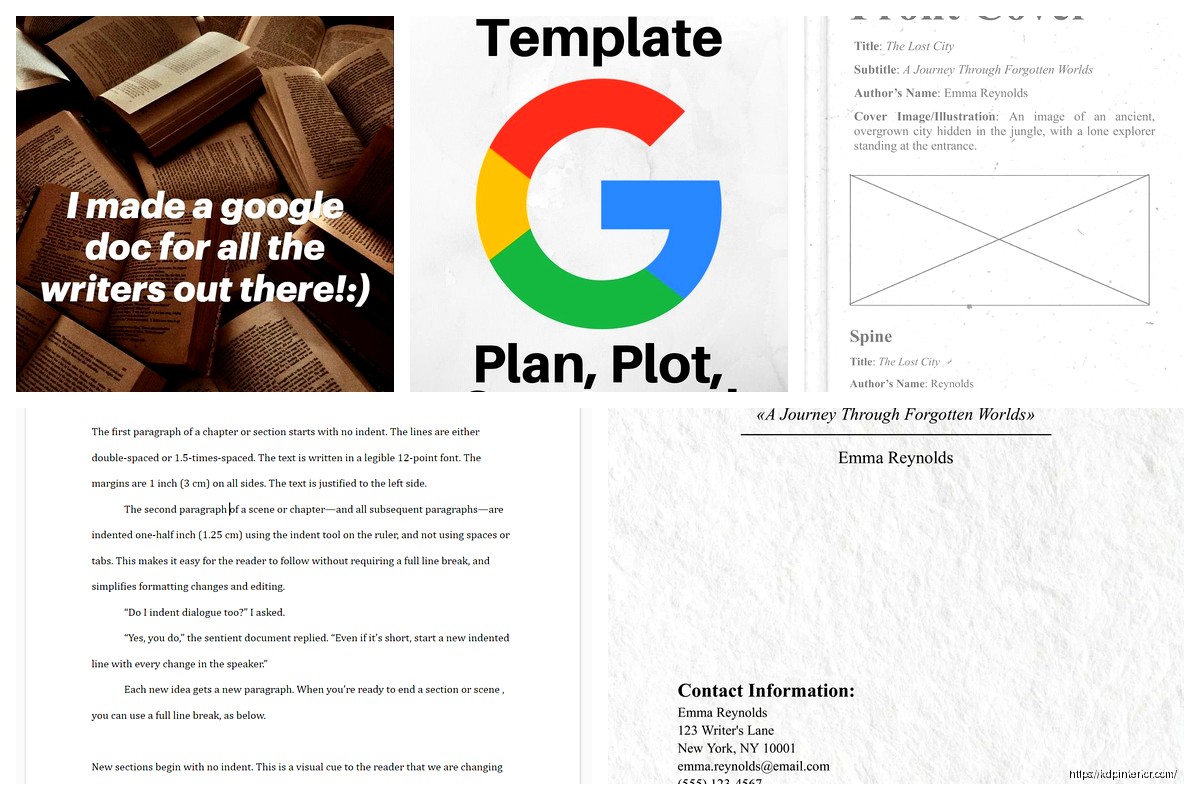
First line indents: Set up a paragraph style with first line indent (Format > Align & indent > Indentation options > First line: 0.5″). Apply this to all body paragraphs except the first paragraph of each chapter. First paragraphs traditionally don’t get indented.
Actually, this is kinda controversial. Some people indent everything. Do whatever looks right to you but be consistent.
Find and Replace: Learn keyboard shortcuts for Find and Replace (Ctrl+H). You’ll use this constantly for fixing repeated words, changing character names, removing double spaces, etc. I probably use Find and Replace like 50 times per manuscript.
word count tracking and writing goals
Tools > Word count (or Ctrl+Shift+C) shows you total word count, page count, and character count. You can also select specific text to count just that section.
But here’s something cool – if you turn on “Display word count while typing” in that same dialog box, you get a persistent word counter in the bottom left corner. I keep this on during writing sessions because I’m motivated by watching the number go up.
Google Docs doesn’t have built-in writing goals like Scrivener or some other writing software, but you can use the word count + a simple spreadsheet to track daily progress. Or just write it down somewhere. I use a physical notebook (I know, very analog of me) to track what I write each day.
writing sprints and focus mode
There’s no official focus mode in Google Docs but you can fake it. Hit F11 to go fullscreen in your browser, then click View > Full screen in Google Docs. This hides most of the UI and gives you just your document. Not as minimalist as some dedicated writing apps but it works.
For writing sprints, I just set a timer on my phone. Write for 25 minutes (Pomodoro style), check word count, take a 5 minute break, repeat. Nothing fancy but it works.
My dog usually interrupts around the 20 minute mark demanding attention, which honestly probably means I need a break anyway.
exporting your manuscript for publishing
When you’re done writing and editing, you gotta export your manuscript. File > Download gives you several options:
- Microsoft Word (.docx) – best for uploading to KDP or sending to formatters
- PDF – good for print preview or sending to beta readers who shouldn’t edit
- EPUB – this is hit or miss, Google’s EPUB export isn’t great honestly
- Plain Text – strips all formatting, useful sometimes for word count verification
For KDP ebook uploads, I download as .docx and then upload that directly to KDP. Amazon’s converter handles Google Docs exports pretty well. For print books, you’ll probably need to reformat in Word or use a professional formatter because Google Docs doesn’t give you enough control over print-specific formatting like bleeds and trim sizes.
Don’t try to make Google Docs do everything. It’s great for writing and basic formatting, but for final publication formatting especially for print, you’ll need different tools.
advanced template features you might want
Once you’ve got the basics down, here’s some extra stuff you can add to your template:
Research notes section: I add a section at the very end of my template (after all the back matter) called “Research & Notes” where I paste research, store character descriptions, track timeline, whatever. This keeps everything in one document. Just make sure this section doesn’t get exported when you publish.
Style guide: Another end section where I note formatting decisions for this specific book. Like “character thoughts are in italics” or “dates are written as Month Day, Year” or whatever. Consistency is important and I have a terrible memory so I write it down.
Macros and shortcuts: Google Docs doesn’t have macros like Word, but you can use Chrome extensions to add this functionality. I use one called “Text Blaze” that lets me create shortcuts for repeated text. Like I type “/scene” and it inserts my scene break formatting automatically.
Custom fonts: You can add custom fonts to Google Docs but honestly I don’t bother for drafting. Only useful if you’re doing the final layout in Google Docs which I don’t recommend for serious publishing.
connecting with other tools
Google Docs plays well with other tools through Add-ons (Extensions > Add-ons > Get add-ons). Some useful ones for authors:
- Grammarly – catches grammar and spelling issues beyond Google’s basic checker
- ProWritingAid – deeper style and consistency analysis
- Plottr – outlining tool that can export to Google Docs
I don’t use a ton of add-ons because they slow down document loading, but Grammarly is pretty much essential.
templates for different book types
You probably need different templates for different types of books. My template folder has:
Fiction novel template: Chapters, scenes, pretty simple. Focus on chapter structure and scene breaks.
Non-fiction template: More complex with sections like case studies, key takeaways, chapter summaries. I use more heading levels and callout boxes (just tables with borders and background color).
Short story collection: Each story is like a chapter but with its own title page. Table of contents lists story titles instead of chapter numbers.
Journal or planner template: For low-content books, though honestly I usually design these in PowerPoint or Canva instead of Google Docs because they’re more layout-focused than text-focused.
Workbook template: Sections for explanations, then space for readers to write (just empty tables or lined sections). This exports better to PDF than trying to make a fillable ebook.
Each book type needs different front matter and different internal structure, so don’t try to use one generic template for everything.
dealing with really long documents
Google Docs starts getting slow around 50,000-60,000 words in my experience. If you’re writing a huge book or a series, consider breaking it into multiple documents. Some options:
- One document per chapter (annoying for reading flow but keeps things fast)
- Split into sections like “Part 1” “Part 2” “Part 3” (better than individual chapters)
- Keep the full manuscript in one doc but write in a separate “Drafting” document and copy finished chapters over
I usually write everything in one document until it gets slow, then split it up. You can always copy/paste everything into one combined document later for export.
DISCOVER OUR FREE BEST SELLING PRODUCTS
Editable Canva Lined Journal: Express Your Thoughts – KDP Template
Lined Pages Journal 120 pages Ready to Upload PDF Commercial Use KDP Template 6×9 8.5×11 5×8 for Notebooks, Diaries, Low Content
Lined Pages Journal 120 pages Ready to Upload PDF Commercial Use KDP Template 6×9 8.5×11 5×8 for Notebooks, Diaries, Low Content
Cute Dogs Coloring Book for Kids | Activity Book | KDP Ready-To-Upload
Daily Planner Diary : Diary Planners for Everyday Productivity, 120 pages, 6×9 Size | Amazon KDP Interior
Wolf Coloring KDP interior For Adults, Used as Low Content Book, PDF Template Ready To Upload COMMERCIAL Use 8.5×11"
Coloring Animals Head Book for Kids, Perfect for ages 2-4, 4-8 | 8.5×11 PDF
Printable Blank Comic Book Pages PDF : Create Your Own Comics – 3 Available Sizes
Notes KDP interior Ready To Upload, Sizes 8.5×11 6×9 5×8 inch PDF FILE Used as Amazon KDP Paperback Low Content Book, journal, Notebook, Planner, COMMERCIAL Use
Black Lined Journal: 120 Pages of Black Lined Paper Perfect for Journaling, KDP Notebook Template – 6×9
Student Planner Journal 120 pages Ready to Upload PDF Commercial Use KDP Template 6×9" 8.5×11" for Low Content book
Recipe Journal Template – Editable Recipe Book Template, 120 Pages – Amazon KDP Interior