Amazon KDP guide, KDP book publishing
KDP Print Template: Paperback & Hardcover Files

Mar
Okay so the KDP print templates are honestly way less complicated than people make them out to be but there’s like three different versions and nobody explains which one you actually need so let me just break this down.
The Basic Template Situation
Right so Amazon gives you templates for both paperback and hardcover and they come in two formats – PDF and Word doc. Most people grab the PDF version because it looks more official but honestly the Word template is sometimes easier if you’re doing super basic layouts. I spent like two hours last month trying to figure out why my margins looked weird and it was literally because I downloaded the wrong trim size template. Super annoying.
The templates are specific to your trim size which is basically the dimensions of your finished book. Most common ones are 6×9 for nonfiction and 5×8 for fiction but there’s also 8.5×11 for workbooks and planners which is what I use most often now.
Finding the Right Template
You gotta go to KDP’s help section and search for “formatted templates” or just go through the setup process for a new book and they’ll offer you the download link. Here’s what matters – pick your exact trim size before downloading anything because a 6×9 template is NOT gonna work if you decide later you want 5.8×8 or whatever.
The page count matters too kinda. Amazon has different spine widths based on how many pages you have so if you’re doing hardcover especially you need to know your approximate page count. For paperback it’s more forgiving but hardcover spine calculations are weirdly specific.
Paperback Templates Deep Dive
So paperback templates come with bleed or without bleed. Bleed means your images or background colors extend past the trim line so when they cut the book there’s no white edges. If you’re doing a book with just text and maybe some basic graphics you probably don’t need bleed. But if you’ve got full page images or colored backgrounds you absolutely need the bleed version.
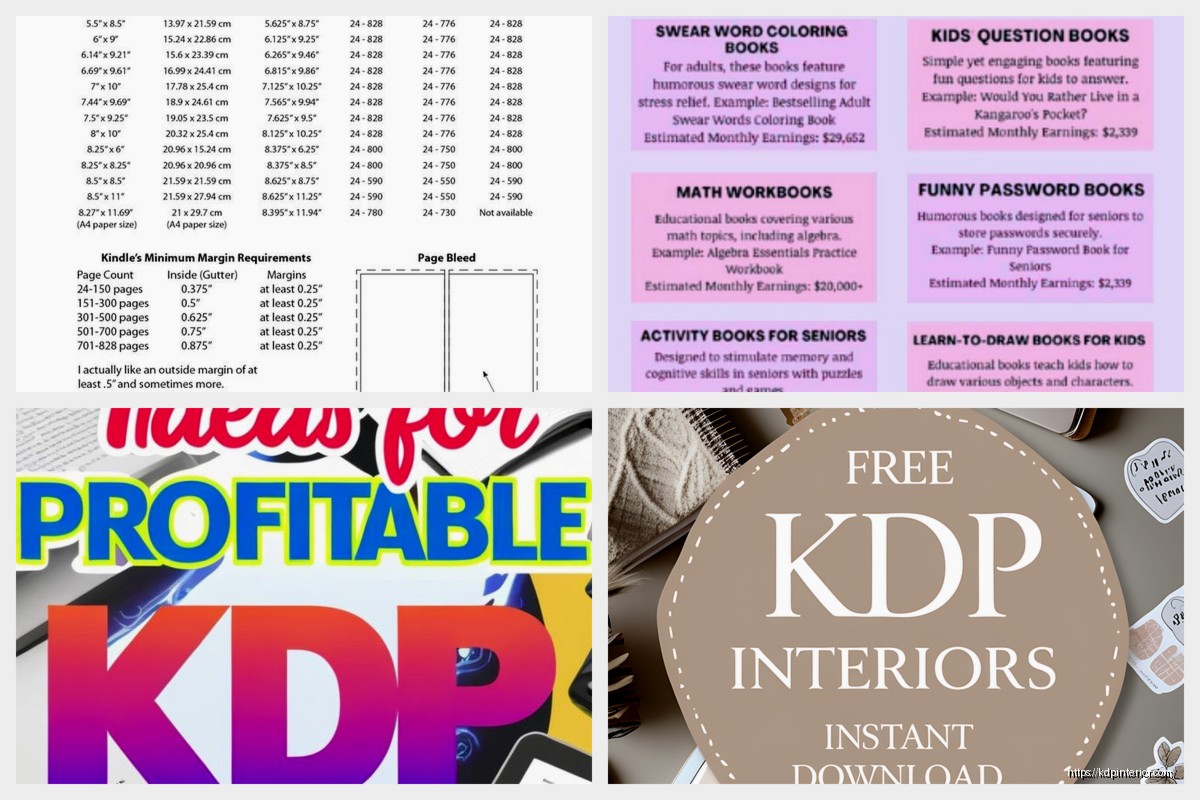
The margins are already built into the template and this is where people mess up constantly. The inside margin (gutter) is bigger than the outside margin because that’s where the binding is. You don’t want text disappearing into the spine. For a 6×9 paperback the gutter is usually around 0.5 inches but it increases slightly as your page count goes up.
I was watching this documentary on cults last week while setting up a new devotional template and completely forgot to check if I had the right page count range… ended up with margins that were too small for a 300 page book. Had to redo the whole thing.
What’s Actually in the Template
When you open the PDF template you’ll see guides and lines everywhere. The outer line is the trim line – that’s where they cut. If there’s a bleed template the actual page extends beyond that. Then there’s the margin guides showing your safe zone for text.
Don’t put anything important near the trim lines. Like headers and page numbers should be at least 0.3 inches from any edge. I learned this the hard way when my first planner had page numbers that got chopped off on some copies because Amazon’s cutting isn’t perfectly precise every single time.
The Word templates are basically the same but with actual margin settings you can see in the page setup. Some people find this easier to work with especially if you’re just flowing text and don’t need precise graphic placement.
Hardcover Is Different and Kinda Annoying
Hardcover templates include the cover boards which makes the file bigger and more complex. You’ve also got a dust jacket option now which uses a completely different template structure. The interior pages for hardcover are basically the same as paperback just with slightly different margin calculations.
Where hardcover gets tricky is the case laminate cover if you’re not doing a dust jacket. The template includes the front cover, spine, and back cover all in one spread plus it wraps around the boards. You need to account for the board thickness in your spine width calculation.
Oh and another thing – hardcover templates require your spine width to be exact. With paperback Amazon is more flexible but hardcover if your spine calc is off by even a little bit it can cause issues. There’s a spine calculator on KDP but honestly I just use the formula: (page count × paper thickness) + cover board thickness. For standard paper that’s roughly page count × 0.0025 inches plus 0.25 inches for the boards.
The Dust Jacket Situation
If you’re doing dust jackets the template is massive because it includes the flaps. Front flap is usually where you put book description, back flap for author bio. The flaps are typically 3-4 inches wide and they fold inside the cover.
I haven’t done a ton of dust jacket books because they’re pricier to produce and most of my stuff is practical nonfiction that doesn’t need that premium feel but I did one last year for a client and the template file was like 20×15 inches laid flat. It’s basically a giant wraparound design.
Setting Up Your Files to Match the Template
This is where people get stuck because you can’t just dump your content into the template PDF. You need to use the template as a guide for setting up your actual design file.
If you’re using Word just download the Word template and type directly into it. Easy. But if you’re using InDesign or Affinity Publisher or even Canva you need to manually input those margin measurements and page dimensions.
For InDesign I always create a new document with facing pages enabled and set the page size to match the trim size. Then I go into margins and master pages to set up the gutter and outside margins according to what the template shows. Bleed setting is 0.125 inches on all sides if you need it.
Canva’s gotten better about this but their KDP templates aren’t always accurate especially for larger page counts where the gutter needs to be bigger so double check those measurements.
The Actual Measurements You Need
For a standard 6×9 paperback with like 150 pages:
– Page size: 6×9 inches obviously
– Top margin: 0.5 inches
– Bottom margin: 0.5 inches
– Outside margin: 0.5 inches
– Inside/gutter margin: 0.625 inches
– Bleed: 0.125 inches if using
As page count goes up past 150 pages add a bit more to the gutter. Past 300 pages you’re looking at 0.75 inches or more.
For 8.5×11 which I use for workbooks and journals:
– Top: 0.5 inches
– Bottom: 0.5 inches
– Outside: 0.5 inches
– Inside: 0.75 inches minimum
– Bleed: 0.125 inches
wait I forgot to mention – hardcover interiors need bigger gutters always because the case binding is thicker than paperback perfect binding. Usually add at least 0.125 inches to whatever you’d use for paperback.
Common Screw-Ups I See All the Time
People use RGB color mode instead of CMYK. Amazon prints in CMYK so if your files are RGB the colors will shift during printing. Not a huge deal for text-only books but if you’ve got color images or graphics convert everything to CMYK before exporting.
Wrong resolution on images. Needs to be 300 DPI minimum for print. I see so many books with pixelated images because someone pulled graphics off the internet at 72 DPI and just stuck them in. Looks fine on screen, terrible in print.
Forgetting to embed fonts. If you’re using anything other than standard fonts and you don’t embed them Amazon’s system will substitute something else and your book will look wrong. In InDesign this happens automatically when you export to PDF but double check your settings.
Not accounting for creep on thick books. This is super technical but basically in a really thick paperback the center pages stick out slightly more than the outer pages because of how they’re folded. Professional printers adjust for this but KDP doesn’t so if you’ve got a 400 page book with tight margins you might see some text getting close to the trim on middle pages.
PDF Export Settings That Actually Matter
Your final file needs to be PDF/X-1a format ideally or at minimum a high-quality print PDF. In InDesign use the PDF/X-1a preset and make sure:
– Compatibility is Acrobat 4 or higher
– Compression is set to maximum quality for images
– Marks and bleeds – include bleed if your template has it
– Don’t include crop marks or registration marks
From Word export as PDF and choose “Best for printing” option. Not best for online viewing, that’s different.
My dog just knocked over my coffee which is perfect timing because I need a break anyway but lemme wrap up the important stuff.
Testing Your Template Setup
Before you upload anything order a proof copy. Always. I don’t care how perfect it looks on your screen, print is different. I still order proofs for every single book even after seven years of doing this.
Check your margins by looking at the gutter – can you read text comfortably without breaking the spine? Check trim – did anything get cut off? Check image quality – do photos look crisp or muddy?
The proof costs like seven bucks plus shipping just do it. I’ve caught so many issues in proofs that would’ve been embarrassing if they went live. Wrong headers, page numbers in weird spots, images that looked fine on screen but printed too dark.
Hardcover Proofs Are Essential
Even more so than paperback because hardcover is less forgiving. The case wrap needs to align properly, spine needs to be exact width, if you did endpapers make sure they’re attached correctly. I’ve had hardcover proofs where the spine text was slightly off center and had to adjust the template and reupload.
This is gonna sound weird but I actually keep all my old proofs in a box in my garage. Sometimes I need to reference how something printed with specific settings and it’s easier to just look at the physical book than try to recreate it digitally.
Quick Template Workflow That Works
Download correct trim size template from KDP. Check page count range for gutter width. Set up your design software with those exact measurements including bleed if needed. Create your content staying within margin guides. Export as high-quality PDF with CMYK colors and embedded fonts. Upload to KDP and order proof. Adjust based on proof if needed. That’s it.
The templates themselves are just guides showing you where the safe zones are. You’re not literally editing the template file in most cases you’re using it as reference to build your own properly formatted document.
People overcomplicate this constantly but Amazon’s print quality is actually pretty forgiving as long as your margins are right and your images are decent resolution. The template just makes sure you don’t put text where it’ll get cut off or bound into the spine where nobody can read it.

DISCOVER OUR FREE BEST SELLING PRODUCTS
Editable Canva Lined Journal: Express Your Thoughts – KDP Template
Lined Pages Journal 120 pages Ready to Upload PDF Commercial Use KDP Template 6×9 8.5×11 5×8 for Notebooks, Diaries, Low Content
Lined Pages Journal 120 pages Ready to Upload PDF Commercial Use KDP Template 6×9 8.5×11 5×8 for Notebooks, Diaries, Low Content
Cute Dogs Coloring Book for Kids | Activity Book | KDP Ready-To-Upload
Daily Planner Diary : Diary Planners for Everyday Productivity, 120 pages, 6×9 Size | Amazon KDP Interior
Wolf Coloring KDP interior For Adults, Used as Low Content Book, PDF Template Ready To Upload COMMERCIAL Use 8.5×11"
Coloring Animals Head Book for Kids, Perfect for ages 2-4, 4-8 | 8.5×11 PDF
Printable Blank Comic Book Pages PDF : Create Your Own Comics – 3 Available Sizes
Notes KDP interior Ready To Upload, Sizes 8.5×11 6×9 5×8 inch PDF FILE Used as Amazon KDP Paperback Low Content Book, journal, Notebook, Planner, COMMERCIAL Use
Black Lined Journal: 120 Pages of Black Lined Paper Perfect for Journaling, KDP Notebook Template – 6×9
Student Planner Journal 120 pages Ready to Upload PDF Commercial Use KDP Template 6×9" 8.5×11" for Low Content book
Recipe Journal Template – Editable Recipe Book Template, 120 Pages – Amazon KDP Interior