 Cute Dogs Coloring Book for Kids | Activity Book | KDP Ready-To-Upload
 Subtotal: $0.00
Amazon KDP guide, KDP book publishing
Amazon KDP 6×9 Template: Complete Interior Layout
25
Mar
Mar
Okay so the 6×9 format is basically the bread and butter of KDP and I’ve probably set up like 80 templates in this size alone because it just works for everything from journals to workbooks to actual books with chapters.
First thing you gotta understand is that 6×9 means 6 inches wide by 9 inches tall, which sounds obvious but I’ve seen people mess this up by setting it to 9×6 and then wondering why their preview looks weird. The actual document size in Word or whatever you’re using needs to be exactly that – go to Layout, then Size, then More Paper Sizes, and punch in 6 width and 9 height. Make sure it’s in inches not centimeters because I did that once at like 2am while watching some true crime thing and uploaded a completely wrong file.
Margins Are Where Most People Screw Up
The margins are where everyone gets confused and honestly Amazon’s own documentation isn’t super clear about it. You need different margins depending on your page count because of the gutter – that’s the part that gets eaten by the binding.
For books under 150 pages you want:
- Inside margin (gutter): 0.5 inches
- Outside margin: 0.5 inches
- Top: 0.75 inches
- Bottom: 0.75 inches
But once you go over 150 pages bump that inside margin to 0.625 or even 0.75 because thicker books need more room. I learned this the hard way when I published a 300-page workbook and people complained they couldn’t write in the margins near the spine. Had to reupload the whole thing.
In Word you set this under Layout > Margins > Custom Margins, and there’s a dropdown that says “Apply to: Whole document” – make sure that’s selected. Also click the checkbox for “Mirror margins” because that makes the inside/outside swap correctly on left and right pages.
Bleed Settings That Actually Matter
Bleed is if you want images or colors to go all the way to the edge of the page. Most low-content books don’t need bleed honestly – if you’re doing a lined journal or a planner with just black lines and text, skip it. No bleed means less headache.
But if you DO need bleed, you gotta add 0.125 inches to ALL sides of your document. So your 6×9 becomes 6.25 x 9.25 inches. Then anything you want to bleed needs to extend into that extra space. Amazon will trim it off during printing.
The thing nobody tells you is that you can’t have important stuff (text, lines you care about) in that bleed zone OR in the 0.125 inches inside from where the trim happens. So really you’re losing 0.25 inches all around if you use bleed. I usually just avoid it unless I’m doing something with full-page images.
Setting Up Your Actual Content Pages
This is gonna sound basic but start with a master page setup before you add any content. Like create one page that’s perfect, then copy it 100 times or however many you need.
For a basic lined journal I use:
- Font: Usually Arial or Helvetica for clean lines, 10pt
- Line spacing: Exactly 0.375 inches (which is 27pt if your program measures that way)
- Paragraph spacing: 0 before and after
- Alignment: Left
The line spacing thing is important because you want consistent space between lines. If you use the default “single” or “double” spacing it can shift around. Setting it to “Exactly” with a point value locks it in.
To make actual lines I just use the underscore character repeated across the page width. Some people use the Insert > Shapes > Line tool but that’s annoying to position consistently across dozens of pages. The underscore method is faster and when you copy-paste pages it maintains perfectly.
Headers and Footers and Page Numbers
Oh and another thing – headers and footers need to be at least 0.5 inches from the page edge. I usually put page numbers in the footer, centered, about 0.6 inches from bottom.
To set this up properly: Insert > Header & Footer, then make sure “Different First Page” is checked if you don’t want a page number on your title page. Also check “Different Odd & Even Pages” if you want page numbers on the outside corners (right side on odd pages, left side on even pages) which looks more professional.
For the actual page number: Insert > Page Number > Bottom of Page > Plain Number. Then adjust the footer margin in the header/footer tools.
Most of my low-content books I just skip headers entirely. Nobody needs a header in a journal. But if you’re doing a workbook or something with chapters you might want chapter titles in the header. Keep them simple and in a small font like 9pt.
Front Matter Pages You Actually Need
Every KDP book needs at minimum:
- Title page
- Copyright page
- Then your actual content
The title page is just your book title and subtitle (if you have one) and your name, centered, usually in a larger font like 18-24pt. I put this stuff in the vertical center of the page using paragraph spacing before/after to push it down.
Copyright page is next and here’s my standard format that I literally copy-paste for every book:
Copyright © [YEAR] by [YOUR NAME] All rights reserved. No part of this publication may be reproduced, distributed, or transmitted in any form or by any means without prior written permission.
You can add your publisher name if you made one up, or an ISBN if you bought one (KDP gives you free ones though so why bother). Keep this page simple, left-aligned, 10pt font.
Some people add a dedication page or a “this book belongs to” page for journals and planners. That’s fine but it’s not required. I usually skip it to keep page count down because printing costs are per page.
The Actual Template Files
Wait I forgot to mention – you can download Amazon’s official templates from the KDP website under “Formatted Trim Sizes” but honestly they’re kind of overbuilt with all these guides and layers. I find it easier to just build from scratch in Word or Google Docs.
If you use Word: Save your template as a .docx first so you can reuse it, then when you’re done export as PDF. The PDF is what you upload to KDP. Make sure when you export you’re not compressing images too much – use “Standard” quality not “Minimum size” or your lines might look fuzzy.
If you use Google Docs: The margins work the same way but the export to PDF sometimes adds weird spacing. I always download as PDF, then open it in a PDF viewer to check before uploading. Google Docs is free though which is nice when you’re starting out.
Some people swear by Affinity Publisher or InDesign but that’s overkill for most low-content books. I’ve made like $200k on KDP and 90% of my books were made in Word.
Interior Type – Black and White vs Color
This matters for your template because color costs way more to print. Like a 100-page black and white book might cost Amazon $2.50 to print but in color it’s like $6. That kills your royalty.
Most journals, planners, workbooks should be black and white only. Use pure black (#000000) for all your content. Don’t use dark gray thinking it’s “close enough” because on some printers it’ll look washed out.
If you’re doing a coloring book or something that needs color, make sure you select “Color” when you’re setting up your KDP paperback. The template doesn’t change size-wise but you need to make sure your colors are in CMYK if possible, not RGB. This is where Word kinda sucks because it doesn’t handle CMYK well. You might need Affinity or something for color books.
Common Mistakes I See All The Time
People forget to check their gutter margins and text gets cut off near the spine. Always order a proof copy before you publish for real – it’s like $5-7 shipped and you’ll catch issues you can’t see on screen.
Using too many fonts. Stick to one or two max. I usually use one font for the whole book in a low-content template. Maybe a different font for the title page but that’s it.
Inconsistent spacing between pages. If you’re copy-pasting pages make sure you’re not accidentally adding extra paragraph returns between them. Your page breaks should be clean – use Insert > Page Break, don’t just hit Enter a bunch of times.
Not testing the PDF before upload. I always open my final PDF in Adobe Reader or Preview and flip through every single page. It takes 5 minutes and catches stuff like random blank pages or formatting that shifted during export.
Tools That Make This Faster
Honestly Word is fine but if you’re gonna make a lot of templates, Book Bolt has template generators that are pretty good. They’re like $10/month and you can pump out interiors in minutes. I used them for a while when I was doing tons of volume.
Tangent has a free template generator too but it’s more limited. Good for basic lined pages though.
For making patterns or decorative elements, Canva is actually useful even though everyone uses it for covers. You can design a page in Canva then export as PDF and drop it into your Word doc. I did this for some gratitude journals with little decorative headers.
Page Count Considerations
KDP requires minimum 24 pages for a paperback. Most of my journals are 100-120 pages because that’s a good balance of usability and printing cost. Going to 200+ pages means you need wider margins and the book costs more which hurts your pricing.
Your total page count needs to be divisible by 2 obviously since books are printed on sheets folded in half. Word will automatically add a blank page at the end if your count is odd, which is fine.
For printing cost calculation Amazon charges per page plus a flat fee. Like in the US it’s roughly $0.012 per page for black and white plus a base cost around $0.85. So a 100-page book costs about $2.05 to print. You can use their royalty calculator to check.
Saving Your Template for Reuse
Once you’ve got a template you like, save it with a clear name like “6×9-lined-journal-template-100pages.docx” and keep it in a folder. Then when you start a new book you just open that template, do a Save As with the new book’s name, and boom you’re ready to go.
I have like 15 different templates saved – lined journals, dotted journals, college-ruled, wide-ruled, blank pages with borders, weekly planners, daily planners. Any time I’m making a new book I just grab the closest template and modify it slightly if needed.
This is gonna sound weird but I also keep a text file with all my standard copyright text, common page headers, stuff like that. Just copy-paste city. No need to retype the same stuff 200 times.
Oh and if you’re doing books with prompts or questions on each page, I use a spreadsheet to generate all the prompts first, then copy them into the Word doc. Way faster than thinking them up one by one while you’re building the template. My cat was walking on my keyboard while I was doing this once and somehow changed all my prompts to gibberish, had to redo like 50 pages.
File Size and Upload Issues
Your final PDF shouldn’t be huge – like under 40MB ideally. If it’s bigger Amazon might reject it or it’ll take forever to upload. This usually only happens with color interiors or if you embedded high-res images.
To reduce file size: when you export to PDF from Word, use the “Standard” preset not “High Quality”. If it’s still too big, open the PDF in Preview (Mac) or use a PDF compressor online and knock it down. Just don’t compress so much that text looks fuzzy.
The upload itself on KDP takes a few minutes then they process it. You’ll see a preview that you can flip through page by page. Check it carefully – I’ve had weird stuff happen where margins shifted during their processing.
That’s pretty much it for the template setup really – once you’ve done one or two you can bang these out in like 30 minutes. The key is having your master template dialed in with the right margins and spacing, then it’s just filling in content and exporting.
DISCOVER OUR FREE BEST SELLING PRODUCTS
Editable Canva Lined Journal: Express Your Thoughts – KDP Template
Lined Pages Journal 120 pages Ready to Upload PDF Commercial Use KDP Template 6×9 8.5×11 5×8 for Notebooks, Diaries, Low Content
Lined Pages Journal 120 pages Ready to Upload PDF Commercial Use KDP Template 6×9 8.5×11 5×8 for Notebooks, Diaries, Low Content
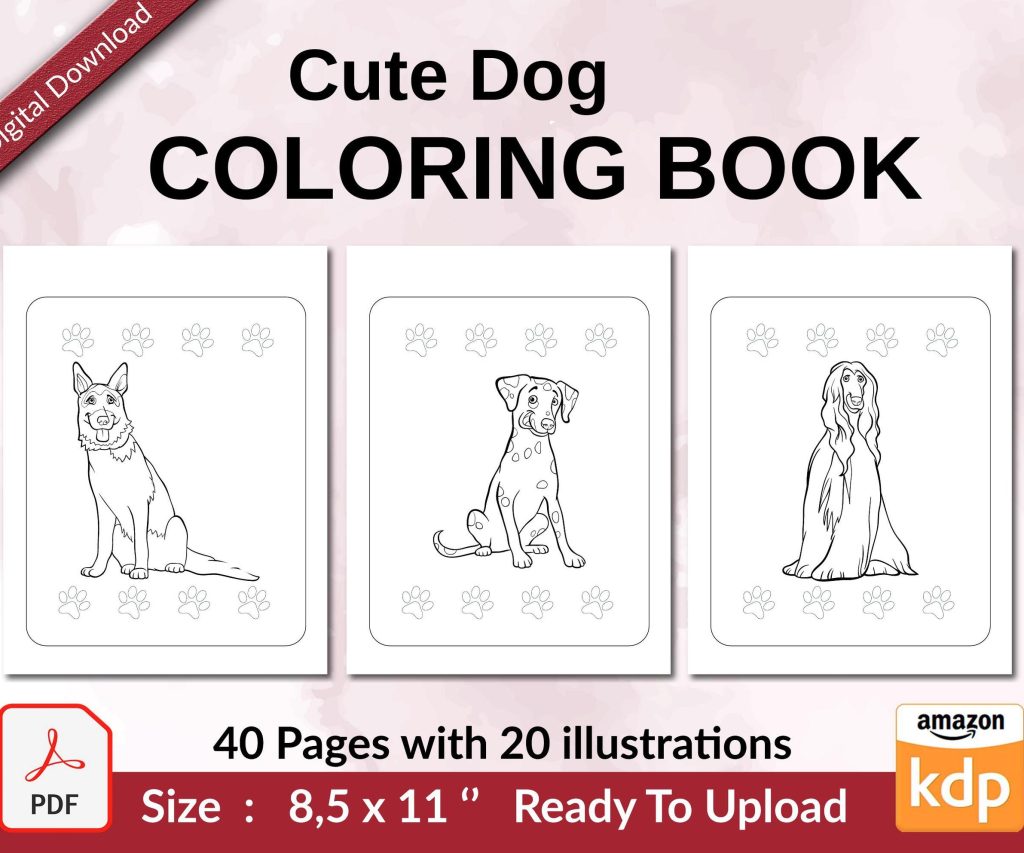
Cute Dogs Coloring Book for Kids | Activity Book | KDP Ready-To-Upload
Daily Planner Diary : Diary Planners for Everyday Productivity, 120 pages, 6×9 Size | Amazon KDP Interior
Wolf Coloring KDP interior For Adults, Used as Low Content Book, PDF Template Ready To Upload COMMERCIAL Use 8.5×11"
Coloring Animals Head Book for Kids, Perfect for ages 2-4, 4-8 | 8.5×11 PDF
Printable Blank Comic Book Pages PDF : Create Your Own Comics – 3 Available Sizes
Notes KDP interior Ready To Upload, Sizes 8.5×11 6×9 5×8 inch PDF FILE Used as Amazon KDP Paperback Low Content Book, journal, Notebook, Planner, COMMERCIAL Use
Black Lined Journal: 120 Pages of Black Lined Paper Perfect for Journaling, KDP Notebook Template – 6×9
Student Planner Journal 120 pages Ready to Upload PDF Commercial Use KDP Template 6×9" 8.5×11" for Low Content book
Recipe Journal Template – Editable Recipe Book Template, 120 Pages – Amazon KDP Interior