Amazon KDP guide, KDP book publishing
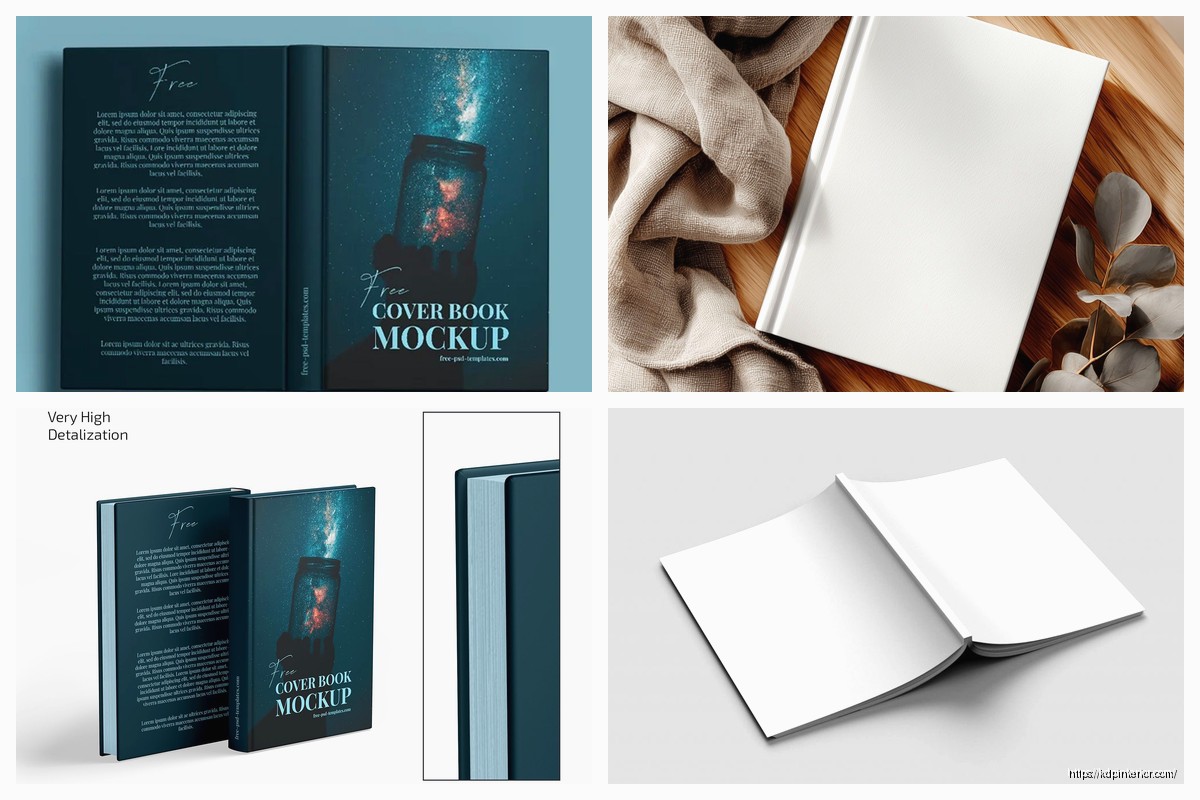
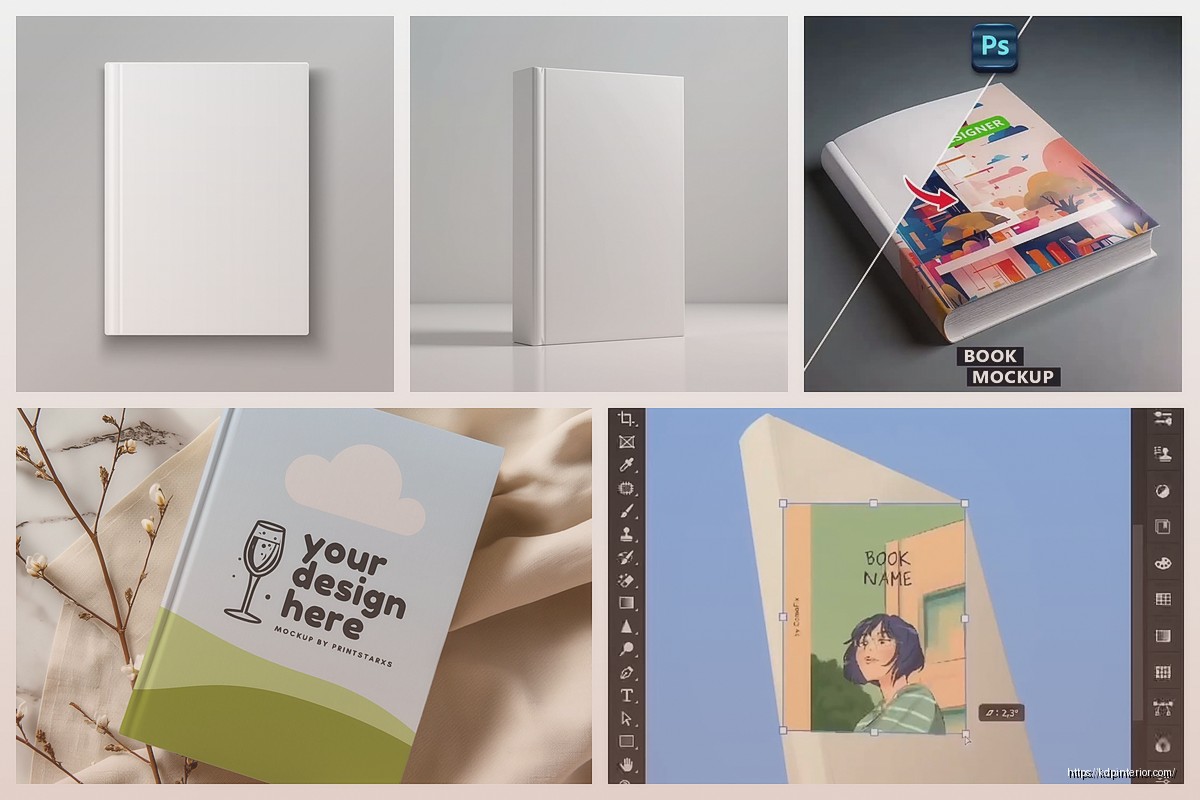
Book Cover Mockup: 3D Visualization Templates

Apr
Okay so I just spent like three hours yesterday playing with different 3D mockup templates and here’s what you actually need to know because most people overthink this whole thing.
The Basic Setup You Actually Need
First thing – you don’t need Photoshop to make decent 3D book mockups. I know everyone acts like you do, but honestly I use Canva for like 60% of my mockups now and they look fine. The free version has limitations but the pro version is $12.99/month and you can create unlimited mockups which is insane value when you’re pumping out books regularly.
The templates you’re gonna want fall into basically three categories. There’s the standing book mockup where it looks like it’s just sitting upright on a surface, the angled perspective ones that make it look more dynamic, and then the lifestyle shots where the book is on a coffee table with like plants and stuff around it. I use standing ones for most of my Amazon ads because they’re clean and people can actually read the title.
Free Resources That Don’t Suck
Placeit.net has a freemium model that’s actually decent. You can create low-res mockups for free which is perfect for testing designs before you commit. The paid version is like $14.95/month or something but it’s worth it if you’re doing more than 2-3 books a month. They have probably 500+ book mockup templates and you can filter by genre which saves so much time.
Mockup World is completely free and they add new stuff weekly. Quality varies a lot though – some templates are professional grade and others look like someone made them in 2012. I usually grab their hardcover mockups because those are harder to find elsewhere.
Oh and another thing – Smartmockups has this really cool feature where you can create stacks of books. Like if you have a series, you can show all three books standing next to each other. That’s been huge for my box set promotions.
The Actual Technical Stuff
Most templates work with what’s called a smart object layer in Photoshop. You double-click the smart object, paste your flat cover design, save it, and boom – it wraps around the 3D book shape automatically. Sounds complicated but once you do it twice you’ll get it.
For Canva users – they have this upload feature where you drag your cover onto their pre-made 3D book shapes. It’s not as precise as Photoshop but for social media posts nobody’s gonna notice the difference.
Here’s something I learned the hard way last month – always export your mockups at 300 DPI if you’re using them for print ads or promotional materials. I made like 15 mockups at 72 DPI and had to redo all of them because they looked pixelated on my AMS ads. Total waste of an afternoon when I could’ve been watching the new season of that show… what’s it called, the one with the murder mystery. Anyway.
Spine Width Calculations
This is gonna sound weird but the most common mistake I see is people using the wrong spine width for their mockups. If your book is 120 pages on cream paper, the spine is gonna be different than white paper. Amazon has a calculator buried in their KDP dashboard but I just use this formula:
Paperback spine width = (page count × 0.002252) + 0.06 inches for white paper. For cream paper multiply page count by 0.0025 instead.
Most mockup templates let you adjust spine width manually. If you don’t do this right, the mockup looks off and people subconsciously notice something’s wrong even if they can’t articulate what.
Premium Templates Worth Paying For
I’ve bought probably 30+ mockup template packs over the years and most aren’t worth it. But there’s a few that I use constantly.
Creative Market has these bundles that go on sale every few weeks. I got a pack of 50 book mockups for like $19 during their March sale. The quality is way better than free options – better lighting, shadows actually look realistic, more angle variety.
Envato Elements is $16.50/month and you get unlimited downloads of everything including thousands of mockup templates. If you’re also doing your own cover designs this is a no-brainer because you get fonts, graphics, photos, everything. I probably download 20-30 assets per month from there so the value is insane.
Yellow Images has the most photorealistic mockups I’ve found. They’re like $5-8 per template which seems expensive but if you’re doing a launch and want your book to look premium on your sales page, it’s worth it. I used one of their hardcover mockups for my productivity planner launch and I’m convinced it increased conversions.
The Lifestyle Mockup Thing
Okay so funny story – I resisted lifestyle mockups for like two years because I thought they looked cheesy. Then I tested them in Facebook ads against plain 3D mockups and the lifestyle ones got 40% better click-through rates. People respond to context.
The trick is matching the lifestyle setting to your genre. Romance books on a cozy blanket with coffee. Business books on a desk with a laptop. Kids coloring books with crayons scattered around. Don’t overthink it but don’t mismatch it either.
BookBrush is specifically designed for this and it’s like $9.99/month. You can create lifestyle scenes, add props, change backgrounds. My dog knocked over my coffee while I was using it last week and I almost lost an hour of work but autosave kicked in thank god.
Technical Specs You Gotta Know
When you’re setting up your mockup template, you need your cover dimensions exactly right. For a 6×9 paperback the full wrap is gonna be different depending on page count because of that spine width thing I mentioned.
Amazon’s cover template generator gives you the exact dimensions. Download that PDF, use those measurements. Don’t guess. I’ve seen people upload mockups where the spine text is curved wrong because they eyeballed it.
For ebooks you only need the front cover obviously. Standard is 2560 x 1600 pixels minimum but I always do 2700 x 1800 to be safe. Mockups for ebooks are easier – you’re basically just showing it on a tablet or phone screen.
Creating Variations Quickly
Here’s a workflow tip that saves me probably 5 hours a week. Once you have one mockup set up perfectly, create variations by just swapping the background color or angle. I create like 6-8 versions of each book cover – different backgrounds, different perspectives, some with shadows some without.
Then I test them all in my promotional materials to see which performs best. Usually the angled mockup with a subtle shadow on a white background wins but not always. My Halloween coloring book did way better with an orange background for some reason.
Photopea is a free browser-based Photoshop alternative that works with PSD files. If you download a Photoshop template but don’t have Photoshop, use this. It’s not quite as smooth but it works and it’s completely free.
Common Mistakes That Make Mockups Look Cheap
Shadows are the biggest giveaway. If the shadow doesn’t match the lighting direction or it’s too dark/too light, the whole thing looks fake. Most good templates have the shadows built in properly but if you’re adjusting them manually, keep them subtle. Real shadows in indoor lighting are softer than you think.
Another thing – resolution. Never upscale a mockup. If you need it bigger, start with a higher resolution template. Upscaling makes everything look blurry and unprofessional.
Wait I forgot to mention – page curl effects. Just don’t. Nobody’s book pages curl like that in real life and it screams 2008 web design. Keep it clean and simple.
Genre-Specific Considerations
For low-content books like journals and planners, show the interior pages if possible. Some mockup templates let you display open books with both pages visible. This is huge for planners because people want to see the layout.
Fiction books work best with simple mockups that don’t distract from the cover design. Your cover should be doing the selling, the mockup is just presenting it nicely.
Workbooks and activity books – definitely show them open or at an angle where the binding is visible. Makes them feel more substantial.
Batch Processing Your Mockups
If you’re publishing multiple books you’re gonna want to streamline this. I have a folder structure set up where I keep all my favorite templates organized by type. Standing mockups in one folder, lifestyle in another, ebook device mockups in a third.
When I finish a new cover design, I run through my standard set of 5-6 mockups in about 15 minutes. It’s the same process every time so it’s almost automatic now. Create the standing version first, then angled, then lifestyle, then any genre-specific ones.
Some templates come with actions in Photoshop that automate parts of this but honestly I haven’t found them that useful. They’re supposed to save time but setting them up takes longer than just doing it manually.
File Formats and Where to Use What
PNG with transparent background for website headers and promotional graphics where you’re layering the mockup over other designs. JPEG for everything else because the file size is smaller and loads faster.
For social media – Instagram wants square or 4:5 ratio, Facebook is more flexible but I usually do 1200×1200 for posts. Amazon A+ content needs specific dimensions depending on the module you’re using but generally high-res JPEGs work fine.
Email newsletters – don’t go too high res or the email file size gets huge and deliverability drops. I use 800 pixels wide max for email mockups.
The Stuff Nobody Tells You
Okay so this is probably gonna sound paranoid but check the licensing on any templates you download. Some free templates are only for personal use and technically you’re not supposed to use them for commercial book promotion. I’ve never heard of anyone getting in trouble for it but legally you’re supposed to use commercial-license templates for business purposes.
Most paid templates include commercial licenses but read the terms. Envato Elements specifically allows commercial use for anything you create while subscribed, which is why I keep that subscription active.
Also – color profiles matter more than you’d think. Save mockups in sRGB color space for web use. If you’re doing print materials save in CMYK. Most templates default to RGB which is fine for digital but can look different when printed.
My Current Workflow
Just to give you a real example – when I finish a book cover, I open my standing mockup template in Canva (for simple stuff) or Photoshop (for complex stuff). Takes about 3 minutes to insert the cover and adjust if needed.
Then I create the angled version which is another 2-3 minutes. Then lifestyle mockup if the book needs it – that’s maybe 5 minutes because I’m choosing props and background.
Export all of them at once, drop them into my promotional assets folder for that book, and I’m done. Total time is like 15 minutes per book cover unless I’m doing something custom.
For series I create a separate mockup showing all the books together. This takes longer, maybe 20 minutes, but I only do it once per series not per book.
Anyway that’s basically the whole thing. Start with free options like Canva or Placeit, test a bunch of different styles to see what works for your genre, then invest in premium templates once you know what you need. Don’t overthink it – a clean simple mockup is better than a complicated one that looks fake.
DISCOVER OUR FREE BEST SELLING PRODUCTS
Editable Canva Lined Journal: Express Your Thoughts – KDP Template
Lined Pages Journal 120 pages Ready to Upload PDF Commercial Use KDP Template 6×9 8.5×11 5×8 for Notebooks, Diaries, Low Content
Lined Pages Journal 120 pages Ready to Upload PDF Commercial Use KDP Template 6×9 8.5×11 5×8 for Notebooks, Diaries, Low Content
Cute Dogs Coloring Book for Kids | Activity Book | KDP Ready-To-Upload
Daily Planner Diary : Diary Planners for Everyday Productivity, 120 pages, 6×9 Size | Amazon KDP Interior
Wolf Coloring KDP interior For Adults, Used as Low Content Book, PDF Template Ready To Upload COMMERCIAL Use 8.5×11"
Coloring Animals Head Book for Kids, Perfect for ages 2-4, 4-8 | 8.5×11 PDF
Printable Blank Comic Book Pages PDF : Create Your Own Comics – 3 Available Sizes
Notes KDP interior Ready To Upload, Sizes 8.5×11 6×9 5×8 inch PDF FILE Used as Amazon KDP Paperback Low Content Book, journal, Notebook, Planner, COMMERCIAL Use
Black Lined Journal: 120 Pages of Black Lined Paper Perfect for Journaling, KDP Notebook Template – 6×9
Student Planner Journal 120 pages Ready to Upload PDF Commercial Use KDP Template 6×9" 8.5×11" for Low Content book
Recipe Journal Template – Editable Recipe Book Template, 120 Pages – Amazon KDP Interior