Amazon KDP guide, KDP book publishing
Book Layout Google Docs: Interior Design Setup

Mar
Okay so I just spent like three hours last night setting up a book interior in Google Docs and honestly it’s way easier than people make it sound but there’s a few things you gotta know upfront or you’ll mess it up.
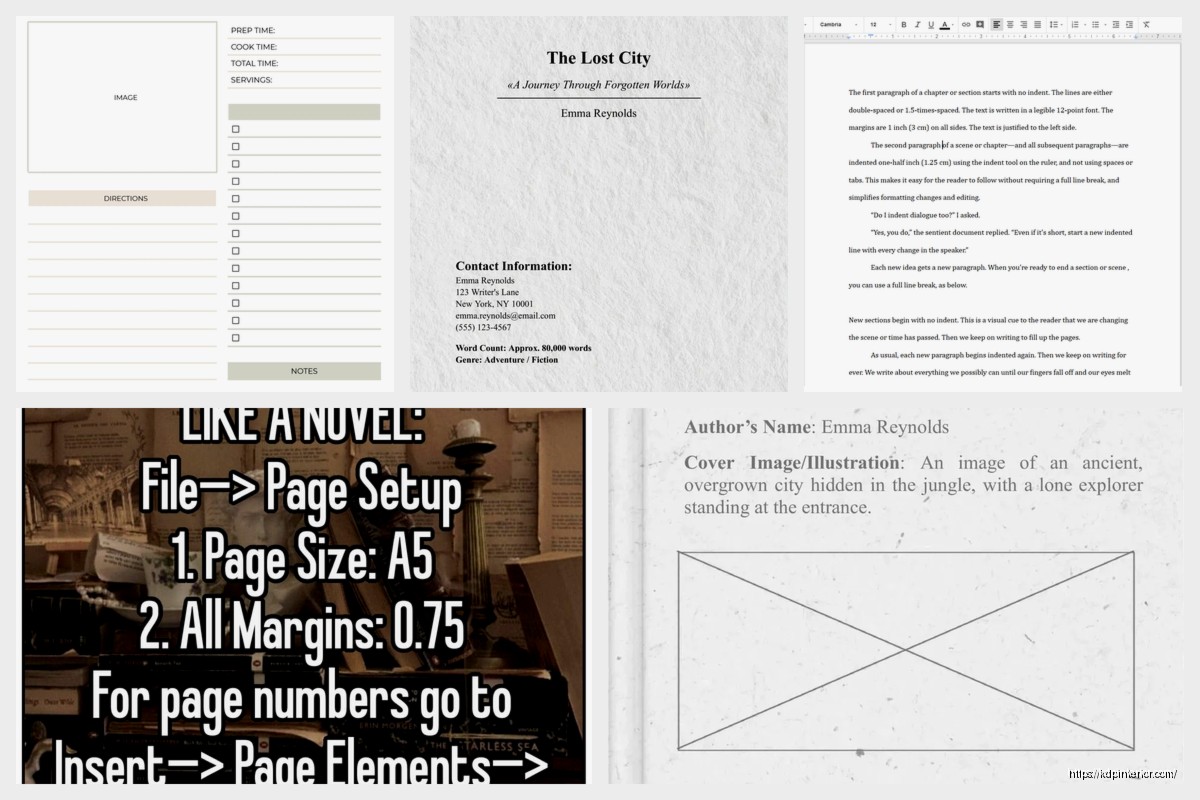
First Thing – Page Size Matters More Than You Think
So most people just open a blank doc and start typing which is… yeah that’s gonna bite you later. You need to set your page size FIRST because Google Docs doesn’t have preset templates for like 6×9 or 5×8 books which is annoying.
Go to File > Page setup and here’s where it gets weird. You’ll see Letter (8.5 x 11) by default but you need custom dimensions. For a standard 6×9 book – which is what like 80% of my books use – type in 6 inches for width and 9 inches for height. Make sure it says “inches” in the dropdown not centimeters because I’ve done that before and ended up with this tiny weird book size.
Oh and another thing, set your margins here too. I usually do 0.5 inches on all sides but if you’re doing a thicker book over 150 pages you might want 0.75 on the inside margin (that’s the binding side). Amazon KDP will tell you if your margins are too small when you upload but better to get it right now.
Click “Set as default” if you’re gonna do multiple books in the same size. Saves time.
The Whole Mirror Margins Thing
This is gonna sound weird but Google Docs doesn’t have real mirror margins like Word does. Mirror margins means your inside margin alternates – left page has the gutter on the right, right page has it on the left. It’s how real books work.
But Google Docs doesn’t do this automatically so you have two options. Either just use the same margins all around (which honestly works fine for most books under 200 pages) or you set it up manually by creating different sections. I usually just go with uniform margins unless I’m doing something fancy.
Wait I forgot to mention – if you click “Apply to whole document” in that page setup dialog it’ll fix everything at once. Don’t do page by page unless you hate yourself.
Headers and Page Numbers Are Weird
So page numbers in Google Docs are kinda clunky compared to InDesign but they work. You want your page numbers to start on the first page of your actual content, not on the title page or copyright page right?
Here’s what I do. I put in all my front matter first – title page, copyright, maybe a dedication page. Then before my Chapter 1 starts, I insert a section break. Go to Insert > Break > Section break (next page). This lets you have different headers and footers for different sections.
Setting Up Page Numbers
Double-click in the footer area of your first content page (after that section break). Click Insert > Page numbers > More options. Uncheck “Show on first page” if you don’t want a number on your title page.
You can choose position – I like bottom center for fiction, bottom outside corner for nonfiction but that’s just me. There’s no “outside alternating” option though which is annoying. You just pick left, center, or right and it stays that way.
For starting your page numbers at a specific number, click on the page number in the footer, then go to Format > Page numbers > Start at and type whatever number you want. Usually 1 for the first content page.
My dog just knocked over my coffee while I was testing this… anyway.
Font Choices That Don’t Look Amateur
Okay so you’re probably thinking Times New Roman or Georgia and yeah those work but they’re kinda boring. I’ve had good success with:
- Garamond – classic, very readable, looks professional
- Crimson Text – free Google font that’s amazing for books
- Libre Baskerville – another good free option
- Georgia – if you want something safe
- Merriweather – great for nonfiction
Size matters too. For a 6×9 book I use 11pt or 12pt. Smaller books like 5×8 I go with 10pt or 11pt. Line spacing should be 1.15 or 1.5 depending on your font. Some fonts need more breathing room.
To change line spacing, highlight everything (Ctrl+A) then click the line spacing icon in the toolbar. Don’t use double spacing unless you’re submitting a manuscript to an agent. Published books don’t look like that.
Chapter Headings Without Going Crazy
So for chapter headings I usually do a page break before each chapter. Insert > Break > Page break. This starts your new chapter on a fresh page which is how books work.
Then for the actual “Chapter 1” heading, I make it like 16pt or 18pt, bold, and centered. Add some space after it – maybe 2-3 returns – before your first paragraph starts. Or you can use the spacing options. Highlight your chapter heading, then Format > Line & paragraph spacing > Add space after paragraph. Set it to like 24pt or 36pt.
You can use the Styles feature (Normal text, Heading 1, etc.) to keep things consistent but honestly I usually just manually format because I’m lazy and it’s faster for me.
First Paragraph After Chapters
Okay this is a small thing but it matters. The first paragraph of each chapter shouldn’t be indented. That’s a traditional publishing thing. Every paragraph after that gets indented though.
To set up indents, highlight your text and drag the little triangle on the ruler at the top. The top triangle controls first-line indent – drag it to like 0.3 or 0.5 inches. If you don’t see the ruler, go to View > Show ruler.
Or do it the proper way through Format > Align & indent > Indentation options. Set “Special indent” to “First line” and put 0.3 or 0.5 inches.
Scene Breaks and Section Dividers
For scene breaks within a chapter I just do three centered asterisks with a blank line above and below. Like this:
* * *
Some people use hashtags or other symbols but asterisks are classic. You could also use a small centered image or a dingbat font character but that’s more work.
The PDF Export Thing Nobody Talks About
Here’s where Google Docs kinda falls apart. When you export to PDF, sometimes the formatting shifts slightly. I’ve had page numbers move or margins change by like 1/16th of an inch. It’s annoying.
Always download as PDF (File > Download > PDF Document) and then open it in Adobe Reader or something to check EVERY page. I caught a weird thing once where page 47 had a random extra space at the top. No idea why. Just check it.
Oh and another thing – if you’ve got images in your book, make sure they’re high resolution. 300 DPI minimum. Google Docs compresses images sometimes so you might need to reinsert them. Right-click the image and check “All image options” to see the size.
Front Matter Setup
Your title page should just be the title and author name, centered, maybe with some extra spacing to push it toward the middle of the page. Use returns or set spacing before/after paragraphs.
Copyright page comes next. Left-aligned, small font like 9pt or 10pt. Include your copyright notice, ISBN if you have one, publisher name (even if it’s you), and a disclaimer if needed. I usually put “First Edition” and the year too.
Table of Contents
If you need a TOC, Google Docs can auto-generate one but only if you used the Styles properly. Go to Insert > Table of contents. It’ll pull from your Heading 1, Heading 2, etc. styles.
But honestly for fiction I rarely do a TOC. For nonfiction with chapters and subheadings, yeah definitely.
Hyphenation and Justification
Full justification (where text aligns on both left and right margins) looks more professional for books. Highlight everything, then Format > Align & indent > Justified.
But here’s the problem – Google Docs doesn’t auto-hyphenate. So you get these weird rivers of white space sometimes where words don’t fit. You have to manually add soft hyphens if you see big gaps. Put your cursor where you want the hyphen and press Ctrl+Shift+Minus (or Cmd+Shift+Minus on Mac).
I don’t usually bother with this unless it’s really obvious. Most readers won’t notice small spacing issues.
Widows and Orphans
A widow is when the last line of a paragraph sits alone at the top of a new page. An orphan is when the first line sits alone at the bottom. Both look bad.
Google Docs tries to prevent these automatically but sometimes you gotta manually fix them. Add a soft return (Shift+Enter) or adjust paragraph spacing to push text around. Or just rewrite the sentence to make it shorter or longer. I’ve spent way too much time doing this while watching Netflix honestly.
Special Pages Like Dedications or Quotes
If you want a dedication page or an epigraph (fancy quote at the beginning), just put it on its own page with a page break before and after. Center it or right-align it depending on the style you want. Use italic for quotes and smaller font, maybe 10pt.
The Bleed Thing
Wait I forgot to mention – KDP doesn’t require bleed for books without images that go to the edge. If your book is just text with standard margins, you don’t need to worry about bleed settings. But if you’ve got full-page images or background colors, you need to add 0.125 inches to your page size on all sides.
So a 6×9 book with bleed would be 6.25 x 9.25 inches. Then your actual content area stays 6×9 in the center. Honestly though I avoid bleed situations in Google Docs and use Canva or InDesign for those books.
Saving and Version Control
Google Docs auto-saves which is great but I still download a backup PDF after every major editing session. File names like “BookTitle_Interior_v3_2024-01-15” so I can track versions. Lost work once when my internet went out mid-edit and I’m paranoid now.
What Google Docs Isn’t Good For
Okay real talk – if you’re doing a complex nonfiction book with tons of images, sidebars, text boxes, or weird layouts, Google Docs is gonna frustrate you. Use Vellum or InDesign or even Canva for those.
Google Docs works best for straightforward books. Fiction novels, simple nonfiction, journals, workbooks with basic formatting. I’ve published probably 60 books using just Google Docs and they look fine. Not InDesign-level perfect but like 95% as good for 5% of the effort.
One Last Thing About Fonts
If you use a Google Font that’s not standard, make sure it embeds properly in your PDF. Sometimes rare fonts don’t embed and KDP will reject your file or substitute a different font. Stick with common fonts or the Google Fonts library and you’ll be fine. Test your PDF on a different computer to make sure the fonts display correctly.
And that’s basically it. Once you’ve set up one book interior in Google Docs you’ve got a template you can reuse forever. Just duplicate the doc, clear out the old content, and drop in your new book text. The formatting stays intact which saves so much time.
DISCOVER OUR FREE BEST SELLING PRODUCTS
Editable Canva Lined Journal: Express Your Thoughts – KDP Template
Lined Pages Journal 120 pages Ready to Upload PDF Commercial Use KDP Template 6×9 8.5×11 5×8 for Notebooks, Diaries, Low Content
Lined Pages Journal 120 pages Ready to Upload PDF Commercial Use KDP Template 6×9 8.5×11 5×8 for Notebooks, Diaries, Low Content
Cute Dogs Coloring Book for Kids | Activity Book | KDP Ready-To-Upload
Daily Planner Diary : Diary Planners for Everyday Productivity, 120 pages, 6×9 Size | Amazon KDP Interior
Wolf Coloring KDP interior For Adults, Used as Low Content Book, PDF Template Ready To Upload COMMERCIAL Use 8.5×11"
Coloring Animals Head Book for Kids, Perfect for ages 2-4, 4-8 | 8.5×11 PDF
Printable Blank Comic Book Pages PDF : Create Your Own Comics – 3 Available Sizes
Notes KDP interior Ready To Upload, Sizes 8.5×11 6×9 5×8 inch PDF FILE Used as Amazon KDP Paperback Low Content Book, journal, Notebook, Planner, COMMERCIAL Use
Black Lined Journal: 120 Pages of Black Lined Paper Perfect for Journaling, KDP Notebook Template – 6×9
Student Planner Journal 120 pages Ready to Upload PDF Commercial Use KDP Template 6×9" 8.5×11" for Low Content book
Recipe Journal Template – Editable Recipe Book Template, 120 Pages – Amazon KDP Interior