 Editable Canva Lined Journal: Express Your Thoughts - KDP Template
 Subtotal: $0.00
Amazon KDP guide, KDP book publishing
Book Template Canva: Complete Design Tutorial
16
May
May
Okay so I just spent like three hours in Canva last night designing book templates and honestly it’s way easier than people make it sound but there are some tricks you gotta know upfront.
Setting Up Your Canva Account the Right Way
First thing – you need Canva Pro for this. I know everyone wants the free version to work but trust me you’ll waste more time fighting with limited features than the $12.99 monthly is worth. The main thing you need Pro for is the background remover, custom dimensions, and the brand kit which saves SO much time when you’re doing multiple books.
Go to Canva and if you don’t have Pro already just grab the free trial. You can design like 5-6 templates during the trial period if you hustle.
Custom Dimensions Are Everything
This is where most people screw up right away. Amazon KDP has specific trim sizes and you need to match them EXACTLY or your books gonna look weird when it prints.
Click “Create a design” then “Custom size” – don’t use their preset document sizes because none of them match KDP specs perfectly.
Most common sizes I use:
- 6×9 inches – this is the sweet spot for notebooks journals and planners
- 8.5×11 inches – workbooks activity books larger format stuff
- 5×8 inches – smaller journals travel size books
- 8.5×8.5 inches – square format looks premium for certain niches
Type in your dimensions and make sure you select “inches” not pixels or cm. I once designed an entire 120-page planner in centimeters by accident and didn’t realize until I tried to upload it to KDP… yeah that was a fun evening.
Bleed Settings You Can’t Ignore
Amazon wants 0.125 inches bleed on all sides for paperbacks. What this means is you need to add 0.25 inches to both your width and height dimensions to account for bleed on all edges.
So for a 6×9 book your actual Canva canvas should be 6.25 x 9.25 inches.
Then you set up guides at 0.125 inches from each edge – this is your safe zone. Don’t put any text or important elements outside these guides or they’ll get cut off during trimming.
Building Your First Interior Template
Okay so here’s my actual workflow and I’ve published like 200+ books so this is tested.
Start with page 1. For most low content books you’re designing repetitive pages anyway – lined journals dot grid planners whatever. You design ONE perfect page then duplicate it.
Background Setup
Click “Elements” then search for whatever background you want. For a clean professional look I usually just go with solid white or cream. The cream color is easier on the eyes for journals people actually write in – I use hex code #FFF8E7 constantly.
If you want textures search “paper texture” or “vintage paper” in elements. There’s this one subtle linen texture I use all the time… I think it’s called “natural paper texture” or something. Makes the pages look less digital.
Oh and another thing – if you’re doing something like a gratitude journal or planner you might want decorative elements. Search “floral border” or “minimalist frame” and you’ll find tons. Just keep it simple because too many graphics make the page busy and people hate that for functional books.
Text and Lines Setup
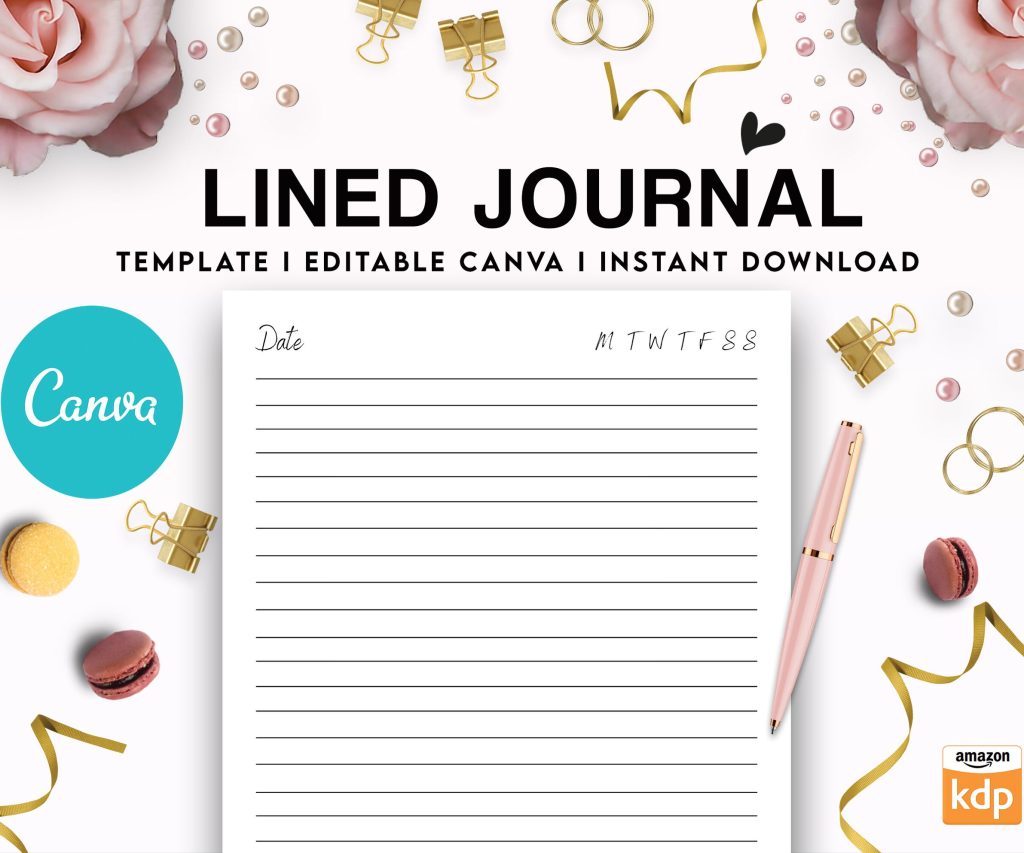
For lined journals you have two options and honestly both work fine.
Option 1: Use Canva’s line element. Click “Elements” search “line” and drag horizontal lines across your page. The annoying part is spacing them evenly. I usually do 0.3 to 0.35 inches between lines which gives you about 25-27 lines per page on a 6×9 book.
To duplicate lines evenly select your line press Ctrl+D (or Cmd+D on Mac) then drag the new line down. Once you get the spacing right just keep pressing Ctrl+D and dragging – Canva will remember the spacing distance.
Option 2: Upload a PNG of lined paper you created elsewhere. Sometimes I make the lines in Google Sheets honestly because you can set exact row heights then screenshot it. Sounds janky but it works.
Dot Grid Pages
For dot grid notebooks search “dot grid pattern” in elements. There’s usually a few good ones but make sure the dots aren’t too large or too close together. The standard is 5mm spacing between dots which translates to roughly 0.2 inches.
I learned this the hard way when I made a dot grid journal with dots spaced like 0.5 inches apart and got a review saying “the dots are uselessly far apart” so yeah… measure twice design once or whatever.
Headers and Footers
Wait I forgot to mention – if you’re adding page numbers or headers you need to stay inside that safe zone we talked about. Page numbers should be at least 0.25 inches from the edge, preferably 0.5 inches.
For page numbers I use a simple text box, size 10-12pt font, and place them centered at the bottom. Use a clean font like Montserrat or Roboto – nothing fancy that’ll be hard to read.
Some people alternate page numbers left and right like real books but honestly for low content KDP books nobody cares that much. Center bottom works fine.
Creating Multiple Page Designs
This is gonna sound weird but I usually design 3-4 different page templates even for simple journals. Like maybe pages with prompts pages with just lines pages with a small quote at the top. It makes the book feel less repetitive.
Design each page type on a separate Canva canvas. Once they’re all done you’ll compile them later.
For prompted journals or planners where every page is different you’re gonna be here a while. I did a 365-day daily planner once with unique quotes on each page and I wanted to throw my laptop out the window by day 200. My cat knocked over my coffee during that project too which didn’t help.
Saving and Organizing Your Templates
Save each page design individually. I name mine super specifically like “6×9-lined-journal-page-cream-background-v2” because I’ve got hundreds of these files now and searching for them later is impossible otherwise.
Use Canva folders to organize by book project. Create a folder for each book you’re working on and dump all the page designs in there.
Downloading for KDP
When you’re ready to download click “Share” then “Download”. Select PDF Print for the best quality. Make sure “Flatten PDF” is NOT checked because sometimes that causes weird issues with KDP’s file processing.
Under advanced options select “Crop marks and bleed” if you set up your document with bleed. Actually you know what, I usually just include the bleed in my canvas size like I mentioned earlier and don’t use Canva’s bleed settings because I’ve had better luck that way.
Download each page as a separate PDF initially. Then you’ll combine them.
Combining Pages Into One Document
You can’t upload 120 separate PDFs to KDP so you need to merge them. I use a free online tool called PDF24 or sometimes just Adobe Acrobat if I’m feeling fancy.
Upload all your page PDFs in the correct order. Double-check the order because fixing this after upload is annoying. For a journal you might go: title page, copyright page, then 120 pages of your lined pages, then maybe a “notes” section at the end.
Oh wait – title page and copyright page. You need those too.
Front Matter Pages
Your book needs a title page and copyright page minimum. Some people add a “this book belongs to” page too which is nice for journals.
Title Page Design
Keep it simple. Book title in a large font (36-48pt), subtitle if you have one in smaller font (18-24pt), and your author name at the bottom (14-18pt).
Center everything vertically and horizontally. Use fonts that match your book’s vibe – script fonts for feminine journals, bold sans-serif for productivity planners, etc.
Don’t overcrowd it with graphics. Maybe one small decorative element at the top or bottom but that’s it.
Copyright Page
Left-align this page with small font (9-10pt). Include:
- Copyright symbol and year and your name
- “All rights reserved” statement
- Maybe your publisher name if you have one
- Country of publication
You can find copyright page templates if you google “KDP copyright page text” and just modify them.
Testing Your Template Before Publishing
Before you commit to publishing order a proof copy. Amazon lets you order a physical proof for like $3-5 plus shipping and you NEED to do this.
I’ve caught so many issues in proof copies – text too close to the spine, colors that looked good on screen but printed weird, page numbers cut off. It’s worth the week wait and few bucks.
When you get the proof flip through every page. Write in it if it’s a journal. Check that lines are straight and evenly spaced. Make sure nothing important got trimmed.
Template Variations for Different Book Types
Okay so depending on what you’re making the template changes obviously.
For planners you need dated or undated pages with sections for different times of day or priorities or whatever your angle is. I usually do a two-page spread design for planners – left page for schedule, right page for notes or goals.
For coloring books you’re working with illustrations obviously. You can create patterns in Canva using their shapes and elements or upload your own line art. Make sure lines are thick enough to print clearly – at least 2-3pt line weight.
For workbooks or activity books you’re combining text boxes with blank spaces for answers. Use light gray text for instructions and leave white space for writing.
Quick Canva Elements Tricks
The “Styles” feature is actually super useful for keeping consistent design across pages. Apply a style to text on page 1 and then use that same style on all other pages so fonts and colors stay consistent.
Canva’s “Brand Kit” (Pro feature) lets you save your frequently used colors and fonts. Set this up at the start of a project and you’ll save tons of time.
You can also save entire page designs as templates in your account. Design your perfect lined page once, save it as a template, then use it for multiple book projects.
Common Mistakes I See Everywhere
People make their margins too small and text gets cut off. Keep at least 0.5 inches margin on all sides, and 0.75 inches on the spine side because of the gutter.
Using RGB color mode instead of CMYK matters for print but honestly Canva handles this pretty automatically when you download as PDF Print so don’t stress too much.
File size issues – if your PDF is over 650MB KDP won’t accept it. This happens when you use too many high-res images. Compress your images before adding them to Canva or use Canva’s built-in photos which are already optimized.
Oh and make sure your page count is correct. KDP requires at least 24 pages for paperbacks and the page count has to include everything – front matter, content pages, back matter.
Speeding Up Template Creation
Once you’ve made a few templates you can reuse and modify them for new books. I’ve got a folder of “base templates” that I duplicate and tweak for each new project.
Change the colors, swap out decorative elements, adjust the header text, and boom – new book template in 30 minutes instead of 3 hours.
For books in a series keep the design super consistent. Just change the title page and maybe rotate some interior page designs but keep the overall look identical.
Honestly after your first few books the template creation becomes pretty fast. My first journal template took me probably 6 hours because I was figuring everything out. Now I can pump out a new template in under an hour for simple projects.
The key is just starting with correct dimensions and keeping everything organized as you go. Save your work constantly because Canva does crash sometimes and there’s nothing worse than losing 2 hours of work because you forgot to save.

DISCOVER OUR FREE BEST SELLING PRODUCTS
Editable Canva Lined Journal: Express Your Thoughts – KDP Template
Lined Pages Journal 120 pages Ready to Upload PDF Commercial Use KDP Template 6×9 8.5×11 5×8 for Notebooks, Diaries, Low Content
Lined Pages Journal 120 pages Ready to Upload PDF Commercial Use KDP Template 6×9 8.5×11 5×8 for Notebooks, Diaries, Low Content
Cute Dogs Coloring Book for Kids | Activity Book | KDP Ready-To-Upload
Daily Planner Diary : Diary Planners for Everyday Productivity, 120 pages, 6×9 Size | Amazon KDP Interior
Wolf Coloring KDP interior For Adults, Used as Low Content Book, PDF Template Ready To Upload COMMERCIAL Use 8.5×11"
Coloring Animals Head Book for Kids, Perfect for ages 2-4, 4-8 | 8.5×11 PDF
Printable Blank Comic Book Pages PDF : Create Your Own Comics – 3 Available Sizes
Notes KDP interior Ready To Upload, Sizes 8.5×11 6×9 5×8 inch PDF FILE Used as Amazon KDP Paperback Low Content Book, journal, Notebook, Planner, COMMERCIAL Use
Black Lined Journal: 120 Pages of Black Lined Paper Perfect for Journaling, KDP Notebook Template – 6×9
Student Planner Journal 120 pages Ready to Upload PDF Commercial Use KDP Template 6×9" 8.5×11" for Low Content book
Recipe Journal Template – Editable Recipe Book Template, 120 Pages – Amazon KDP Interior