 Editable Canva Lined Journal: Express Your Thoughts - KDP Template
 Subtotal: $0.00
Amazon KDP guide, KDP book publishing
Canva KDP: Design Templates & Workflow
13
May
May
Okay so I just spent like three hours in Canva last night setting up a new planner template and honestly the workflow has gotten so much smoother than it used to be. Let me walk you through what actually works because there’s a lot of outdated advice floating around.
Setting Up Your Canva Account for KDP Work
First thing – you need Canva Pro. I know the free version is tempting but you’re gonna hit walls constantly with the download options and template sizes. I resisted upgrading for like six months when I started and it was stupid, just get Pro. It’s maybe $13/month and you’ll make that back on one book sale honestly.
Go into your account settings and set your default measurements to inches. This saves so much time because KDP works in inches and you don’t wanna be converting constantly. Also create a brand kit even if you think you don’t need one – throw in your common color palettes, the fonts you use repeatedly, maybe some basic elements. I ignored this for years and would spend 20 minutes every project trying to remember that exact shade of blue I used.
The Template Size Thing Everyone Gets Wrong
So here’s what trips people up – KDP’s trim sizes don’t match Canva’s preset sizes. You need to create custom dimensions every single time. For a standard 6×9 book (most common for planners, journals, notebooks) you’re creating a custom size that’s actually 6.25 x 9.25 inches. That extra 0.125 on each side is your bleed.
Wait I forgot to mention – you need bleed on all sides for KDP. Bleed is basically the safety zone where your design extends past the trim line so when they cut the book there’s no white edges. KDP requires 0.125 inches of bleed.
My most used sizes:
- 6×9 book = 6.25 x 9.25 canvas
- 8.5×11 workbook = 8.75 x 11.25 canvas
- 5×8 notebook = 5.25 x 8.25 canvas
- 8×10 (weird size but sells well for certain niches) = 8.25 x 10.25 canvas
Create these as saved custom sizes in Canva so you’re not typing them in every time. There’s a little star icon when you’re in the custom dimension box that lets you save frequently used sizes.
The Actual Design Workflow That Doesn’t Make You Wanna Quit
Okay so here’s my process and I’ve tested like five different ways of doing this. Start with the cover because it sets the visual tone for your interiors. KDP has a cover calculator tool – use it. You input your page count and trim size and it spits out the exact dimensions you need including the spine width.
For a 120-page 6×9 book the full cover is gonna be something like 12.25 x 9.25 but with a spine width of like 0.3 inches. The calculator tells you exactly. Set up your Canva canvas to those full dimensions, then use guides to mark where the spine starts and ends. This is gonna sound weird but I actually use thin rectangle shapes in bright pink as my guide markers because Canva’s guide lines are hard to see sometimes.
Oh and another thing – design your back cover and front cover separately if you want, then combine them. I used to try designing the whole wraparound cover at once and would get so frustrated with element placement. Now I design front cover in one canvas, back cover in another, then copy/paste into the full cover template. Way easier.
Interior Pages Strategy
For interiors you’re working with single pages usually. Create your first page as a 6.25 x 9.25 canvas (if doing 6×9 trim). Here’s the critical part – use Canva’s ruler and guides to mark your safe zone. The safe zone is 0.25 inches from all edges. Any text or important design elements need to stay inside that safe zone or they might get cut off.
I set up four guide lines on every template:
- 0.25 inches from top
- 0.25 inches from bottom
- 0.25 inches from left
- 0.25 inches from right
The space outside those guides to the edge of your canvas is your bleed zone. Extend background colors and patterns into that zone but keep text out.
Template Elements That Actually Save Time
So I have this master template file that I duplicate for every new project. It’s basically a blank page with the right dimensions, guides already set up, and a few common elements I use. My dog just knocked over my coffee cup while I’m writing this but anyway –
The elements I keep in my master template:
- Page number placeholder (centered at bottom, in safe zone)
- Header/footer text boxes already sized and positioned
- A few shape options I use frequently (lines, boxes, circles)
- My brand color palette loaded
- Fonts already applied to sample text
When I start a new interior page I just duplicate this master page and start customizing. For a 120-page planner I’m duplicating pages like crazy but the setup is already done.
The Multi-Page Approach
Canva lets you have multiple pages in one document which is perfect for KDP interiors. But here’s the thing – don’t create one massive 120-page Canva document. It gets super slow and laggy. I break it into chunks of 20-30 pages max.
For a typical planner:
- File 1: Cover pages and intro pages (5-10 pages)
- File 2: Weekly spread pages (30 pages)
- File 3: Monthly spread pages (24 pages)
- File 4: Additional sections (remaining pages)
You’ll merge these PDFs later which I’ll get to in a sec.
Design Tips That Actually Matter for Sales
Okay so funny story – my first three notebooks on KDP didn’t sell at all because they looked too busy. I was using every design element Canva offered. Minimalist actually sells better for most low-content books. People want functional not flashy.
Stick to 2-3 colors max per design. I see so many new publishers using like rainbow color schemes and it just looks unprofessional. Pick a main color, an accent color, and use black/gray for text. That’s it.
White space is your friend. I used to fill every inch of the page and customers would leave reviews saying it felt cramped. Now I deliberately leave breathing room and sales improved.
Font choices – don’t use more than two fonts per page, maybe three max for the whole book. One for headers, one for body text, done. Canva has thousands of fonts and it’s tempting to use them all but resist. I mostly stick to:
- Montserrat for headers (clean, modern)
- Open Sans for body text (readable, neutral)
- Sometimes a script font for accent text but sparingly
The Download Settings Nobody Explains Right
This is critical and where people mess up constantly. When you’re ready to download your Canva design for KDP, the settings matter a lot.
For covers: Download as PDF Print, not PDF Standard. Check the “flatten PDF” option if it’s there. Make sure crop marks and bleed marks are OFF. KDP doesn’t want those marks on your file.
For interiors: Same thing – PDF Print, flattened. But here’s the trick – download each multi-page document separately, then you need to combine them.
I use PDFtk or Adobe Acrobat to merge multiple PDFs into one interior file. There’s free online tools too but I don’t trust them with my files honestly. The page order needs to be exact so double-check before uploading to KDP.
Wait I forgot to mention earlier – make sure your interior pages are all the same orientation. Don’t mix portrait and landscape in one book, KDP will reject it.
Resolution and File Size
KDP wants 300 DPI minimum for print quality. Canva Pro automatically does 300 DPI when you download as PDF Print so you’re good. But check your file size – KDP has a 650 MB limit per file. If you’re over that you probably have too many high-res images or your PDF isn’t properly compressed.
For most low-content books (planners, journals, notebooks) your interior file should be like 5-20 MB. If it’s way bigger than that something’s wrong. Usually it means images aren’t compressed or you didn’t flatten the PDF.
Workflow Optimization Because Time Is Money
After you’ve made a few books you’ll notice you’re recreating the same page types over and over. This is when you build a template library. I have probably 50+ saved templates in Canva organized by type:
- Dated daily planner pages
- Undated daily planner pages
- Weekly spreads (like 5 different layouts)
- Monthly calendar pages
- Habit tracker pages
- Goal setting pages
- Lined journal pages (different line spacings)
- Dotted journal pages
- Graph paper patterns
When I get an idea for a new book I’m just pulling from this library and customizing colors/fonts to match the theme. A book that used to take me 3-4 days to design now takes maybe 6-8 hours because I’m not starting from scratch.
Oh and create folders in Canva to organize projects. I have folders for:
- Active projects
- Published books (archived)
- Template library
- Cover designs
- Graphics and elements
Sounds basic but when you have 50+ projects in your Canva account it gets messy fast.
Common Mistakes I Still See People Making
Not testing a proof copy before going live. I don’t care how good it looks on screen, order a proof. I’ve caught bleed issues, color problems, text too close to edges – all stuff that looked fine in Canva but was wrong in print. KDP lets you order an author proof for like $5 plus shipping. Do it.
Using Canva’s pre-made templates without customization. Those templates are used by thousands of people. If you just change the colors and upload it, your book looks exactly like 100 other books. Use templates as inspiration or starting points but customize heavily.
Forgetting about gutter margins. For books over 100 pages the gutter (the inside margin near the spine) needs to be bigger than your outside margins. I usually do 0.5 inches on the gutter side, 0.25 inches on the outside. This prevents text from getting lost in the binding.
Not checking commercial use rights on elements. Canva Pro gives you commercial rights to most elements but not all. Before you use any graphic, photo, or illustration, check if it’s marked for commercial use. There’s a filter in the search that shows only commercial-use items. I’ve seen people get takedown notices for using restricted elements.
Speed Tips for Bulk Creation
If you’re creating a series of books (like 12 different planner designs) use the same interior template for all of them and just change the covers. Customers don’t care if the interior is similar across your series, they care about the cover design and theme.
Batch your work. I spend one day creating covers, another day on interiors, another day on formatting and uploading. Switching contexts constantly kills productivity. I learned this from watching some productivity video during lunch one day and it actually works.
Use Canva’s duplicate page feature aggressively. If you need 52 weekly spread pages, design one perfect spread then duplicate it 51 times. Even if you want variety, duplicate then modify. Starting from blank every time is inefficient.
Keep a swipe file of designs you like. I have a folder on my desktop with screenshots of book interiors, color schemes, layout ideas from other books and products. Not to copy but to reference when I’m stuck. Sometimes you just need to see what works to break through creative block.
Alright so that’s basically my whole Canva KDP workflow. The key is really just setting up your templates right the first time, understanding the technical requirements for KDP, and then building a library you can pull from. Once you’ve got that foundation the actual book creation gets way faster and you can focus on market research and finding profitable niches instead of fighting with design tools.
DISCOVER OUR FREE BEST SELLING PRODUCTS
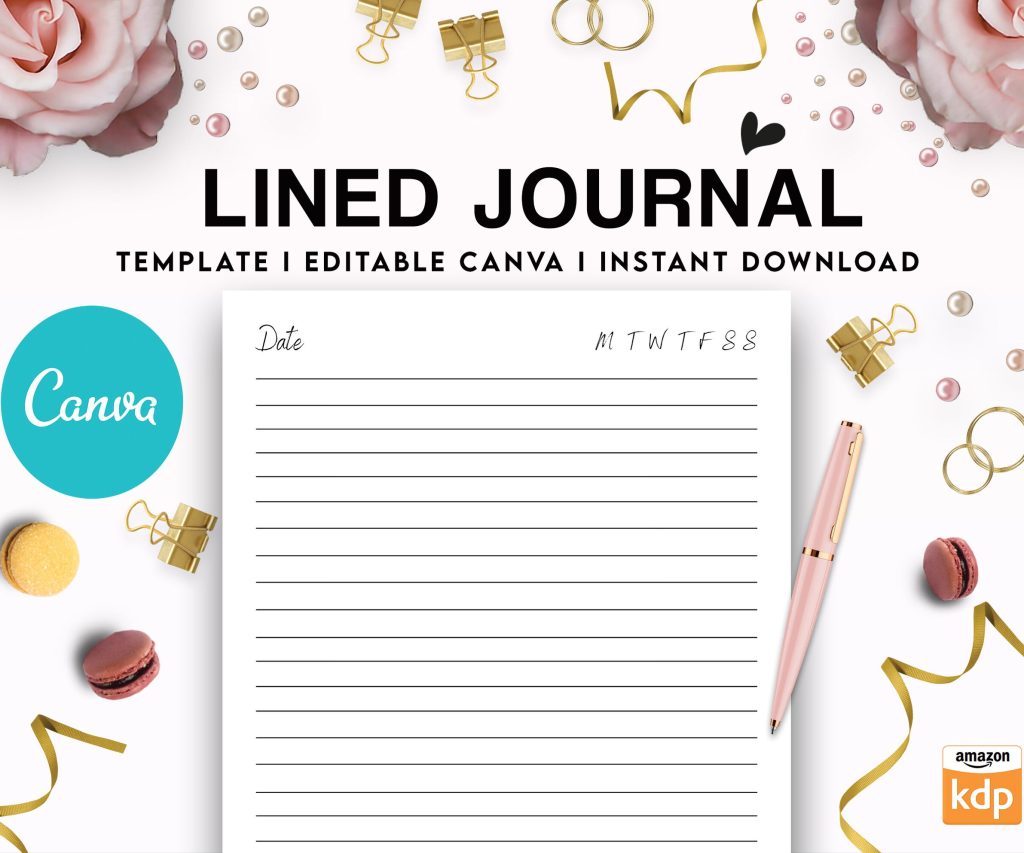
Editable Canva Lined Journal: Express Your Thoughts – KDP Template
Lined Pages Journal 120 pages Ready to Upload PDF Commercial Use KDP Template 6×9 8.5×11 5×8 for Notebooks, Diaries, Low Content
Lined Pages Journal 120 pages Ready to Upload PDF Commercial Use KDP Template 6×9 8.5×11 5×8 for Notebooks, Diaries, Low Content
Cute Dogs Coloring Book for Kids | Activity Book | KDP Ready-To-Upload
Daily Planner Diary : Diary Planners for Everyday Productivity, 120 pages, 6×9 Size | Amazon KDP Interior
Wolf Coloring KDP interior For Adults, Used as Low Content Book, PDF Template Ready To Upload COMMERCIAL Use 8.5×11"
Coloring Animals Head Book for Kids, Perfect for ages 2-4, 4-8 | 8.5×11 PDF
Printable Blank Comic Book Pages PDF : Create Your Own Comics – 3 Available Sizes
Notes KDP interior Ready To Upload, Sizes 8.5×11 6×9 5×8 inch PDF FILE Used as Amazon KDP Paperback Low Content Book, journal, Notebook, Planner, COMMERCIAL Use
Black Lined Journal: 120 Pages of Black Lined Paper Perfect for Journaling, KDP Notebook Template – 6×9
Student Planner Journal 120 pages Ready to Upload PDF Commercial Use KDP Template 6×9" 8.5×11" for Low Content book
Recipe Journal Template – Editable Recipe Book Template, 120 Pages – Amazon KDP Interior