-
×
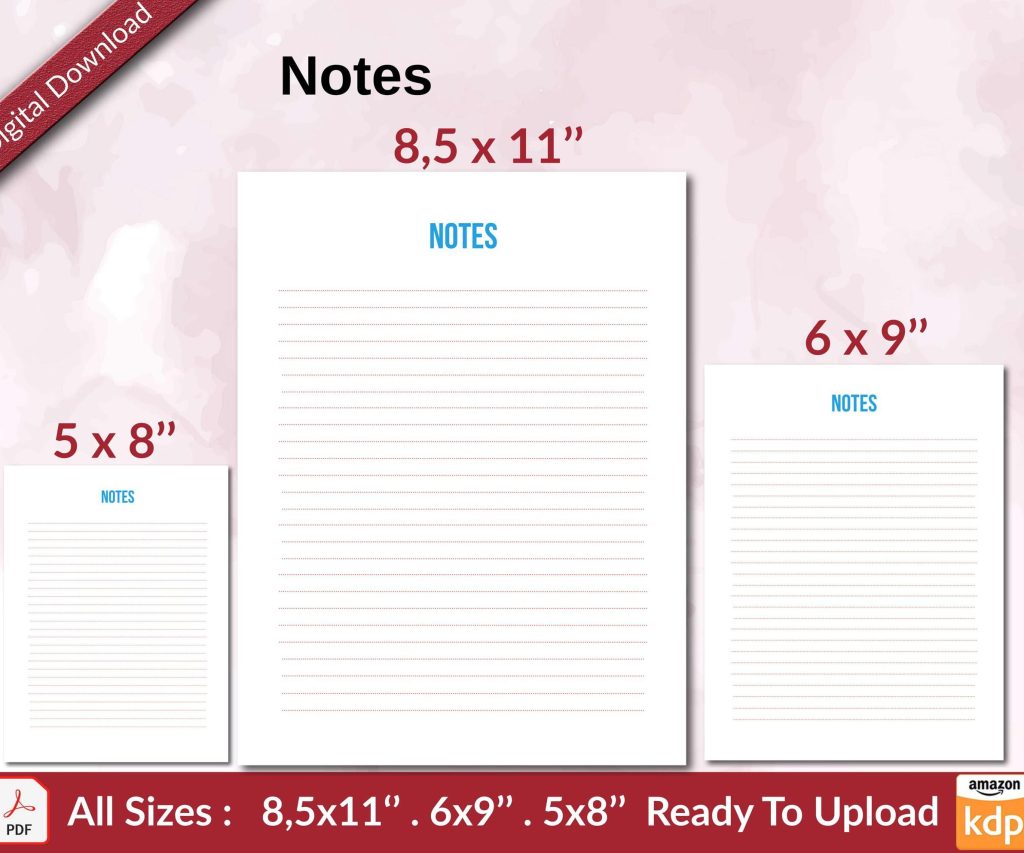 Notes KDP interior Ready To Upload, Sizes 8.5x11 6x9 5x8 inch PDF FILE Used as Amazon KDP Paperback Low Content Book, journal, Notebook, Planner, COMMERCIAL Use
1 × $0.00
Notes KDP interior Ready To Upload, Sizes 8.5x11 6x9 5x8 inch PDF FILE Used as Amazon KDP Paperback Low Content Book, journal, Notebook, Planner, COMMERCIAL Use
1 × $0.00
Subtotal: $0.00
Okay so I’ve been using Google Docs for novel writing for like three years now and honestly it’s way better than people give it credit for. Most fiction authors I know are obsessed with Scrivener but here’s the thing – Google Docs is free, it’s cloud-based, and once you learn the tricks it’s actually pretty solid for drafting full novels.
First thing you gotta do is forget about writing your entire novel in one massive document. That’s a disaster waiting to happen. I learned this the hard way when my 80k word document started lagging so bad I wanted to throw my laptop out the window.
What I do now is create a master folder in Google Drive called whatever your novel title is. Inside that folder you want separate docs for each chapter. Yeah it sounds annoying but trust me. Name them like “Chapter 01 – Opening” or whatever naming convention makes sense to you. The numbering is important because Google Drive will sort them automatically.
You also want a separate planning doc. This is where you dump character profiles, plot notes, world-building stuff, random ideas at 2am. Keep it messy, doesn’t matter. The point is having everything in one folder so you can search across all docs when you forget what color eyes you gave your protagonist in chapter 3.
So if you’re planning to submit to agents or whatever, you need standard manuscript format. Go to File > Page Setup and set margins to 1 inch all around. Font should be 12pt Times New Roman or Courier. I know everyone says Courier but honestly Times New Roman is fine and easier to read on screen.
Line spacing is double. Always double. Go to Format > Line spacing > Double.
Oh and another thing – set up your header. Insert > Headers & footers > Header. Put your last name, a slash, then the novel title, then page number. Like “Harper / NOVEL TITLE / ” and then Insert > Page numbers. This makes you look professional when you’re submitting.
This is gonna sound boring but using heading styles changed everything for me. When you type your chapter title, highlight it and go to the styles dropdown (it probably says “Normal text”). Change it to Heading 1.
Why does this matter? Because then you can open the document outline by clicking View > Show document outline. Now you’ve got this sidebar that shows all your chapters and you can jump around instantly. When I’m editing and someone in chapter 18 references something from chapter 4, I just click and boom, I’m there.
For scene breaks within chapters, use Heading 2. Like if you’re switching POV or jumping in time. Makes navigation so much easier.
The voice typing feature is honestly insane. Tools > Voice typing. I use this when I’m blocked or when I’ve been typing so long my wrists hurt. You just talk out your scene. Yeah it needs editing after but sometimes just speaking the dialogue out loud helps you hear if it sounds natural.
Word count is your friend. Tools > Word count or just hit Command+Shift+C (Control on PC). I check this obsessively. The little box that shows word count also shows character count if you’re writing flash fiction or trying to hit specific targets.
Wait I forgot to mention – set up autocorrect for character names. My protagonist is named Alessandra and I kept typing it wrong. Go to Tools > Preferences and add your character names to autocorrect. You can also set up shortcuts. Like I have “mc” autocorrect to “Alessandra” because I’m lazy.
Okay so when you’re ready for beta readers, Google Docs is actually perfect. You can share the doc with specific people and set their permissions. Click the blue Share button, add their email, and change the dropdown from “Editor” to “Commenter.”
This way they can highlight text and leave comments but can’t accidentally delete your precious words. I had a beta reader once who had editing permissions and they “fixed” my intentional grammar in dialogue and I almost cried.
The comment threads are great for back-and-forth. They can ask questions, you can reply, and once you’ve addressed the feedback you just click Resolve. Keeps everything organized.
Oh and you can assign comments to specific people if you have multiple betas. Just @ mention them in the comment.
This feature has saved my butt so many times. File > Version history > See version history. Google Docs automatically saves versions as you work, but you can also manually name versions.
Like before I do a major revision pass, I’ll go to File > Version history > Name current version and call it “Draft 2 – before developmental edits” or whatever. Then if I hate what I did, I can restore an old version.
You can also see exactly what changed between versions with the color-coded timeline thing. It’s wild. I once accidentally deleted an entire scene and didn’t realize until two days later. Version history let me find it and copy it back.
For research I keep a separate doc called “Research & Notes” in my novel folder. But here’s the cool part – you can link between Google Docs. So if I mention a historical fact in my novel and I want to remember where I found it, I highlight the text, hit Command+K, and link to a specific heading in my research doc.
You can also link to specific places in the same document. This is useful for foreshadowing. Like I’ll link a mysterious reference in chapter 3 to where it’s explained in chapter 15, just so I remember they’re connected during edits.
The Explore feature (Tools > Explore) lets you search the web and Google Drive without leaving your doc. I use this constantly for quick fact-checking. Like if I need to know how long it takes to drive from Boston to Portland, I just open Explore, search it, and keep writing.
You can totally work offline which is clutch when you’re on a plane or your internet dies. You gotta set it up first though. Go to Google Drive settings (the gear icon), check “Offline” and make sure it’s enabled.
Then right-click any doc you want available offline and toggle “Available offline.” The doc will have a little checkmark. Now you can write without internet and it’ll sync when you’re back online.
This is gonna sound weird but I sometimes turn off my wifi on purpose when I’m drafting. No distractions, no temptation to check Twitter every five minutes. Just me and the document.
Most Google Docs add-ons are garbage but a few are useful. Go to Extensions > Add-ons > Get add-ons.
ProWritingAid has a Google Docs extension. It’s like Grammarly but more focused on style for fiction writers. The free version is limited but catches stuff like repeated words, passive voice, and pacing issues.
There’s also one called “Word Counter” that gives you more detailed stats. Like how many words per chapter, average chapter length, stuff like that. I’m a numbers nerd so I like seeing my progress visualized.
Oh and “Table of Contents” is built-in actually. If you used heading styles like I mentioned, go to Insert > Table of contents and it’ll generate a clickable TOC. Updates automatically when you add chapters.
When you’re ready to publish, you’ll need to export your doc. File > Download. For most purposes you want .docx format. This is what agents expect if you’re submitting.
For self-publishing, you might need other formats. The .epub export from Google Docs is pretty rough honestly. What I do is download as .docx, then use Calibre (it’s free) to convert to .epub or .mobi. Way cleaner.
Before exporting, do a cleanup pass. Search for double spaces (just search for two spaces). Get rid of extra line breaks. Make sure all your chapter headings are consistent.
I’m gonna just dump these because they’re super useful:
Find and replace is stupidly powerful. Say you realize halfway through your novel that you want to change a character’s name from “Jack” to “Jackson.” Command+H, type “Jack” in find, “Jackson” in replace, but make sure you check each one because you don’t want to replace words like “jacket” accidentally.
I usually have like three or four novel projects going at once because I’m a disaster. Color-coding folders helps. Right-click a folder in Google Drive, change color. Red for active project, blue for backlist, green for planning stages, whatever system works.
You can also star important docs. That little star icon at the top. Then they show up in your “Starred” section for quick access.
My cat just knocked over my coffee so… anyway.
When I’m doing developmental revisions, I duplicate the entire chapter folder first. Right-click folder > Make a copy. That way I have the original if I need it.
Then I use suggestion mode. There’s a little pencil icon in the top right – click it and switch from “Editing” to “Suggesting.” Now all your changes show as suggestions instead of direct edits. You can see what you changed and accept or reject later.
This is super useful when you’re not sure about a change. Like maybe I rewrote an entire scene but I wanna compare it to the original. Suggestion mode lets me see both versions side by side basically.
For line edits I print to PDF and read on my iPad with a stylus. Something about seeing it in different format helps me catch typos and awkward sentences. But that’s just me.
Okay this isn’t really a Google Docs feature but I keep a spreadsheet in the same Drive folder tracking daily word count. Just a simple sheet with date, words written, total word count. Seeing the numbers go up is weirdly motivating.
You can also set up a template doc with your target word count at the top. Like “Goal: 80,000 words. Current: [update this daily].” Some people need that visual reminder.
Google Docs also saves automatically so you never lose work. I’ve never once lost a manuscript to a crash or power outage. That alone makes it worth using over Word in my opinion.
DISCOVER OUR FREE BEST SELLING PRODUCTS
Editable Canva Lined Journal: Express Your Thoughts – KDP Template
Lined Pages Journal 120 pages Ready to Upload PDF Commercial Use KDP Template 6×9 8.5×11 5×8 for Notebooks, Diaries, Low Content
Lined Pages Journal 120 pages Ready to Upload PDF Commercial Use KDP Template 6×9 8.5×11 5×8 for Notebooks, Diaries, Low Content
Cute Dogs Coloring Book for Kids | Activity Book | KDP Ready-To-Upload
Daily Planner Diary : Diary Planners for Everyday Productivity, 120 pages, 6×9 Size | Amazon KDP Interior
Wolf Coloring KDP interior For Adults, Used as Low Content Book, PDF Template Ready To Upload COMMERCIAL Use 8.5×11"
Coloring Animals Head Book for Kids, Perfect for ages 2-4, 4-8 | 8.5×11 PDF
Printable Blank Comic Book Pages PDF : Create Your Own Comics – 3 Available Sizes
Notes KDP interior Ready To Upload, Sizes 8.5×11 6×9 5×8 inch PDF FILE Used as Amazon KDP Paperback Low Content Book, journal, Notebook, Planner, COMMERCIAL Use
Black Lined Journal: 120 Pages of Black Lined Paper Perfect for Journaling, KDP Notebook Template – 6×9
Student Planner Journal 120 pages Ready to Upload PDF Commercial Use KDP Template 6×9" 8.5×11" for Low Content book
Recipe Journal Template – Editable Recipe Book Template, 120 Pages – Amazon KDP Interior