Okay so I just spent like three hours setting up manuscript templates in Google Docs last week because one of my students was losing their mind trying to format their romance novel, and honestly? Google Docs is actually pretty solid for this once you know what you’re doing.
First thing – you gotta understand that publishers and agents want standard manuscript format. It’s not about being pretty, it’s about being readable and professional. Think Times New Roman 12pt, double-spaced, one-inch margins. Boring but necessary.
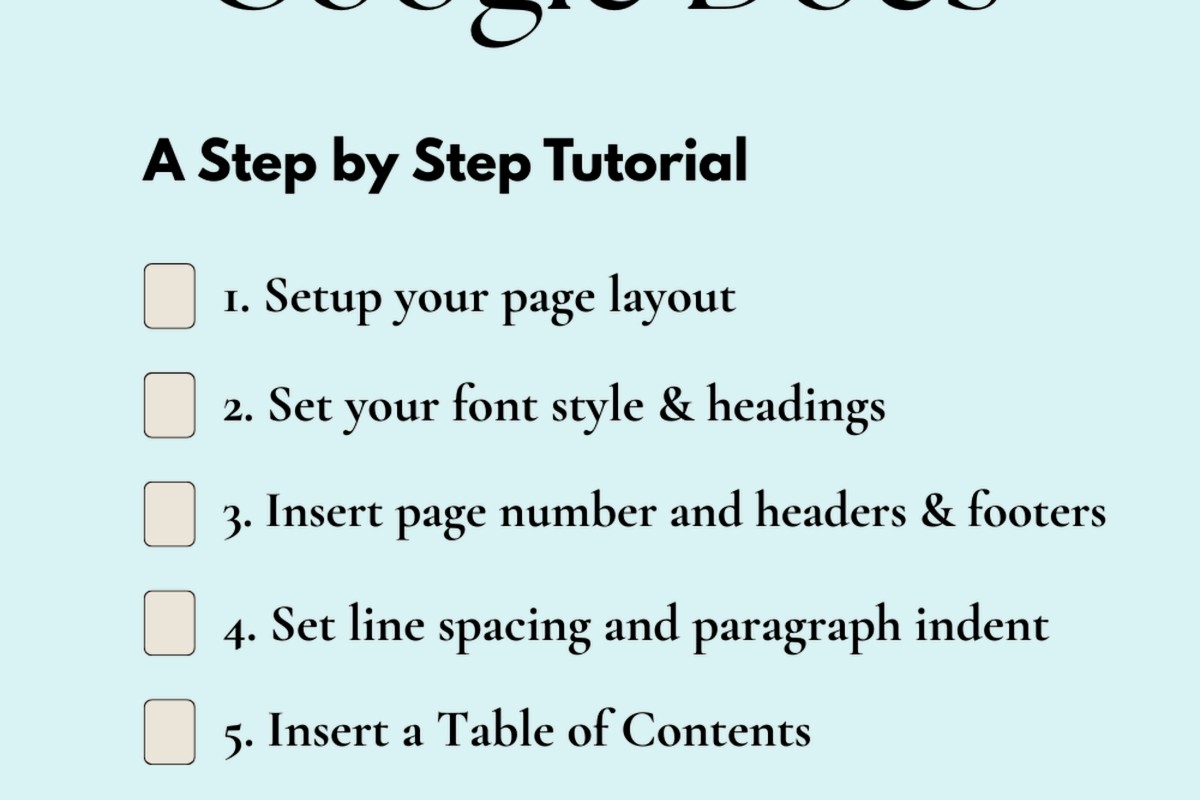
Setting Up Your Basic Template
Start with a blank Google Doc. Go to File > Page Setup and set all your margins to 1 inch. Google Docs defaults to something weird like 1.15 spacing which drives me crazy, so click on the line spacing icon (looks like little lines with arrows) and select Double. Choose Times New Roman size 12 from the font dropdown. Some people swear by Courier but honestly Times New Roman is cleaner and most places accept it now.
Oh and another thing – turn off smart quotes if you’re planning to upload this anywhere later. Tools > Preferences and uncheck the “Use smart quotes” box. Trust me on this one. I had a whole manuscript get messed up because of curly quotes once and spent two days fixing it.
The Header Situation
Here’s where it gets specific. You need your last name and page number in the top right corner of every page except the title page. Go to Insert > Headers & footers > Header. Type your last name, hit the space bar once, then go to Insert > Page numbers but choose the option that just puts the number without any formatting.
The trick is you want this right-aligned. Highlight what you just typed, then click the align right button. Now here’s the annoying part – you need to make the first page different because your title page shouldn’t have this header.
Go back to the header area, and you’ll see a tiny checkbox that says “Different first page” – check that box. Now your title page is clean and every other page has your header. This took me forever to figure out the first time because Google Docs hides this option in the weirdest place.
Title Page Format
Okay so your title page needs specific info in specific places. Top left corner: your real name, address, phone number, email. Single-spaced. I usually put this in 12pt too but some people go smaller. Whatever.
Then about halfway down the page, center-aligned, you put your title in ALL CAPS. Skip a line, put “by” in lowercase, skip another line, put your author name (which might be different from your real name if you’re using a pen name).
Bottom right corner: word count rounded to the nearest thousand. So if your manuscript is 47,834 words, you write “approximately 48,000 words” or just “48,000 words.”
Wait I forgot to mention – some people put genre or category info on the title page too. Like “Young Adult Fantasy” or whatever. I usually skip this unless a specific agent asks for it in their guidelines.
Chapter Headings and Scene Breaks
Start each chapter about a third of the way down the page. Just hit Enter a bunch of times – like 8-10 times. Type “Chapter One” or “Chapter 1” or whatever numbering system you use, centered. Some people do fancy chapter titles, that’s fine too.
Skip two lines (so hit Enter twice) then start your text, left-aligned.
For scene breaks within chapters, don’t just put blank lines because formatting gets weird. Use the # symbol centered on its own line. Three spaces before and after the scene break. This shows clearly that it’s an intentional break and not just formatting getting messed up.
Paragraph Formatting That Actually Matters
First line of each paragraph needs to be indented 0.5 inches. Do NOT use the Tab key for this oh my god. I see people do this all the time and it creates chaos when you export or convert formats later.
Instead, highlight your entire manuscript (Ctrl+A or Cmd+A), then go to Format > Align & indent > Indentation options. Set “Special indent” to “First line” and put 0.5 in the box. Click Apply. Done. Every paragraph now auto-indents properly.
Exception: don’t indent the first paragraph of a chapter or the first paragraph after a scene break. These should be flush left. You’ll have to manually fix these by clicking at the start of those specific paragraphs and dragging the little indent marker back.
Creating the Actual Template
Once you’ve got all this formatting set up, save it as a template so you don’t have to do this every single time. File > Make a copy, give it a name like “Manuscript Template – Standard Format” or whatever makes sense to you.
Better yet, if you have a Google account, you can make it a legit template. There’s this thing where you go to the Template Gallery but honestly I just keep a master doc in my Drive and copy it whenever I start a new project. Less hassle.
This is gonna sound weird but I also keep different versions for different publishers because some want specific tweaks. Like one publisher I worked with wanted Courier New and 1.5 spacing instead of double. Having templates ready saves so much time.
Styles and Formatting Tricks
Google Docs has this Styles feature that nobody uses but should. See where it says “Normal text” in the toolbar? Click that dropdown. You can set up styles for your chapter headings, scene breaks, whatever.
Highlight a chapter heading you’ve formatted how you want it. Click the Styles dropdown > “Heading 1” or whichever level > “Update ‘Heading 1’ to match.” Now every time you apply that style, it’ll look consistent.
I use this for manuscripts with multiple POV characters where I want each character’s name formatted the same way. Saves me from manually formatting every single time.
Oh and if you’re writing anything with italics – thoughts, emphasized words, whatever – Google Docs handles this fine. Just make sure you’re using actual italic formatting (Ctrl+I) and not underlining or anything weird. Some older manuscript guidelines said to underline for italics but that’s outdated now.
Word Count Tracking
Tools > Word count or just Ctrl+Shift+C. This gives you pages, words, characters, all that. The count includes everything though, even your title page and headers, so your actual manuscript word count is slightly different.
For accurate count, highlight just the manuscript text (excluding title page and any front matter) and check the word count of just that selection. That’s what you report to agents or publishers.
I usually keep a separate doc where I track daily word count because I’m nerdy like that, but that’s optional. My cat knocked over my coffee while I was doing this last week and I lost like an hour of work because I forgot to let Google Docs auto-save… wait no, Google Docs auto-saves constantly. I’m thinking of Word. Never mind.
Export Settings
When you’re ready to send your manuscript, most places want .doc or .docx files, not Google Docs format. File > Download > Microsoft Word (.docx).
Check the file after you download it though. Sometimes formatting gets wonky in the conversion – especially with headers and page numbers. I always open the Word doc and scroll through quickly to make sure nothing broke.
If you need a PDF (some contests want this), File > Download > PDF Document works fine. PDFs preserve formatting perfectly but aren’t editable, which is why most publishers don’t want them for submissions.
Common Mistakes to Avoid
Don’t use extra spaces between paragraphs. Just the indent. I see this constantly from people used to writing blog posts or emails. Manuscript format is different.
Don’t use different fonts for chapter headings or anything fancy. Everything should be the same font. This isn’t a design project, it’s a manuscript.
Don’t put page numbers at the bottom center. Top right with your last name. Always.
Don’t forget to turn off hyphenation if it’s on. Format > Text > Hyphenation > uncheck it. Publishers handle this in layout.
Version Control and Backups
Google Docs auto-saves which is great, but I still keep backup copies. Every time I finish a major revision, I make a copy with the date in the filename. “Novel Title – Draft 3 – Oct 2024” or whatever.
The version history feature is actually useful too. File > Version history > See version history. You can see every change and even restore old versions if you accidentally delete something important.
I also download a Word version to my hard drive weekly, just in case Google ever has issues or my account gets hacked or who knows what. Paranoid maybe, but I’ve heard horror stories.
Sharing and Collaboration
If you’re working with an editor or beta readers, the Share button is your friend. You can give people commenting access without letting them edit your actual text. They leave comments in the margin, you address them, mark them resolved.
Way better than emailing Word docs back and forth. Everyone’s looking at the same current version, and you can see who wrote what comment.
Just make sure you set the sharing permissions correctly. “Commenter” for beta readers, not “Editor” unless you actually want them changing your text directly.
Special Formatting Needs
If you’re writing something with epigraphs, format them centered and italicized, about 4-5 lines down from the chapter heading. These should be single-spaced even though the rest of your manuscript is double-spaced.
For books with multiple timelines or POV switches, some writers put the POV character name or date/location centered above each chapter or section. That’s fine, just keep it consistent and simple.
Poetry or lyrics quoted in prose – indent these further than your regular paragraphs and single-space them. You can use the indent markers for this instead of creating a whole new style.
The template I use most is saved in my Google Drive under “Writing Templates” and I’ve probably copied it 50 times by now for different projects. Once you get it set up right, you literally never have to think about formatting again until you’re ready to submit somewhere.
Anyway that’s basically the whole setup. Takes like 15 minutes to create your template properly the first time, then you’re set forever. Or until manuscript standards change again, but that happens like once every decade so you’re probably good.
 Printable Blank Comic Book Pages PDF : Create Your Own Comics - 3 Available Sizes
1 × $0.00
Printable Blank Comic Book Pages PDF : Create Your Own Comics - 3 Available Sizes
1 × $0.00  Daily Planner Diary : Diary Planners for Everyday Productivity, 120 pages, 6×9 Size | Amazon KDP Interior
1 × $0.00
Daily Planner Diary : Diary Planners for Everyday Productivity, 120 pages, 6×9 Size | Amazon KDP Interior
1 × $0.00 
DISCOVER OUR FREE BEST SELLING PRODUCTS
Editable Canva Lined Journal: Express Your Thoughts – KDP Template
Lined Pages Journal 120 pages Ready to Upload PDF Commercial Use KDP Template 6×9 8.5×11 5×8 for Notebooks, Diaries, Low Content
Lined Pages Journal 120 pages Ready to Upload PDF Commercial Use KDP Template 6×9 8.5×11 5×8 for Notebooks, Diaries, Low Content
Cute Dogs Coloring Book for Kids | Activity Book | KDP Ready-To-Upload
Daily Planner Diary : Diary Planners for Everyday Productivity, 120 pages, 6×9 Size | Amazon KDP Interior
Wolf Coloring KDP interior For Adults, Used as Low Content Book, PDF Template Ready To Upload COMMERCIAL Use 8.5×11"
Coloring Animals Head Book for Kids, Perfect for ages 2-4, 4-8 | 8.5×11 PDF
Printable Blank Comic Book Pages PDF : Create Your Own Comics – 3 Available Sizes
Notes KDP interior Ready To Upload, Sizes 8.5×11 6×9 5×8 inch PDF FILE Used as Amazon KDP Paperback Low Content Book, journal, Notebook, Planner, COMMERCIAL Use
Black Lined Journal: 120 Pages of Black Lined Paper Perfect for Journaling, KDP Notebook Template – 6×9
Student Planner Journal 120 pages Ready to Upload PDF Commercial Use KDP Template 6×9" 8.5×11" for Low Content book
Recipe Journal Template – Editable Recipe Book Template, 120 Pages – Amazon KDP Interior