 Printable Blank Comic Book Pages PDF : Create Your Own Comics - 3 Available Sizes
 Subtotal: $0.00
Amazon KDP guide
How to change KDP cover size?

26
Oct
Oct
To begin, go over to the KDP book cover templates website and locate the trim size of the KDP book you like to build a cover for. The best place to save information is someplace you can find it quickly on your computer. Creating a cover for a kdp book requires the following three things:
- Color
- The number of pages
- It’s a trim size
Please remember that you can only upload a single PDF file. There can’t be any visual breaks between the back and front of this kdp book cover and the spine. We can’t have this kdp book cover go beyond 650 MB in size. Due to potential delays when printing large files, KDP recommends restricting file sizes to 40MB or below.
Amazon Kindle Edition Cover Sizing Trimming Guide
The importance of choosing the right cover size for KDP
To achieve KDP quality requirements, you should calculate your KDP cover size with bleed space included. “Bleed” is a term from the printing industry, meaning images, backgrounds, and other printed page components extending over the page’s edge. The bleed on your kdp cover file requires an extra 0.125 inches (3.2 millimeters) on the top, bottom, and outside corners. Avoid using page numbers like 100, 110, 112, 120, 124, etc. Any program that can open or create a PDF or PNG file may use the KDP templates to make a print-ready book cover. With the right ink and paper choices, trim size, and page count inputted into the cover calculation and template generator, you’ll get a layout like this:

Utilizing the Kdp Book Calculator
- Full Cover. Measurements of the cover’s front, back, spine, and wrap, in addition to its width and height.
- The cover page. The final width and height of the cover after printing. Nothing has changed on the back cover, either.
- Safe Place. If you want your text and images to stay put on the inside covers during printing, be sure to keep them completely inside this area.
- Bleed. By setting up your bleed properly, you can ensure that your printed materials go right up to the page’s edges. It is important to account for the bleed so that your pages don’t end up with a white border once you cut them out of the book.
- Margin. Put no text or images here unless you wish them to continue around the book’s inside cover.
- Spine. The book’s pages are gathered and bound at the edge that the reader will see. If you want to add text to the spine of your book, the publisher requires that it be at least 79 pages long.
- Spine-Safe zone, number six. To prevent the text and artwork from the spine from migrating to the front or back cover during printing, maintain them here.
- Spinal edge. The spine is a weak spot in a book; therefore, it’s not a suitable place for important information or artwork that may be shifted to the front or back cover during printing.
- Barcode Margin: The barcode is guaranteed to remain in place during the printing process and to be scanned accurately if it is printed in this area.
Manual Calculation
The spine measurements of your paperback book are necessary before you can begin formatting the kdp cover size for your book. Ensure that you leave an extra 0.125 millimeters on either side for the bleed. The trim size determines the spine size, which is always supplied. Simply enter your measurements into the following formulas to get an estimate of your desired cover size: Notice the section below.
A book’s overall width is calculated as follows: bleed + back cover width + spine width + front cover width + bleed
The cover height is calculated as: Bleed + Trim Height + Bleed
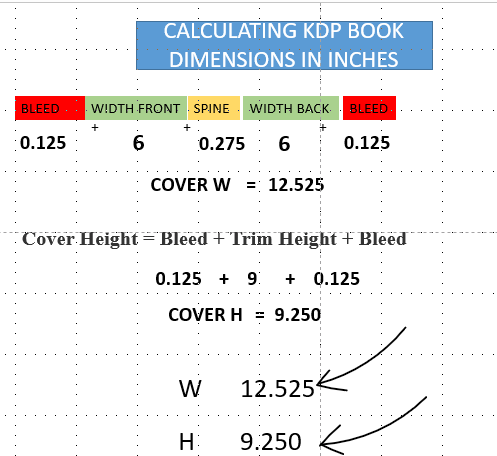
Calculating the Size of a Kdp Cover
Where can I get instructions on how to set up a backdrop for my kdp cover?
- Bleed. There is blood on every single cover. Background colors or images should extend 0.125 inches (3.2 millimeters) on each side beyond the final trim line. To prevent any blank spots on the page after cutting, the background should extend 0.125′′ (3.2 mm) beyond the book’s top, bottom, and outer borders. Your book will be cut without a blank edge when you do this.
- Unintelligible prose. Consider how effectively the writing stands out from the background. It might be challenging to read the text if the foreground and background colors are the same.
- Borders. Given that variations as little as 0.125 inches (3.2 millimeters) during production might cause the border to be mutilated or the surface to seem lopsided, we do not recommend utilizing borders. If there are borders in your file, they need to be at least 0.25 inches (6.4 mm) long after you’ve made your final cut. Have a white margin? If it isn’t at least as broad as ours, we may have to reject your submission.
Remember that Amazon controls a staggering 85% of the worldwide eBook market and 65% of the print book market. The explanation is quite clear: Amazon serves millions of consumers who make purchases daily. If your store is set up correctly, you will almost surely make some money from this avenue. Use Amazon’s free KDP platform, and Amazon will give you a part of the revenues from the sales of books you upload to their site. Make your books available to the public by using the free Amazon Kindle publishing service. You should not make any effort to publicize or disseminate copies of the book. Amazon will gladly take care of this for you.
DISCOVER OUR FREE BEST SELLING PRODUCTS
Editable Canva Lined Journal: Express Your Thoughts – KDP Template
Lined Pages Journal 120 pages Ready to Upload PDF Commercial Use KDP Template 6×9 8.5×11 5×8 for Notebooks, Diaries, Low Content
Lined Pages Journal 120 pages Ready to Upload PDF Commercial Use KDP Template 6×9 8.5×11 5×8 for Notebooks, Diaries, Low Content
Cute Dogs Coloring Book for Kids | Activity Book | KDP Ready-To-Upload
Daily Planner Diary : Diary Planners for Everyday Productivity, 120 pages, 6×9 Size | Amazon KDP Interior
Wolf Coloring KDP interior For Adults, Used as Low Content Book, PDF Template Ready To Upload COMMERCIAL Use 8.5×11"
Coloring Animals Head Book for Kids, Perfect for ages 2-4, 4-8 | 8.5×11 PDF
Printable Blank Comic Book Pages PDF : Create Your Own Comics – 3 Available Sizes
Notes KDP interior Ready To Upload, Sizes 8.5×11 6×9 5×8 inch PDF FILE Used as Amazon KDP Paperback Low Content Book, journal, Notebook, Planner, COMMERCIAL Use
Black Lined Journal: 120 Pages of Black Lined Paper Perfect for Journaling, KDP Notebook Template – 6×9
Student Planner Journal 120 pages Ready to Upload PDF Commercial Use KDP Template 6×9" 8.5×11" for Low Content book
Recipe Journal Template – Editable Recipe Book Template, 120 Pages – Amazon KDP Interior