Okay so I just spent like three hours yesterday messing with InDesign templates for KDP and honestly the whole process is way simpler than people make it out to be but there’s some weird gotchas that’ll mess you up if you don’t know them.
Setting Up Your Document The Right Way
First thing – you gotta start with the correct trim size. Most people just open InDesign and pick random dimensions which is gonna cause problems when you upload. KDP has specific trim sizes they accept and if you’re even like 0.01 inches off, their system will reject it or worse, it’ll accept it but your book will look weird with uneven margins.
The most common sizes I use are 6×9 for nonfiction and 5×8 for fiction. But here’s what nobody tells you – when you create a new document in InDesign you need to set it up as facing pages if you want to see your spreads, but you actually export as single pages for KDP. I know that sounds backwards but trust me on this.
Go to File > New > Document and set your width and height to your trim size. Then – and this is important – set your bleed to 0.125 inches on all sides. KDP requires bleed if your book has images or colors that go to the edge of the page. Even if you think you don’t need it, just add it anyway because I’ve had books where I thought I didn’t need bleed and then ended up with these thin white lines on the edges.
Margins Are Gonna Drive You Crazy
The margin thing is where most people screw up. You need different margins for the inside (gutter) versus the outside edges. For a 6×9 book I usually do 0.75 inches on the outside, 0.875 inches on the inside (that’s the gutter where the binding happens), and 0.75 inches top and bottom.
But wait – if you’re doing hardcover, you need MORE gutter space. Like 0.95 to 1 inch because hardcovers have a deeper binding. I learned this the hard way when I did my first hardcover planner and the text was disappearing into the spine. My cat literally knocked over my coffee while I was fixing that mess and I had to redo like 40 pages.
Master Pages Are Your Best Friend
Okay so here’s where InDesign actually becomes useful instead of just being complicated. Master pages let you set up headers, footers, and page numbers once and they automatically apply to every page.
Go to your Pages panel and double-click on A-Master. This is your template within the template. Set up your page numbers by going to Type > Insert Special Character > Markers > Current Page Number. It’ll show up as a letter but when you apply it to regular pages it becomes actual numbers.
One thing I always do is create multiple master pages – one for chapter starts (usually no header or page number), one for regular pages, and one for front matter that might have different formatting. You can create a new master page by right-clicking in the Pages panel and selecting “New Master.”
Oh and another thing – make sure your page numbers are on the outside edges. That means right side for right-hand pages, left side for left-hand pages. I see so many published books where someone put all the page numbers on the right and it just looks unprofessional.
Paragraph and Character Styles Will Save Your Life
This is gonna sound tedious but setting up styles before you start is crucial. I used to just format as I went and then when I needed to change something I’d have to manually update like 200 pages. Never again.
Create paragraph styles for your body text, chapter titles, subheadings, quotes, lists – everything. Go to Type > Paragraph Styles and click the little icon to create new styles.
For body text in a typical nonfiction book I use:
- Font: Garamond or Minion Pro at 11pt
- Leading (line spacing): 14-15pt
- Alignment: Left aligned with hyphenation turned off
- First line indent: 0.2 inches for paragraphs after the first one
The hyphenation thing is personal preference but I hate when words break across lines in print books. Looks choppy to me.
Typography Stuff That Actually Matters
Use a serif font for body text. Sans serif is fine for headers but please don’t make me read 200 pages of Arial. Your readers’ eyes will hate you.
Turn on optical kerning. Go to Character panel and where it says “Metrics” change it to “Optical.” This adjusts spacing between letters automatically and makes everything look more professional.
Use proper quotation marks not straight quotes. InDesign usually does this automatically but check your preferences under Type > Use Typographer’s Quotes.
The Actual Template Files You Need
Okay so when I say template I mean you should save different versions for different book types. I have templates saved for:
- Fiction 5×8 standard
- Nonfiction 6×9 with one column
- Workbooks 8.5×11 with guides for writing spaces
- Planners 6×9 with weekly layouts
- Journals 5×8 with lines or dots
Each template has the margins set, master pages created, paragraph styles loaded, and the bleed configured. When I start a new project I just open the appropriate template and save it with a new name.
To save a template go to File > Save As and choose InDesign Template (.indt) as the file type. This prevents you from accidentally overwriting your template when you’re working on actual projects.
Working With Images For KDP
If your book has images this gets more complicated. All images need to be 300 DPI minimum for print. I usually work with 400 DPI just to be safe because KDP’s printing can sometimes make things look slightly less crisp than on your screen.
When you place an image (File > Place) make sure you embed it or link it properly. I prefer embedding for KDP books because then everything is contained in one file and I don’t have to worry about missing links when I move files around.
If you have full-page images that bleed off the edge, extend them into the bleed area by at least 0.125 inches on all sides. I made this mistake on a coloring book once and some pages had white slivers on the edges after printing.
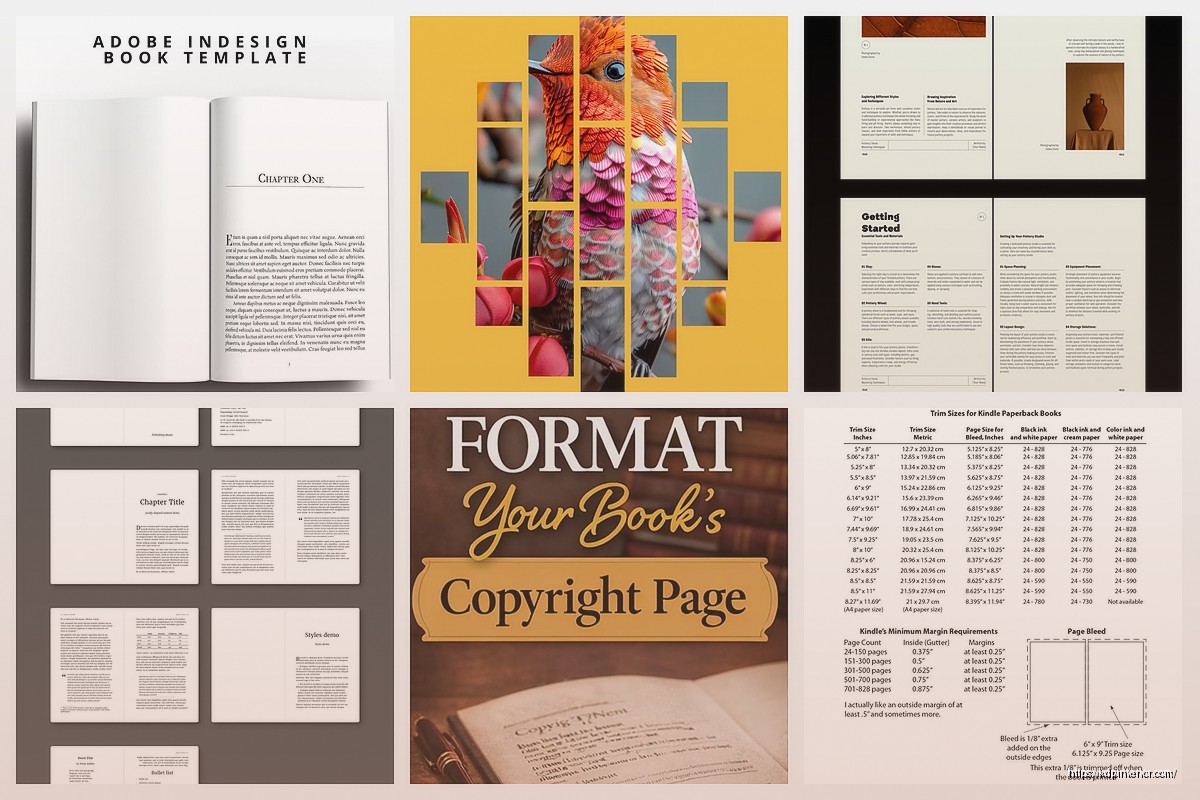
Exporting For KDP Upload
This is where people mess up constantly. You can’t just export any old PDF. KDP needs a very specific type of PDF.
Go to File > Export and choose Adobe PDF (Print). Then click the dropdown where it says “Adobe PDF Preset” and pick “PDF/X-1a:2001” or “PDF/X-4:2010” – either works but I usually use X-1a because it’s more universally compatible.
Make sure these settings are correct:
- Pages: All
- Spreads: UNCHECKED (this is critical)
- Compatibility: Acrobat 4 or higher
- Include bleed marks: No
- Bleed: 0.125 inches on all sides
Under Compression make sure images are at least 300 PPI. Under Marks and Bleeds check “Use Document Bleed Settings.”
Wait I forgot to mention – before you export, turn on “Overprint Preview” under View. This shows you what your book will actually look like when printed. Sometimes colors look different in overprint mode and it’s better to catch that before uploading.
Common Problems I’ve Run Into
Wrong page count – KDP requires books to have at least 24 pages for paperback and the total page count must be divisible by 2. Actually that’s not quite right… they need to be in signatures which are usually groups of 4 or 8 pages depending on the printer. I just always make sure my final count is even.
Fonts not embedding – if you use a font that’s not licensed for commercial use or that doesn’t embed properly, KDP will reject your file. Stick with Adobe fonts or fonts you have commercial licenses for. Google Fonts are free and work great.
Colors looking weird – RGB vs CMYK is a whole thing. For print you want CMYK color mode but honestly I’ve uploaded books in RGB and KDP converts them automatically. Sometimes the colors shift a bit though so if color accuracy matters, work in CMYK from the start.
Testing Your File Before Upload
Always always always download the preview from KDP after you upload. I’ve caught so many issues in the preview that I didn’t see in InDesign. Things like:
- Text too close to the gutter
- Images slightly off-center
- Page numbers in wrong positions
- Blank pages where they shouldn’t be
Order a proof copy if it’s your first time with a particular format. The digital preview is good but seeing the actual printed book is different. I’ve had books where the preview looked fine but the printed version had issues with darkness or the paper texture affected readability.
Batch Processing Multiple Books
Once you have your templates dialed in you can work so much faster. I’ve got my workflow down to where I can format a 100-page book in like 2-3 hours now. Used to take me full days when I was starting out.
The key is having those paragraph styles set up and using Find/Change to quickly format text if you’re bringing it in from Word. You can find all instances of chapter titles (usually they’re in a specific style in Word) and apply your InDesign chapter style in one click.
Scripts can help too – there are free InDesign scripts that’ll automatically create table of contents, clean up extra spaces, fix quotation marks, all kinds of stuff. I use a script called “GrepStyles” that applies formatting based on patterns which is super helpful for workbooks where I have repeated elements.
Keeping Everything Organized
I keep a folder structure that looks like this:
Project Name/
– InDesign Files/
– Images/
– Fonts/
– Export/
This way all my assets are together and if I need to make updates later I can find everything. Trust me you’ll thank yourself six months from now when you need to fix a typo and you can’t remember where anything is.
Also version your files. I save like BookTitle_v1, BookTitle_v2, etc. Disk space is cheap and I’ve definitely needed to go back to an earlier version when I screwed something up.
My dog just started barking at literally nothing which is perfect timing because I think I’ve covered the main stuff you need to know about InDesign templates for KDP. The learning curve is real but once you’ve got a solid template setup you can pump out professional-looking books pretty quickly and that’s when KDP actually becomes profitable instead of just being a frustrating time sink.
 Wolf Coloring KDP interior For Adults, Used as Low Content Book, PDF Template Ready To Upload COMMERCIAL Use 8.5x11"
1 × $0.00
Wolf Coloring KDP interior For Adults, Used as Low Content Book, PDF Template Ready To Upload COMMERCIAL Use 8.5x11"
1 × $0.00  Student Planner Journal 120 pages Ready to Upload PDF Commercial Use KDP Template 6x9" 8.5x11" for Low Content book
1 × $0.00
Student Planner Journal 120 pages Ready to Upload PDF Commercial Use KDP Template 6x9" 8.5x11" for Low Content book
1 × $0.00 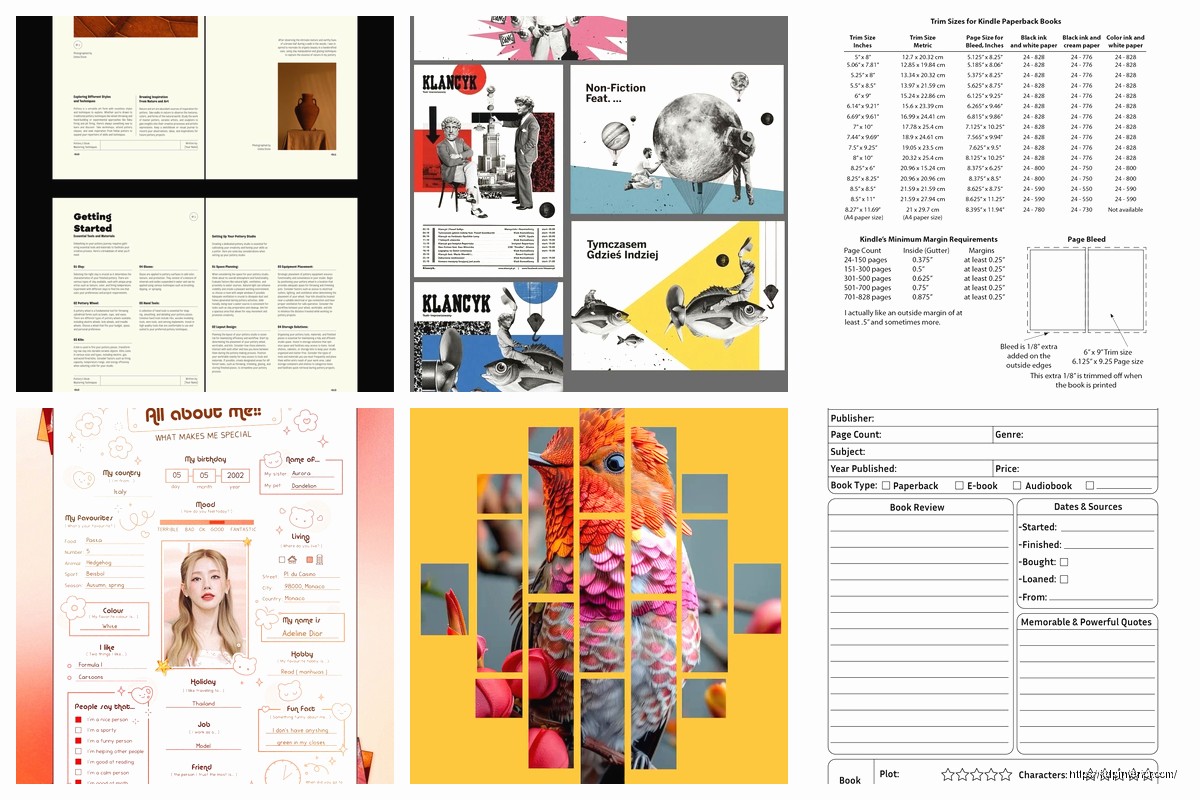
DISCOVER OUR FREE BEST SELLING PRODUCTS
Editable Canva Lined Journal: Express Your Thoughts – KDP Template
Lined Pages Journal 120 pages Ready to Upload PDF Commercial Use KDP Template 6×9 8.5×11 5×8 for Notebooks, Diaries, Low Content
Lined Pages Journal 120 pages Ready to Upload PDF Commercial Use KDP Template 6×9 8.5×11 5×8 for Notebooks, Diaries, Low Content
Cute Dogs Coloring Book for Kids | Activity Book | KDP Ready-To-Upload
Daily Planner Diary : Diary Planners for Everyday Productivity, 120 pages, 6×9 Size | Amazon KDP Interior
Wolf Coloring KDP interior For Adults, Used as Low Content Book, PDF Template Ready To Upload COMMERCIAL Use 8.5×11"
Coloring Animals Head Book for Kids, Perfect for ages 2-4, 4-8 | 8.5×11 PDF
Printable Blank Comic Book Pages PDF : Create Your Own Comics – 3 Available Sizes
Notes KDP interior Ready To Upload, Sizes 8.5×11 6×9 5×8 inch PDF FILE Used as Amazon KDP Paperback Low Content Book, journal, Notebook, Planner, COMMERCIAL Use
Black Lined Journal: 120 Pages of Black Lined Paper Perfect for Journaling, KDP Notebook Template – 6×9
Student Planner Journal 120 pages Ready to Upload PDF Commercial Use KDP Template 6×9" 8.5×11" for Low Content book
Recipe Journal Template – Editable Recipe Book Template, 120 Pages – Amazon KDP Interior