-
×
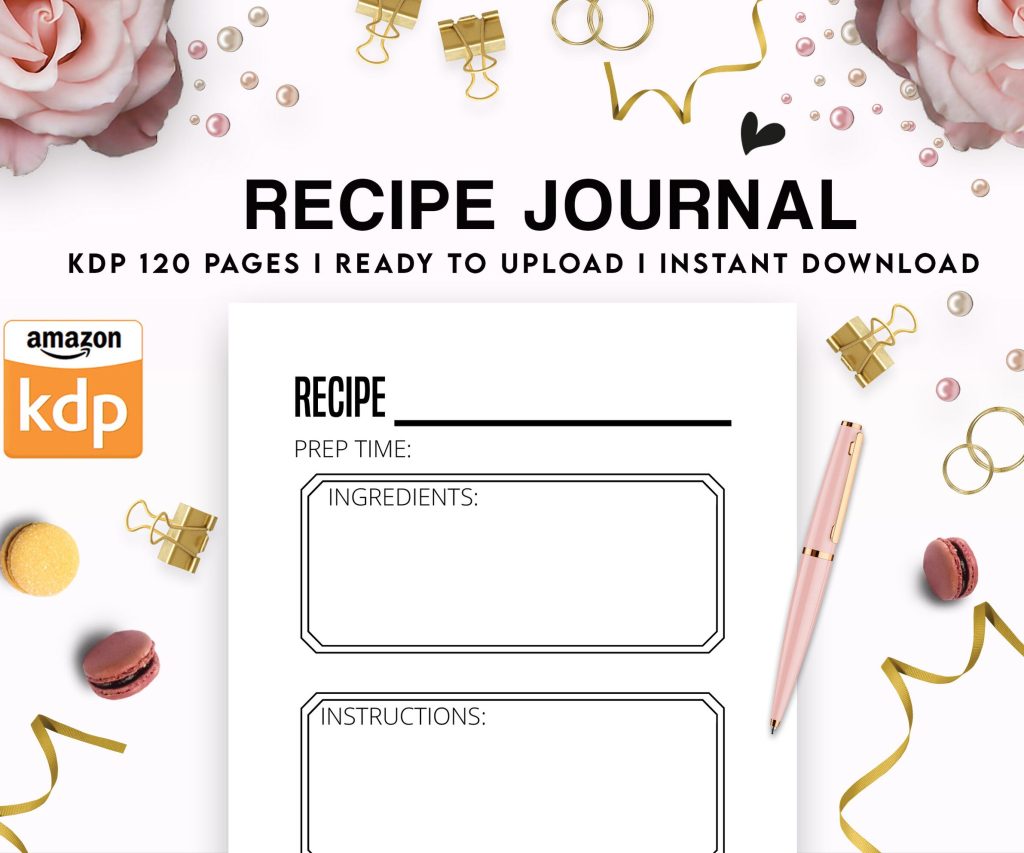 Recipe Journal Template - Editable Recipe Book Template, 120 Pages - Amazon KDP Interior
1 × $0.00
Recipe Journal Template - Editable Recipe Book Template, 120 Pages - Amazon KDP Interior
1 × $0.00
Subtotal: $0.00
Recipe Journal Template - Editable Recipe Book Template, 120 Pages - Amazon KDP Interior
1 × $0.00 Subtotal: $0.00
Alright look, I just walked through this whole process with a client last week and I’m gonna tell you exactly what works because there’s so much garbage advice out there that’ll waste your time.
First thing – formatting. This is where everyone screws up and then wonders why their book looks like trash on someone’s Kindle. You gotta understand that Amazon‘s system converts everything to their own format anyway, so you’re not trying to make it perfect, you’re trying to make it convertible.
I use Microsoft Word for 90% of my books because it just… works. Google Docs can work too but honestly the conversion gets wonky sometimes. Open a fresh document and I mean FRESH – don’t copy paste from some random PDF or website because you’ll bring over hidden formatting that’ll haunt you later.
Here’s what I do:
Oh and another thing – use styles properly. Like actually use the Heading 1, Heading 2 styles in Word instead of just making text bigger and bold. This is how Amazon generates your table of contents automatically and trust me you want that working right.
So your book needs front matter and back matter. Front matter is everything before chapter 1 – title page, copyright page, maybe a dedication or table of contents. Back matter is your author bio, maybe a “thanks for reading” page, links to your other books.
For the title page just center your title and author name. That’s it. Don’t get fancy with images or weird fonts because it won’t translate well.
Copyright page – this is gonna sound weird but I literally have a template I copy for every book. It’s got the copyright symbol, year, my name, “All rights reserved,” and then the standard disclaimer about this being a work of fiction if it’s fiction or whatever applies. Takes 30 seconds.
Table of contents – if you used heading styles properly, you can auto-generate this in Word. Go to References > Table of Contents. Amazon‘s conversion will pick this up and make it clickable which is what you want.
Don’t just hit Enter a bunch of times to start a new chapter. Use actual page breaks – Insert > Page Break or just hit Ctrl+Enter. This tells the Kindle “hey start fresh here” instead of creating a bunch of empty paragraphs that look different on every device.
My cat just jumped on my keyboard sorry – anyway, each chapter should start with your chapter heading using Heading 1 style. You can add a little space after it if you want but again, keep it simple.
For low-content books or books with images, make sure they’re at least 300 DPI and saved as JPG. Don’t use PNG unless you absolutely need transparency. Keep file sizes reasonable – if your whole document is like 50MB Amazon’s gonna take forever to process it.
Center your images and don’t wrap text around them. Just don’t. It breaks on different screen sizes and you’ll get reviews complaining about it.
Okay so funny story – I used to mess around with Calibre and all these conversion tools but honestly just upload your Word doc directly to KDP. Amazon’s conversion tool has gotten really good and it handles .doc or .docx files perfectly fine like 95% of the time.
The only time I use anything else is for more complex books with lots of images or special formatting, and then I’ll use Kindle Create which is Amazon’s free tool. It’s actually not bad – gives you more control and lets you preview exactly how it’ll look.
Download it from Amazon’s KDP site. Open your Word doc in it. It’ll import and try to detect your chapters automatically. Check that it got them right because sometimes it picks up random headings as chapters.
You can adjust chapter formatting, add drop caps if you’re into that, and preview on different devices. The preview feature is actually super useful – you can see phone, tablet, e-reader views all in one place.
When you’re done, export as KPF file and that’s what you’ll upload to KDP.
Log into kdp.amazon.com and hit “Create New Title” – you’ll choose between eBook and paperback but we’re focusing on eBook here.
Book title – obvious but make sure it matches what’s on your actual title page. Subtitle if you have one goes in the subtitle field, not in the main title field even though you see people trying to game the system that way.
Series info – if this is book 1 of something, add the series. It helps with discovery when people finish and want more.
Author name – gotta be consistent across all your books. Amazon links them automatically if you use the same name.
Description – this is your sales copy. Use HTML formatting to make it look good. I always include:
wait I forgot to mention – you can use basic HTML in the description. Bold tags, italics, line breaks, bullet points. Makes it way more readable than just a wall of text.
You get to pick two categories when uploading but you can contact KDP support after publishing and get up to 10 total. I always do this because more categories = more ways to hit bestseller lists.
Keywords – you get 7 keyword boxes. Don’t waste them on single words. Use phrases people actually search for. Like instead of “mystery” use “small town murder mystery” or “cozy mystery with cats” or whatever fits your book.
I spent like three hours last month comparing keyword tools and honestly Publisher Rocket is worth the money if you’re serious about this, but you can also just type stuff into Amazon’s search bar and see what autocompletes.
You’ve got two royalty options – 35% or 70%. The 70% option requires:
For most books I go with 70% royalty and price at $2.99-$4.99. Sweet spot seems to be $3.99 for fiction, $4.99 for non-fiction.
You can also enroll in KDP Select which makes your book exclusive to Amazon for 90 days but you get bonuses like Kindle Unlimited borrows (you get paid per page read) and the ability to run free promos and Countdown Deals.
Manuscript file – upload your .doc, .docx, or .kpf file. Amazon will convert it and then show you a preview. Actually LOOK at the preview. Click through every chapter. I’ve caught so many formatting issues here.
Cover – needs to be at least 1000 pixels on the shortest side but I always do 1600×2560 or similar ratio. JPG format. Under 50MB. If your cover doesn’t look professional, nothing else matters because nobody’s gonna click on it.
For eBooks you don’t need an ISBN. Amazon assigns a free ASIN. For paperbacks you need one but Amazon gives you a free one or you can buy your own. I just use Amazon’s free ones for KDP books – only time I buy my own is if I’m doing wide distribution.
Okay so if you’re not doing KDP Select (which requires exclusivity), you can distribute to other platforms too. Main ones are:
You can upload directly to each or use Draft2Digital or PublishDrive as aggregators. I use Draft2Digital for my non-exclusive books because their interface is way better than dealing with each platform separately and they don’t take much of a cut.
this is gonna sound weird but I actually make more per sale on Apple Books than Amazon sometimes because Apple pays 70% on books priced as low as $0.99 and there’s no delivery fees. But Amazon has way more volume so.
My general rule – if you’re just starting out, go exclusive with Amazon (KDP Select) for your first 90 days. Get some page reads, run a free promo to get reviews, see how it performs. After 90 days you can decide whether to renew or go wide.
If you’ve got a series, sometimes I’ll keep book 1 in Select because you can do promos and funnel people to books 2-3 which might be wide. Test different things.
Takes about 24-48 hours for your book to show up on Amazon. Sometimes faster, I’ve had books go live in like 6 hours.
First thing – check your book page. Make sure everything looks right. Buy a copy yourself and check the actual reading experience.
Then you gotta think about launch strategy but that’s a whole other conversation. Just know that publishing is the easy part – marketing is where the real work starts.
Oh and keep your manuscript file backed up somewhere. I use Dropbox and Google Drive. Lost a manuscript once in a hard drive crash and had to retype sections from the Kindle file which was absolutely miserable.
DISCOVER OUR FREE BEST SELLING PRODUCTS
Editable Canva Lined Journal: Express Your Thoughts – KDP Template
Lined Pages Journal 120 pages Ready to Upload PDF Commercial Use KDP Template 6×9 8.5×11 5×8 for Notebooks, Diaries, Low Content
Lined Pages Journal 120 pages Ready to Upload PDF Commercial Use KDP Template 6×9 8.5×11 5×8 for Notebooks, Diaries, Low Content
Cute Dogs Coloring Book for Kids | Activity Book | KDP Ready-To-Upload
Daily Planner Diary : Diary Planners for Everyday Productivity, 120 pages, 6×9 Size | Amazon KDP Interior
Wolf Coloring KDP interior For Adults, Used as Low Content Book, PDF Template Ready To Upload COMMERCIAL Use 8.5×11"
Coloring Animals Head Book for Kids, Perfect for ages 2-4, 4-8 | 8.5×11 PDF
Printable Blank Comic Book Pages PDF : Create Your Own Comics – 3 Available Sizes
Notes KDP interior Ready To Upload, Sizes 8.5×11 6×9 5×8 inch PDF FILE Used as Amazon KDP Paperback Low Content Book, journal, Notebook, Planner, COMMERCIAL Use
Black Lined Journal: 120 Pages of Black Lined Paper Perfect for Journaling, KDP Notebook Template – 6×9
Student Planner Journal 120 pages Ready to Upload PDF Commercial Use KDP Template 6×9" 8.5×11" for Low Content book
Recipe Journal Template – Editable Recipe Book Template, 120 Pages – Amazon KDP Interior