-
×
 Student Planner Journal 120 pages Ready to Upload PDF Commercial Use KDP Template 6x9" 8.5x11" for Low Content book
1 × $0.00
Student Planner Journal 120 pages Ready to Upload PDF Commercial Use KDP Template 6x9" 8.5x11" for Low Content book
1 × $0.00
Subtotal: $0.00

Okay so I just wrapped up helping a client outline their third novel last week and they were totally stuck on structure, which got me thinking I should probably dump everything I know about this because honestly most people overcomplicate it.
Look, I’m gonna start with Save The Cat because even though it’s technically a screenwriting method, literally half the successful indie authors I know swear by it. Blake Snyder made this for movies but it works stupidly well for novels too.
Here’s what you’re working with – fifteen beats that basically map out your entire story. The opening image, theme stated, catalyst, debate, break into two… and honestly I used to print out the beat sheet and just fill in what happens at each point. Takes like an hour if you already have a vague idea of your story.
The thing that made this click for me was understanding that the “midpoint” beat isn’t just the middle of your book. It’s where false victory or false defeat happens. Like your character thinks they’ve won but they haven’t, or they think everything’s lost but there’s still hope. I was watching Severance the other night and you can literally see these beats play out in each episode.
The percentages matter too. Your catalyst should hit around 10% into the story, break into two at 25%, midpoint at 50%, all is lost at 75%. When I’m outlining, I actually calculate the chapter numbers based on these percentages. So if I’m writing an 80,000 word novel with 2,000 word chapters, that’s 40 chapters, which means catalyst hits around chapter 4, break into two around chapter 10, you get it.
I open a Google doc. I list all fifteen beats down the left side. Then I just start brainstorming what could happen at each beat. Don’t overthink it. Your first ideas are gonna be generic and that’s fine – you can make them specific later.
Oh and another thing – the “fun and games” section (that’s around 25-50% of your book) is literally just your character doing the thing your book promised. If it’s a romance, they’re falling in love. If it’s a thriller, they’re chasing or being chased. This is the part you probably daydreamed about when you first got the story idea.
So three act structure is the grandfather of all this stuff, right? Beginning, middle, end. But here’s what nobody tells you – the middle is actually three parts, not one. This is why so many people’s middles sag like crazy.
Act 1 is your setup. You’re introducing your character, their world, what they want, what’s stopping them. This should be about 25% of your book, maybe less. I usually aim for 20% because readers want to get to the good stuff.
Act 2A is response. Your character is reacting to everything that happened at the end of Act 1. They’re defensive, they’re figuring things out, they’re probably failing a lot. This goes from about 25% to 50%.
Act 2B is attack. Now your character has a plan and they’re going on offense. They’re making moves. This is 50% to 75% roughly.
Then Act 3 is resolution, the final 25%. Climax, falling action, denouement, all that.
Wait I forgot to mention – the reason this structure works is because it matches how humans naturally process stories. We need setup to care, we need to see someone struggle and adapt, then we need to see them take action, then we need closure. It’s literally how our brains are wired.
I use Scrivener for this but you could use anything. I create four main folders – Act 1, Act 2A, Act 2B, Act 3. Under each folder, I create scene cards for every scene I think I’ll need. Each card gets a one-sentence description.
The trick is knowing what needs to happen at the act breaks. End of Act 1, something big happens that forces your character into the story – they can’t go back to their normal life. End of Act 2A (the midpoint), something shifts and your character changes strategy. End of Act 2B, everything falls apart – this is your “all is lost” moment. Then Act 3 is them putting it all back together.
Okay so Joseph Campbell’s Hero’s Journey has like twelve stages and it’s very mythic and grand but honestly it’s kinda overkill unless you’re writing epic fantasy or something with a chosen one vibe.
The stages are: ordinary world, call to adventure, refusal of the call, meeting the mentor, crossing the threshold, tests allies enemies, approach to the inmost cave, ordeal, reward, the road back, resurrection, return with the elixir.
I used this for a fantasy series I ghostwrote back in 2019 and it worked great because the story was literally about a farm boy becoming a warrior. But when I tried to use it for a contemporary romance? Total disaster. It just didn’t fit.
The Hero’s Journey works best when your story is about transformation and adventure. If your character is literally going on a journey – physical or metaphorical – this structure will support that perfectly.
You don’t need all twelve stages. Here’s what I actually use: ordinary world (setup), call to adventure (inciting incident), crossing threshold (point of no return), tests (midpoint complications), ordeal (all is lost), resurrection (final battle), return (new normal).
That’s seven stages instead of twelve and it covers everything important. I map these onto chapters just like I do with Save The Cat percentages.
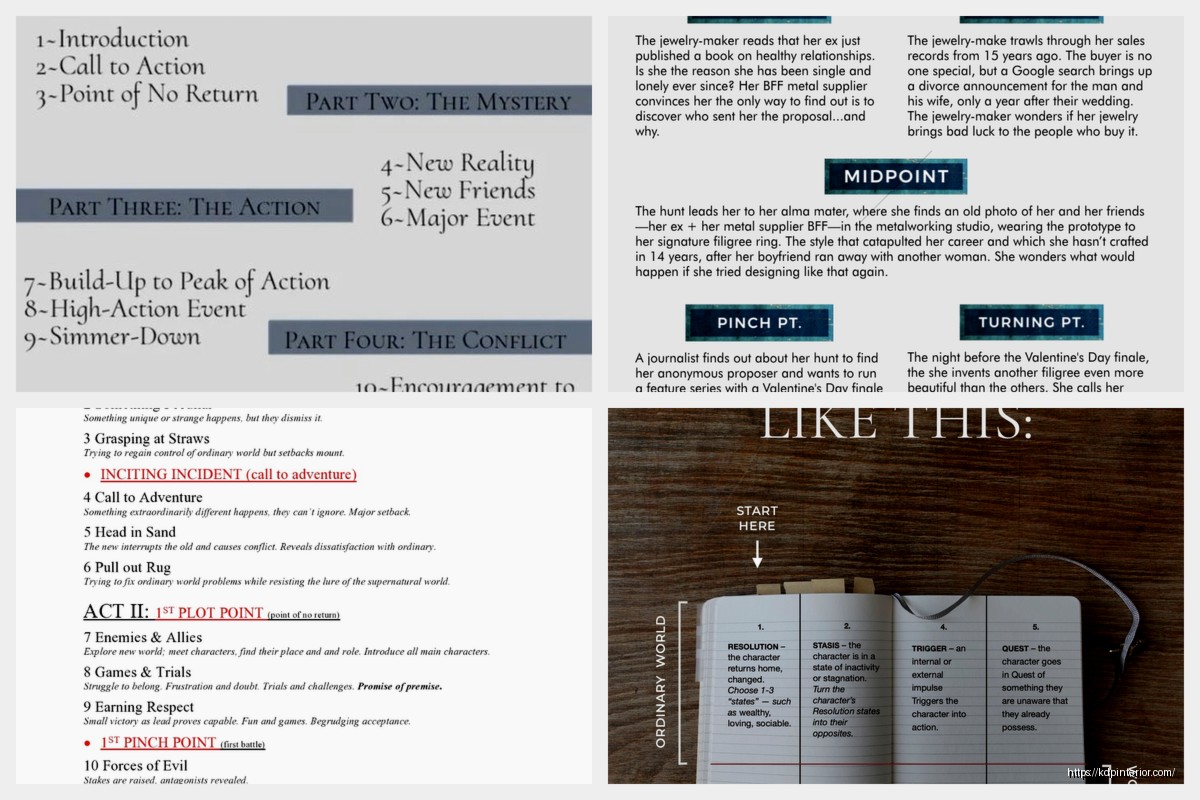
This one’s from Dan Wells and it’s stupidly simple. Hook, plot turn 1, pinch 1, midpoint, pinch 2, plot turn 2, resolution. That’s it.
Here’s what makes this different – you start by figuring out your resolution first. Like what’s the final state of your character and their world? Then you figure out the hook, which should be the opposite of the resolution. If they end up confident and in love, they start insecure and alone.
Then the midpoint is where they shift from reactive to proactive. Everything before the midpoint, they’re reacting to what’s happening. After the midpoint, they’re making things happen.
The pinches are moments where the antagonistic force (doesn’t have to be a person, could be nature or society or whatever) shows its full power. Pinch 1 reminds us what’s at stake. Pinch 2 makes everything seem impossible.
Plot turn 1 is where they commit to the story. Plot turn 2 is where they gain the final piece they need to win – usually some kind of information or internal realization.
My client last week actually used this method because they only had a weekend to outline before they wanted to start drafting. We knocked it out in like three hours over Zoom. The book’s probably gonna be fine.
It forces you to think about character arc alongside plot. That thing where you start with resolution and hook being opposites? That’s character arc built right into the structure. You can’t ignore it.
Also it’s flexible enough that you can layer it with other methods. I sometimes do Seven Point Structure to get the big picture, then use Save The Cat beats to fill in the details.
This is gonna sound weird but I discovered this method by accident when I was analyzing why some of my thriller clients’ books were doing better than others on Amazon. The ones with constant rising tension sold better, shocking nobody.
Fichtean Curve is all about starting with action – you throw your character into a crisis immediately. No slow setup. Then you just pile on more crises, each one bigger than the last, until you hit the climax. After the climax you resolve quickly.
Think of it like this: crisis, crisis, crisis, brief calm, crisis, crisis, bigger crisis, brief calm, crisis, crisis, crisis, CLIMAX, resolution. Each crisis should be harder than the last and should prevent your character from going back to normal.
I used this structure for a thriller I published in 2020 about a woman whose identity gets stolen and it just keeps getting worse for her every chapter. Started with her credit card declining at a restaurant, ended with her framed for murder. Every scene made things worse.
List out every crisis you can think of related to your premise. Like brainstorm twenty problems your character could face. Then organize them from smallest to biggest impact. Cut the boring ones. Arrange the rest in escalating order.
Between every three or four crises, give your character a moment to breathe and regroup. This is where relationship development happens, where they process what’s happening, where readers catch their breath too.
The thing about Fichtean Curve is it’s exhausting to read if you don’t pace it right. Those calm moments aren’t optional, they’re structural necessities. I learned this the hard way when beta readers told me my first thriller attempt was “too much.”
Okay so this isn’t exactly a full structure method but it’s something I use with almost every outline now. Start your story as late as possible. Like way later than you think you should.
Instead of opening with your character’s normal life, open with them already in trouble. Open the romance with them already attracted to each other but fighting it. Open the mystery with the detective already at the crime scene. Then fill in backstory through dialogue and flashbacks as needed.
My dog just knocked over my coffee which is perfect because it’s this kind of interruption that reminds me – stories need interruptions too. Don’t frontload all your worldbuilding and backstory. Interrupt the forward momentum with backstory only when readers are asking questions.
When I outline using in media res, I literally write “START HERE” at what would normally be chapter 3 or 4 of my outline. Everything before that becomes either flashbacks or exposition woven into later scenes.
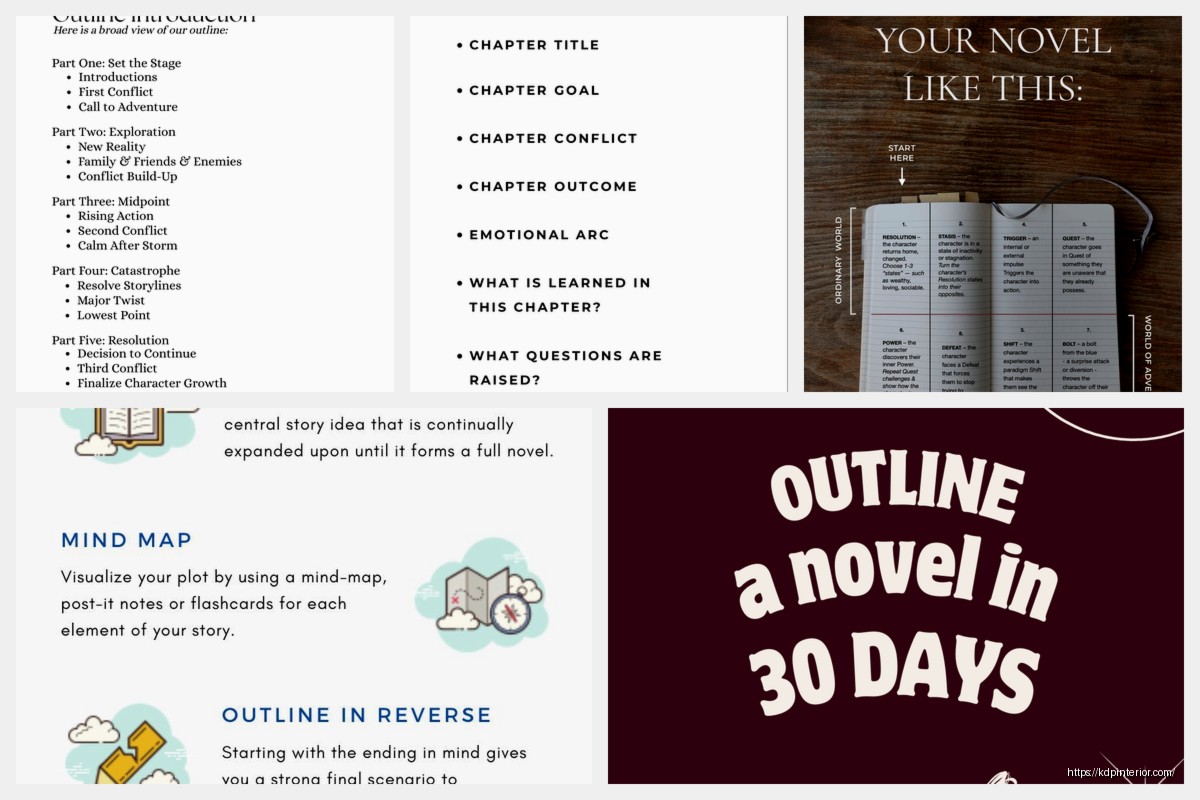
Randy Ingermanson created this and it’s very systematic. You start with a one-sentence summary of your novel. Then you expand that to a paragraph with five sentences – one for the setup, one each for three disasters, and one for the ending.
Then you write a page about each major character. Then you expand each sentence of that paragraph into its own paragraph, giving you five paragraphs (about a page). Then you write more detailed character sheets. Then you expand each paragraph to multiple pages.
You keep expanding and expanding until you have a detailed outline and basically know everything about your story before you write a single actual sentence of the book.
This is gonna sound weird but I hate this method for myself but recommend it to certain clients. Some people need this level of detail to feel comfortable drafting. I had a client who was a former engineer and she loved this method because it felt logical and systematic.
For me though? I’d never finish outlining. I’d get bored and want to just start writing. But if you’re someone who panics when you don’t know what comes next, Snowflake might be your thing.
Complex plots with multiple POVs. Mystery novels where you need to track clues and red herrings. Series where you need to set up stuff that pays off three books later. Basically anything where you can’t afford to plot yourself into a corner.
I used a modified version of this for a six-book series I wrote. I didn’t do the full Snowflake process but I did the sentence-to-paragraph-to-page expansion for the overall series arc. Saved me from massive continuity errors.
Dwight Swain wrote about this decades ago and it’s still the best way to structure individual scenes. Every scene should have goal, conflict, disaster. Every sequel should have reaction, dilemma, decision.
Scene = action. Your character wants something specific in this scene, they encounter conflict trying to get it, and things end badly (or unexpectedly).
Sequel = processing. Your character reacts emotionally to what just happened, realizes they’re facing a dilemma with no good options, then makes a decision that leads to a new goal for the next scene.
So it goes: Scene (goal-conflict-disaster), Sequel (reaction-dilemma-decision), Scene (new goal-conflict-disaster), Sequel (reaction-dilemma-decision), etc.
Not every single chapter needs to follow this exactly but when I’m outlining individual chapters, I literally write “Goal: Character wants X. Conflict: Y is stopping them. Disaster: Z happens instead.” Then for the sequel: “Reaction: Character feels X. Dilemma: Should they do Y or Z? Decision: They choose to do Y.”
This keeps every scene purposeful. You can’t write a meandering chapter where nothing happens if you’re forcing yourself to identify the goal, conflict, and disaster.
Here’s the thing nobody tells you – you can combine these methods. I usually use Save The Cat for the overall story structure, then Seven Point for the character arc specifically, then Scene and Sequel for individual chapters.
Like I’ll map out my fifteen Save The Cat beats. Then I’ll check to make sure my character’s arc hits all seven points of the Seven Point Structure. Then when I’m actually outlining chapters, I use Scene and Sequel pattern.
Last month I helped a romance author who was using the Romance Beat Sheet (which is its own thing, basically Save The Cat but for romance) combined with the Fichtean Curve’s escalating crises. Each romance beat had an accompanying crisis that made the relationship harder. Worked great.
The structure exists to serve your story, not the other way around. If a method isn’t working, try a different one. If you need to break the rules of a structure to make your story work, break them.
After seven years and 200+ books, here’s what I actually do. I start with a premise and a vague idea of the ending. Then I use the Seven Point Structure to figure out my seven major story points. Takes maybe thirty minutes.
Then I expand those seven points using Save The Cat beats. So like my midpoint from Seven Point becomes the “midpoint beat” in Save The Cat, but now I also figure out what happens at “fun and games” and “bad guys close in” around that midpoint. This takes another hour or two.
Then I open Scrivener and create a scene card for every scene I think I’ll need. I aim for scenes that are about 2000-2500 words each, so if I’m writing 80k words, I need about 35-40 scenes. I distribute those scenes across my Save The Cat beats, making sure each beat has appropriate number of scenes based on the percentages.
For each scene card, I write a one-sentence description using Scene structure: “Character wants X, but Y happens, ending in Z disaster.” If it’s a sequel chapter, I note that and write “Character processes X, faces dilemma of Y or Z, decides to Z.”
Then I start writing. And honestly? I still diverge from the outline constantly. But having the outline means I’m diverging with purpose, not just wandering aimlessly.
Outlining too much detail. If you write three pages of outline for every chapter, you’ve basically already written the book and now you’re bored with it. Keep outlines loose enough that you’re still excited to write the actual prose.
Not outlining enough. “I’ll just start writing and see what happens” works for some people but most people end up with a saggy middle and no clear climax. At minimum, know your major turning points before you start.
Following structure too rigidly. The beat sheet says something should happen at 50% but your story feels like it should happen at 45%? Put it at 45%. These are guidelines, not laws of physics.
Forgetting that structure serves character arc. Plot structure alone makes a hollow story. Your character needs to change and grow along with the plot. The external events should force internal change.
Oh and another thing – not testing the concept before outlining. I always write a one-page summary of my book idea and show it to a few people (or post it in a writer group) before I spend hours outlining. If the concept doesn’t hook anyone, the outline won’t fix that.
Scrivener’s cork board view is perfect for moving scenes around. You can see all your scene cards at once and drag them into different orders. I do this constantly while outlining.
Google Sheets for tracking percentages and word counts. I have a template spreadsheet where I input my target word count and it calculates exactly which chapter each beat should hit. I can share this if anyone wants it, just message me.
Physical note cards if you’re a tactile person. My office is full of index cards pinned to cork boards. Sometimes I need to physically move scenes around to figure out the right order.
Plot generators for brainstorming. I don’t use them for actual plotting but when I’m stuck on what crisis should happen next or what disaster could end this scene, I’ll look at random plot generators to shake loose ideas. They’re terrible at creating actual plots but great at suggesting possibilities you haven’t considered.
DISCOVER OUR FREE BEST SELLING PRODUCTS
Editable Canva Lined Journal: Express Your Thoughts – KDP Template
Lined Pages Journal 120 pages Ready to Upload PDF Commercial Use KDP Template 6×9 8.5×11 5×8 for Notebooks, Diaries, Low Content
Lined Pages Journal 120 pages Ready to Upload PDF Commercial Use KDP Template 6×9 8.5×11 5×8 for Notebooks, Diaries, Low Content
Cute Dogs Coloring Book for Kids | Activity Book | KDP Ready-To-Upload
Daily Planner Diary : Diary Planners for Everyday Productivity, 120 pages, 6×9 Size | Amazon KDP Interior
Wolf Coloring KDP interior For Adults, Used as Low Content Book, PDF Template Ready To Upload COMMERCIAL Use 8.5×11"
Coloring Animals Head Book for Kids, Perfect for ages 2-4, 4-8 | 8.5×11 PDF
Printable Blank Comic Book Pages PDF : Create Your Own Comics – 3 Available Sizes
Notes KDP interior Ready To Upload, Sizes 8.5×11 6×9 5×8 inch PDF FILE Used as Amazon KDP Paperback Low Content Book, journal, Notebook, Planner, COMMERCIAL Use
Black Lined Journal: 120 Pages of Black Lined Paper Perfect for Journaling, KDP Notebook Template – 6×9
Student Planner Journal 120 pages Ready to Upload PDF Commercial Use KDP Template 6×9" 8.5×11" for Low Content book
Recipe Journal Template – Editable Recipe Book Template, 120 Pages – Amazon KDP Interior