Okay so I just spent like three weeks testing different online cookbook templates and here’s what actually works if you’re trying to put together a digital recipe book.
First thing – and I wish someone had told me this before I wasted two days – you need to decide if you’re selling this as a PDF download or if it’s gonna be an actual interactive thing people use in their kitchen on their tablet. Because that completely changes which template route you go down.
The PDF Route That Most People Actually Use
If you’re doing PDFs, Canva is honestly your best friend here. I know everyone talks about it but there’s a reason. They’ve got these cookbook templates already built in and you can customize them without wanting to throw your laptop across the room. The free version works fine but the Pro version (like $13/month) gives you way more recipe card layouts and you can resize everything to different formats which is clutch.
What I do is start with their 8.5 x 11 template because most people are either gonna print sections or read it on a tablet and that size just works. You want good margins though – at least 0.5 inches all around. I learned this the hard way when someone printed my first cookbook template and half the ingredient lists got cut off.
Structuring Your Template Pages
Here’s what pages you actually need:
- Cover page obviously
- Table of contents (make it clickable if you can, I’ll get to that)
- Recipe index organized by category or meal type
- The actual recipe pages with consistent formatting
- Notes pages at the end because people love writing in cookbooks
- Measurement conversion chart – everyone forgets this but it’s super helpful
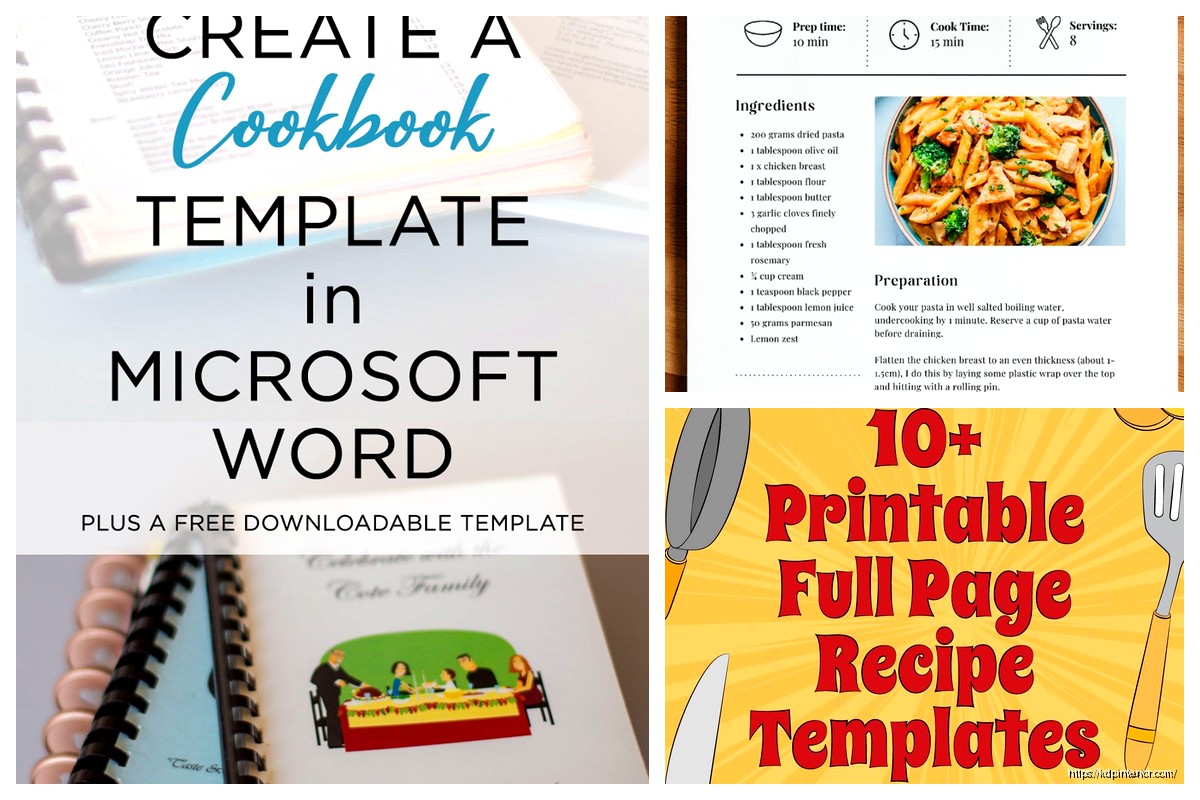
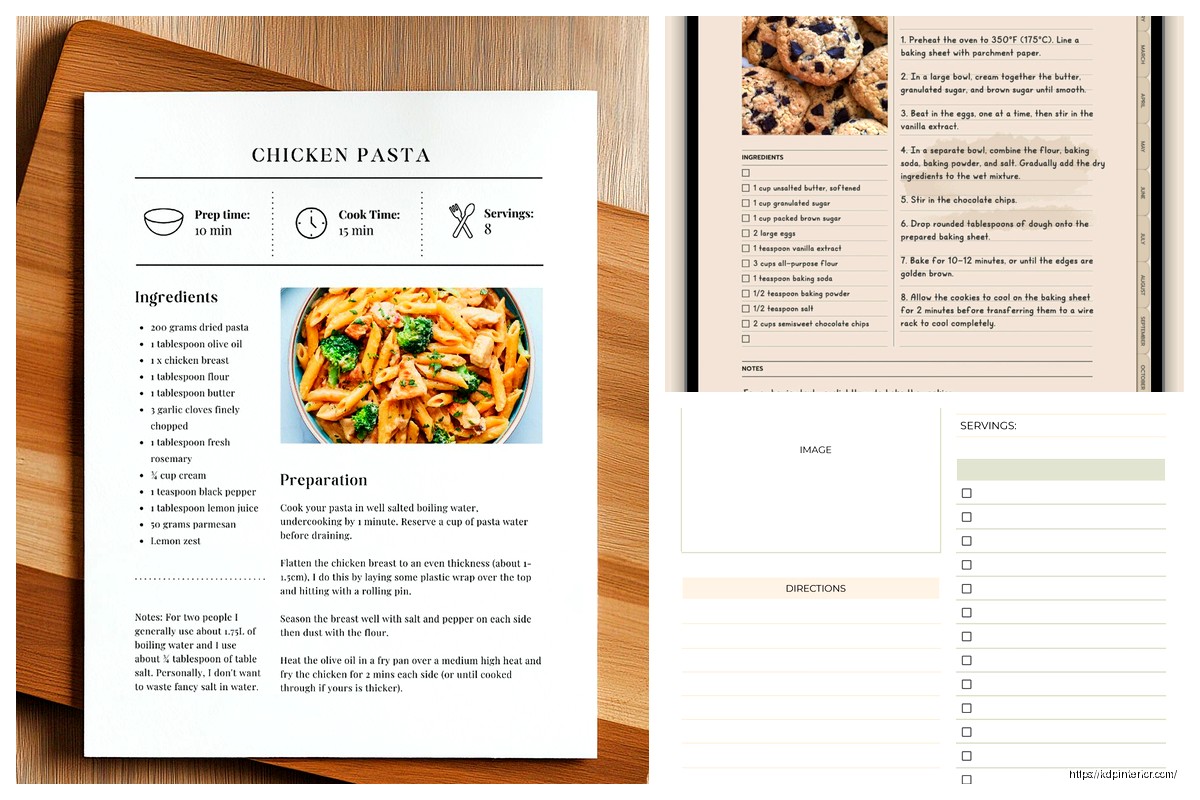
For the recipe pages themselves, consistency is everything. Pick ONE layout and stick with it. I use a format that has the recipe title at top, then a small image section, then ingredients on the left side and instructions on the right. Servings, prep time, and cook time go right under the title.
Oh and another thing – use a readable font size. I see so many templates with like 9pt font because the designer wanted to fit everything on one page. Nobody over 35 can read that without their glasses. I use 11pt minimum for body text and 14-16pt for headings.
Making It Interactive (The Fancy Way)
So if you want people to actually USE your cookbook digitally and not just print it, you gotta add some interactive elements. Adobe InDesign can do this but honestly it’s overkill unless you’re already familiar with it. The learning curve is brutal.
What I’ve been doing lately is building in Google Slides of all things. Sounds weird but hear me out – you can add clickable buttons, embed video links if you want to show techniques, and people can make their own copies to edit and add notes. Plus it’s free and works on any device.
Wait I forgot to mention – hyperlinks are your friend in PDFs. In Canva you can link your table of contents entries directly to the recipe pages. Makes navigation so much better. Same with the index. Just select the text and add the link to the specific page number.
Recipe Card Format That Actually Makes Sense
Your recipe cards need these elements in this order or people get confused:
- Recipe name (big and bold)
- Quick stats bar – servings, prep time, cook time, total time
- Brief description (2-3 sentences max)
- Ingredients list
- Step-by-step instructions
- Chef’s notes or tips section
- Nutritional info if you’re including it
The ingredients list needs to be super clear. I format mine with the measurement first, then the ingredient, then any prep notes in parentheses. Like “2 cups flour (sifted)” or “1 onion (diced)”. Some people do it backwards but that’s harder to scan quickly when you’re cooking.
Color Schemes and Visual Stuff
This is gonna sound obvious but use colors that don’t make people hungry feel sick. I tested a template with this bright orange and purple combo because I thought it looked modern and literally everyone said it was hard to look at for long periods.
Stick with:
- Warm neutrals (creams, tans, soft browns)
- Muted greens and blues
- One accent color for headers and important elements
- White space – so much white space
My dog just knocked over my coffee which is perfect timing for a break but anyway…
The photos are tricky. If you’re creating a template for OTHER people to use, you need placeholder images that are clearly placeholders. I use solid color boxes with “Add Recipe Photo Here” text. If it’s for your own recipes, invest in decent food photography or buy stock photos. Unsplash and Pexels have tons of free food images that don’t look terrible.
The Technical Setup Nobody Talks About
Okay so here’s where people mess up – file size. If your PDF is like 50MB because you used giant high-res images, people are gonna have issues downloading and storing it. Compress your images before adding them. I use TinyPNG or just compress them in Canva before downloading.
Export settings matter too. For PDFs, export as “PDF Print” quality if people might print it, or “PDF Standard” if it’s digital-only. The file size difference is huge. Standard quality is usually under 10MB for a 50-page cookbook which is way more manageable.
Making Templates People Can Actually Edit
If you’re selling blank templates that buyers will fill in themselves, you need editable fields. In Canva, this means using text boxes that are clearly marked. I create a template with dummy text like “[Recipe Name Here]” and “[Add ingredients list]” so it’s obvious what goes where.
For Word or Google Docs templates, use actual tables for ingredient lists and instruction steps. Makes it so much easier for people to add or remove items without the formatting going haywire. I learned this after trying to edit someone else’s cookbook template where everything was just… floating text boxes positioned manually. Nightmare.
Interactive Digital Cookbook Options
Wait I forgot to mention the app-style approach. If you’re tech-savvy there’s platforms like Notion or Airtable where you can build interactive recipe databases. Not exactly templates in the traditional sense but people love them because you can tag recipes, search by ingredient, and even build in grocery list generators.
I built one in Notion last month just to test it and honestly it’s pretty cool. You create a database where each entry is a recipe, then you add properties for cuisine type, dietary restrictions, cook time, etc. People can filter and sort however they want. The template itself is just the database structure and a few example recipes to show the format.
Selling Your Templates (Quick Money Talk)
Since you’re probably wondering – Etsy is still the easiest place to sell cookbook templates. List them as digital downloads, price between $7-$25 depending on how many pages and how fancy they are. I’ve got a set of 10 different recipe card templates that sells for $12 and it brings in a few hundred bucks a month on autopilot.
Gumroad works too and takes smaller fees. Creative Market if you’ve got really professional-looking stuff. Just make sure you include a preview PDF showing every page layout so people know exactly what they’re getting.
Common Mistakes I See Everywhere
People put way too much on each page. A recipe should breathe. If it needs two pages, use two pages. Don’t shrink the font to 8pt and cram everything together.
Not including an editable shopping list section. People want to check off ingredients as they shop. Add a simple checklist template in the back.
Forgetting about mobile users. Like 60% of people are gonna look at your cookbook on their phone at some point. Test your template on a phone screen before you finalize it. If the text is unreadable without zooming, fix it.
Oh and another thing – not providing multiple file formats. Give people both PDF and maybe a Word doc or Google Docs version. Some people prefer one over the other and it’s easy to export both.
The Category/Section Dividers Thing
Your cookbook needs clear sections – appetizers, mains, desserts, whatever categories make sense. Create divider pages that are visually distinct. I use a full-page image with the category name in big text. Makes flipping through way easier.
Include a mini table of contents at the start of each section listing just those recipes. Seems like overkill but it actually helps people navigate, especially in longer cookbooks with 30+ recipes.
Tools I Actually Use Daily
Besides Canva which I already mentioned way too much:
Affinity Publisher – one-time payment alternative to InDesign, way cheaper, does everything you need for cookbook templates
Google Docs/Slides – free, collaborative, accessible anywhere
Adobe Spark – good for quick recipe cards if you’re not doing a full cookbook
PicMonkey – photo editing specifically for food photos, has recipe card templates built in
I switch between these depending on what I’m working on. None of them are perfect but they all work.
The Actual Recipe Testing Part
This isn’t about templates but like… test your recipes before you put them in a cookbook you’re selling. Obvious right? But I bought a cookbook template once that had example recipes and half of them didn’t work. The bread recipe had no rising time listed. The pasta sauce was weirdly salty. Just test them.
If you’re creating a blank template, include one or two solid tested recipes as examples. Shows people the format and gives them something to reference.
Print vs Digital Considerations
If there’s ANY chance someone might print your cookbook, design with that in mind. Use CMYK color mode instead of RGB. Leave bigger margins. Avoid light text on dark backgrounds because that eats printer ink like crazy and people will hate you for it.
For spiral binding (which is honestly the best for cookbooks), you need extra margin on the left side – like 1 inch minimum. The spiral takes up space.
Digital-only gives you more freedom. You can use darker backgrounds, interactive elements, even video embeds if you’re fancy. File size matters less if people are just storing it in Google Drive or whatever.
Okay so that’s basically everything I’ve figured out about cookbook templates over the past few years. The main thing is just pick a format, stay consistent, and make it actually usable for someone who’s cooking with flour on their hands trying to read instructions. Everything else is just details.
 Lined Pages Journal 120 pages Ready to Upload PDF Commercial Use KDP Template 6x9 8.5x11 5x8 for Notebooks, Diaries, Low Content
1 × $0.00
Lined Pages Journal 120 pages Ready to Upload PDF Commercial Use KDP Template 6x9 8.5x11 5x8 for Notebooks, Diaries, Low Content
1 × $0.00  Editable Canva Lined Journal: Express Your Thoughts - KDP Template
1 × $0.00
Editable Canva Lined Journal: Express Your Thoughts - KDP Template
1 × $0.00 
DISCOVER OUR FREE BEST SELLING PRODUCTS
Editable Canva Lined Journal: Express Your Thoughts – KDP Template
Lined Pages Journal 120 pages Ready to Upload PDF Commercial Use KDP Template 6×9 8.5×11 5×8 for Notebooks, Diaries, Low Content
Lined Pages Journal 120 pages Ready to Upload PDF Commercial Use KDP Template 6×9 8.5×11 5×8 for Notebooks, Diaries, Low Content
Cute Dogs Coloring Book for Kids | Activity Book | KDP Ready-To-Upload
Daily Planner Diary : Diary Planners for Everyday Productivity, 120 pages, 6×9 Size | Amazon KDP Interior
Wolf Coloring KDP interior For Adults, Used as Low Content Book, PDF Template Ready To Upload COMMERCIAL Use 8.5×11"
Coloring Animals Head Book for Kids, Perfect for ages 2-4, 4-8 | 8.5×11 PDF
Printable Blank Comic Book Pages PDF : Create Your Own Comics – 3 Available Sizes
Notes KDP interior Ready To Upload, Sizes 8.5×11 6×9 5×8 inch PDF FILE Used as Amazon KDP Paperback Low Content Book, journal, Notebook, Planner, COMMERCIAL Use
Black Lined Journal: 120 Pages of Black Lined Paper Perfect for Journaling, KDP Notebook Template – 6×9
Student Planner Journal 120 pages Ready to Upload PDF Commercial Use KDP Template 6×9" 8.5×11" for Low Content book
Recipe Journal Template – Editable Recipe Book Template, 120 Pages – Amazon KDP Interior