-
×
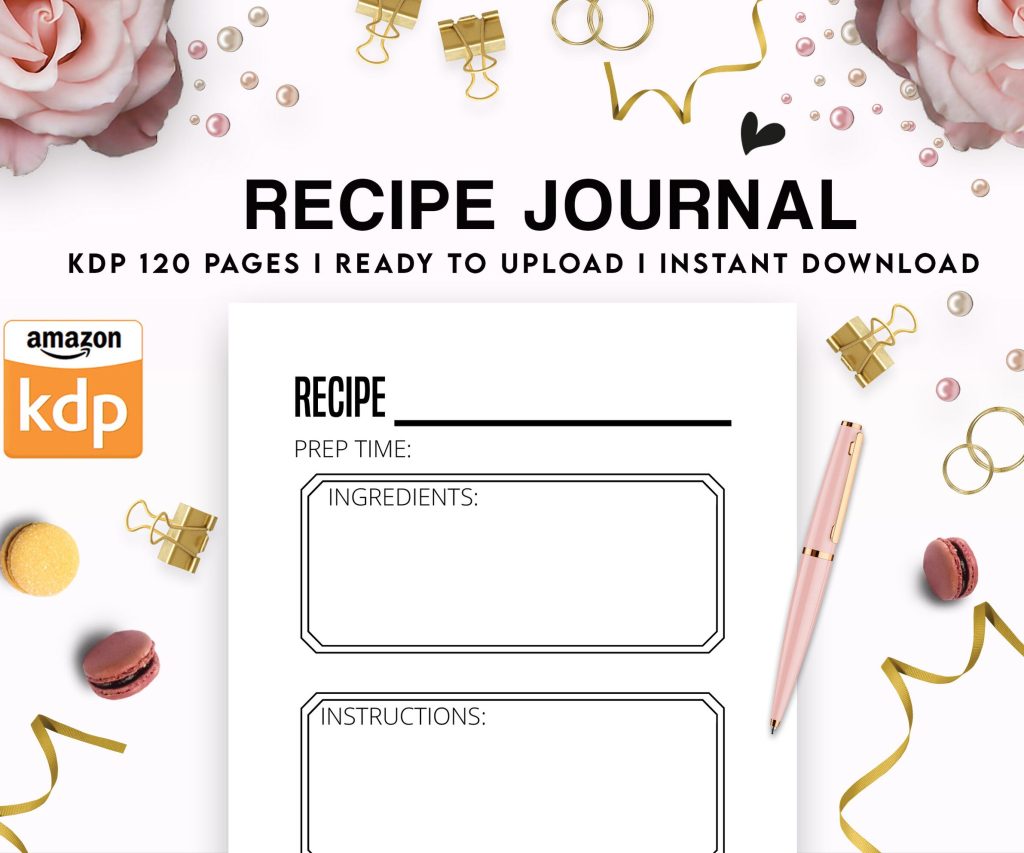 Recipe Journal Template - Editable Recipe Book Template, 120 Pages - Amazon KDP Interior
1 × $0.00
Recipe Journal Template - Editable Recipe Book Template, 120 Pages - Amazon KDP Interior
1 × $0.00
Subtotal: $0.00
Recipe Journal Template - Editable Recipe Book Template, 120 Pages - Amazon KDP Interior
1 × $0.00 Subtotal: $0.00
Before you even think about uploading your first book, Amazon needs your tax information. You’ll fill out either a W-9 if you’re in the US or a W-8BEN if you’re international. This is boring but super important because without it, they’re gonna withhold like 30% of your royalties which… yeah, no thanks.
I spent three hours last Tuesday helping a client fix this because she skipped it initially and wondered why her payments were so low. The tax interview is right there in your KDP dashboard under Account Settings. Just click through it, answer honestly, and you’re done in like five minutes.
So when you first create your KDP account, you’ll use your Amazon login. If you don’t have one, just make it. But here’s the thing – use an email you actually check because Amazon sends important notifications there and I’ve seen people miss copyright strikes or policy warnings because they used some random email from 2008.
Your author name can be your real name or a pen name, doesn’t matter. I use both depending on the niche. For low-content stuff like journals and planners, I usually go with pen names that sound relevant to the niche. For my hiking books I use “Summit Press” as the publisher name and it just feels right, you know?
Under “Getting Paid” you’ll enter your bank details. Direct deposit is the only real option unless you want a check which takes forever. Amazon pays royalties like 60 days after the end of the month you made the sale, so if someone buys your book in January, you get paid end of March. It’s annoying but that’s just how it works.
Make sure the name on your bank account matches the name on your KDP account. I had this whole issue where my business account had “Daniel Harper LLC” but my KDP said “Daniel Harper” and it delayed my first payment by like three weeks.
The KDP dashboard is where you’ll live basically. Left side has all your menus – Bookshelf is where all your books show up, Reports is where you check sales, and Marketing tools is… well, we’ll get to that.
Oh and another thing – the dashboard can be glitchy sometimes. Like last week I was uploading a planner and the preview just wouldn’t load, had to switch browsers. Chrome usually works best for me but some people swear by Firefox.
You need two files – your manuscript (the inside pages) and your cover. For the manuscript, KDP accepts PDF, DOC, DOCX, and a few others, but honestly just use PDF. Export as PDF/X-1a:2001 if you’re doing print, it’s the cleanest.
Interior file requirements depend on what you’re publishing:
For trim size, 6×9 is the most common for books. I use it for like 90% of my stuff because it’s versatile and the printing costs are reasonable. 8.5×11 works great for workbooks and planners but it costs more to print so your royalty takes a hit.
If your book has images or backgrounds that go to the edge, you need bleed. That’s an extra 0.125 inches on all sides that gets trimmed off. Without it, you’ll get white lines on the edges and it looks terrible.
Margins are different – you need at least 0.375 inches on the outside edges and 0.5 inches on the inside (the gutter). Amazon’s templates have this built in, and honestly I’d recommend downloading their templates from the KDP website. They have them for every trim size in Word, PowerPoint, and PDF formats.
Wait I forgot to mention – if you’re doing a book over 150 pages, your gutter margins need to be bigger. Amazon has a calculator on their site but basically the thicker your book, the more margin you need so text doesn’t disappear into the spine.
Your cover dimensions depend on your page count because the spine width changes. KDP has a cover calculator – you plug in your page count, paper type (white or cream), and trim size, and it spits out the exact dimensions you need.
Most people use Canva or Photoshop for covers. I’m not a designer so I usually outsource this to Fiverr, costs like $15-50 depending on complexity. Just make sure whoever does it knows KDP specs – 300 DPI minimum, RGB for ebooks, and that cover template I mentioned.
This is gonna sound weird but check your cover in grayscale before uploading. Sometimes colors that look different on screen look identical when printed and you don’t want your title disappearing into the background.
Click the big “+ Create” button and choose Paperback, Hardcover, or Kindle eBook. You can’t do all formats at once, you have to create each separately then link them later (it’s annoying but whatever).
The upload process has three sections: Kindle eBook Details, Content, and Pricing (or similar for print). Let’s break it down:
Language is obvious. Title and subtitle – make them clear and keyword-rich. Like if you’re publishing a gratitude journal, don’t call it “Peaceful Moments” – call it “Gratitude Journal: Daily Prompts for Mindfulness and Positivity” or something that actually tells people what it is.
Series info only if you’re doing a series (duh). Edition number usually stays at 1 unless you’re updating an existing book.
Author name should match what you decided earlier. Publisher is optional – you can leave it blank or put your own imprint name. I have like five different publisher names I rotate through depending on the niche lol.
Description is huge for sales but Amazon gives you this tiny box that’s weirdly limiting. You get 4000 characters. Use HTML formatting – bold important words with tags, add bullet points with
Publishing rights – you’ll almost always choose “I own the copyright” unless you bought rights from someone else or it’s public domain.
You get to pick two categories when uploading. Choose the most specific ones possible because competing in “Books > Fiction” is impossible, but “Books > Fiction > Romance > Time Travel Romance > Historical” is way easier to rank in.
You can actually get up to 10 categories by emailing KDP support after publishing, but that’s a whole other thing. Just start with two good ones.
Seven keyword boxes – don’t waste them on single words. Use phrases people actually search for. Like “meal prep cookbook for beginners” instead of just “cookbook” or “meal prep.” Amazon’s search works on phrases not individual words scattered around.
Upload your manuscript PDF here. The previewer will show you how it looks – actually scroll through the WHOLE thing because I once published a planner with a totally blank page in the middle that I didn’t catch. Super embarrassing.
For print books, you’ll choose paper type (white or cream – cream is warmer and easier on eyes, white is brighter and better for images), cover finish (matte or glossy – I prefer matte, feels more professional), and then upload your cover.
The 3D preview is cool but sometimes doesn’t load properly. Don’t panic if it’s broken, your book is probably fine.
For ebooks you choose between 35% and 70% royalty. The 70% option has restrictions – your book has to be priced between $2.99 and $9.99, and you pay delivery fees (usually like 15 cents). Under $2.99 or over $9.99, you’re stuck with 35%.
For print books, royalty depends on printing cost which depends on page count and trim size. Amazon shows you the printing cost right there. Your royalty is whatever’s left after Amazon takes their cut and printing costs. So if your book costs $4 to print and you price it at $10, Amazon takes 40% ($4), printing is $4, you get $2.
Pricing in different marketplaces – Amazon auto-converts but you can set custom prices for UK, Europe, Japan, etc. I usually just let it auto-convert because managing individual prices is tedious.
Okay so funny story, I went exclusive with KDP Select for my first 50 books because everyone said it was better. KDP Select means your ebook is exclusive to Amazon – you can’t sell it anywhere else. In exchange, you get benefits like:
The KU money can add up. I make like 40% of my ebook income from KU page reads. But you’re locked in for 90 days at a time, and if you want to sell on Apple Books, Kobo, or your own website, you can’t.
Going wide means not enrolling in Select. You keep the 35% or 70% royalty but lose KU income and promotional tools. For most beginners, I’d say start with Select because KU income helps, but if you already have an audience outside Amazon, maybe go wide.
Print books aren’t affected by this – they can be sold anywhere regardless of your ebook enrollment.
Review takes like 24-72 hours usually. Amazon’s robots check for formatting issues, content violations, copyright problems, all that. Sometimes they reject for weird reasons – I had a blank lined journal rejected once because they thought the lines were “too uniform” and might be AI-generated, which like… they’re lines??? Anyway, you can appeal or fix and resubmit.
Once it’s live, you’ll get an ASIN (Amazon Standard Identification Number) for ebooks and an ISBN for print. Amazon provides free ISBNs for print books but they’re the publisher of record if you use theirs. You can buy your own from Bowker for like $125 if you want to be listed as the publisher, which matters if you’re building a legit publishing business.
If you published both ebook and print, they should auto-link but sometimes don’t. When they’re linked, customers see all formats on one product page. If they don’t link automatically, contact KDP support with both ASINs and they’ll fix it, usually within a day.
Author Central is separate from KDP – it’s where you create your author page on Amazon. Go to authorcentral.amazon.com and sign in with the same Amazon account. Add your bio, photo, and link all your books. It makes you look legit and the author page shows up in search results which drives more sales.
You can also see additional sales data in Author Central, like which keywords are driving traffic and how many people viewed your book page. KDP reports only show sales, but Author Central shows page views which helps you understand conversion rates.
Don’t expect sales immediately unless you’re running ads or have an audience already. My first book sat at zero sales for like three weeks and I thought I’d failed completely. Then someone bought it and left a review and suddenly it started trickling in.
Amazon’s algorithm needs data – sales, page reads, reviews. The more you get, the more Amazon shows your book to people. It’s this weird momentum thing where nothing happens, then suddenly everything happens at once.
Check your reports obsessively if you want (I still do after 7 years lol) but try not to stress about it. The real game is publishing multiple books consistently. One book making $20/month isn’t exciting, but 50 books making $20/month each is $1k/month and that’s when it gets interesting.
Oh wait one more thing – turn on email notifications in your account settings so you know when people buy your book or leave reviews. It’s motivating early on when every sale feels like a huge win.
DISCOVER OUR FREE BEST SELLING PRODUCTS
Editable Canva Lined Journal: Express Your Thoughts – KDP Template
Lined Pages Journal 120 pages Ready to Upload PDF Commercial Use KDP Template 6×9 8.5×11 5×8 for Notebooks, Diaries, Low Content
Lined Pages Journal 120 pages Ready to Upload PDF Commercial Use KDP Template 6×9 8.5×11 5×8 for Notebooks, Diaries, Low Content
Cute Dogs Coloring Book for Kids | Activity Book | KDP Ready-To-Upload
Daily Planner Diary : Diary Planners for Everyday Productivity, 120 pages, 6×9 Size | Amazon KDP Interior
Wolf Coloring KDP interior For Adults, Used as Low Content Book, PDF Template Ready To Upload COMMERCIAL Use 8.5×11"
Coloring Animals Head Book for Kids, Perfect for ages 2-4, 4-8 | 8.5×11 PDF
Printable Blank Comic Book Pages PDF : Create Your Own Comics – 3 Available Sizes
Notes KDP interior Ready To Upload, Sizes 8.5×11 6×9 5×8 inch PDF FILE Used as Amazon KDP Paperback Low Content Book, journal, Notebook, Planner, COMMERCIAL Use
Black Lined Journal: 120 Pages of Black Lined Paper Perfect for Journaling, KDP Notebook Template – 6×9
Student Planner Journal 120 pages Ready to Upload PDF Commercial Use KDP Template 6×9" 8.5×11" for Low Content book
Recipe Journal Template – Editable Recipe Book Template, 120 Pages – Amazon KDP Interior