-
×
 Lined Pages Journal 120 pages Ready to Upload PDF Commercial Use KDP Template 6x9 8.5x11 5x8 for Notebooks, Diaries, Low Content
1 × $0.00
Lined Pages Journal 120 pages Ready to Upload PDF Commercial Use KDP Template 6x9 8.5x11 5x8 for Notebooks, Diaries, Low Content
1 × $0.00
Subtotal: $0.00
Okay so tunnel books are actually one of those formats that look way more complicated than they are, and I’ve been messing around with templates for these since like 2019 when someone in a KDP Facebook group mentioned they were selling well around holidays.
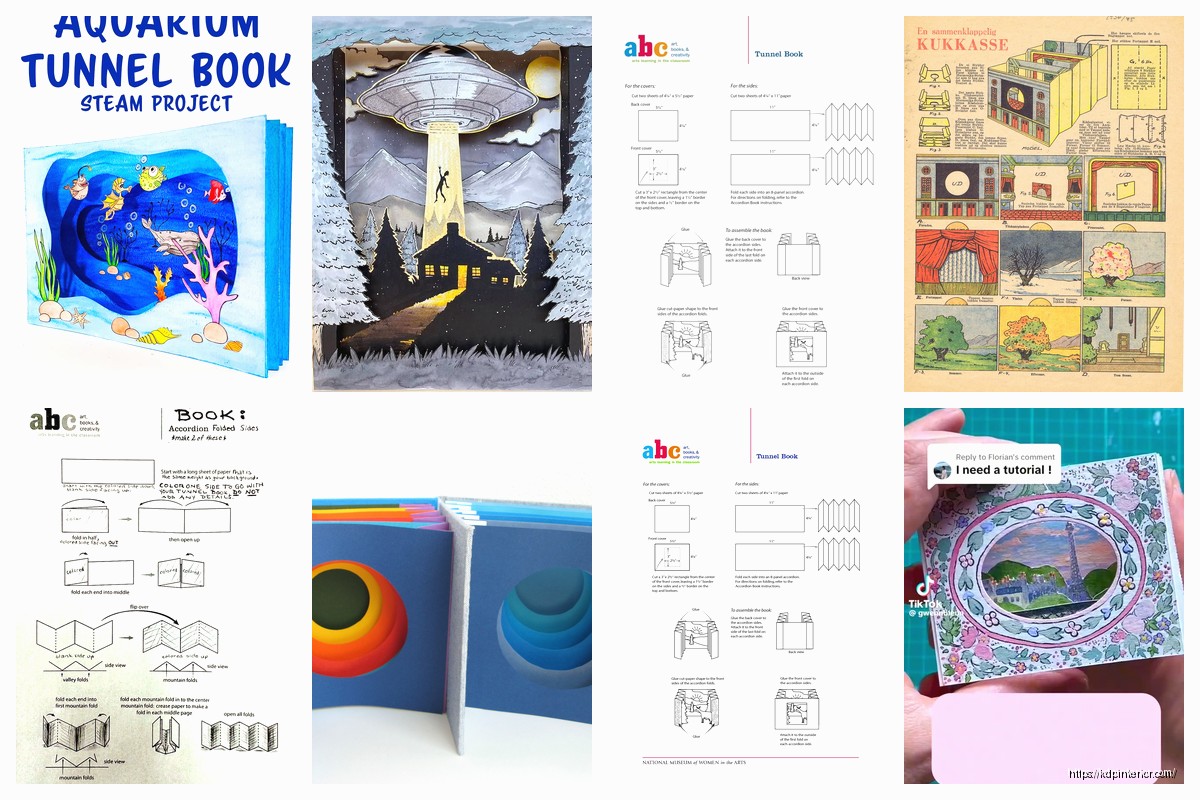
The basic idea is you’ve got these layered paper scenes that create depth when you look through them. Think like a Victorian peepshow but for kids’ craft projects or adult paper art. Each layer has cutouts and the spacing between them creates this 3D effect that’s honestly pretty cool when you get it right.
So first thing – you need to decide how many layers. Most tunnel books I’ve sold templates for have between 5-8 layers including the front and back covers. Fewer than 5 looks kinda flat, more than 8 gets fiddly and people complain in reviews that it’s too complicated. I learned this the hard way with a Christmas template that had 12 layers and got a bunch of 3-star reviews saying it was “too advanced.”
Each layer needs to be the same dimensions. I usually go with 8.5 x 6 inches because it fits nicely on standard letter paper and doesn’t waste too much when people print. The accordion sides that hold everything together should be about 2 inches tall and however long you need them based on your spacing.
Wait I forgot to mention – the spacing between layers is super important. I do about 1 inch between each layer, sometimes 1.5 inches if it’s a design that needs more depth. You gotta mark this clearly in your template instructions because if people mess up the spacing the whole 3D effect falls apart.
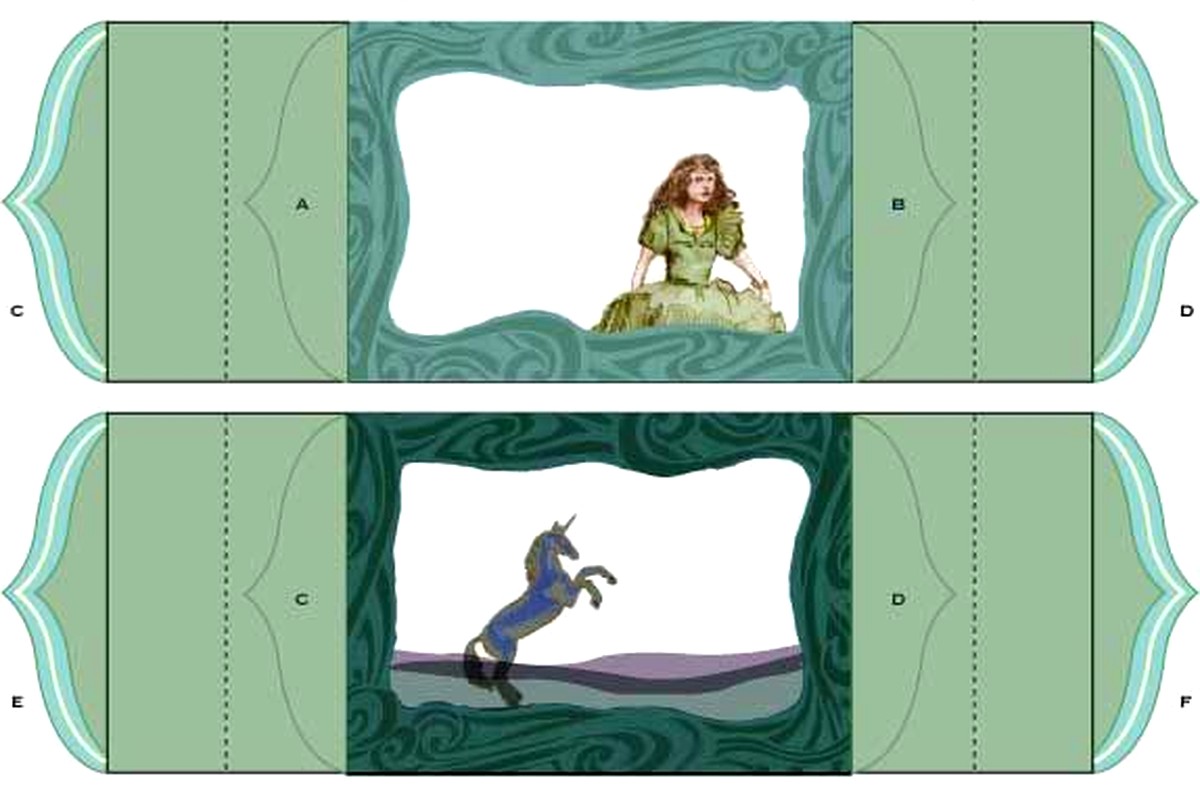
I work in Illustrator for these but you can technically do it in Canva or even PowerPoint if you’re desperate. Each layer needs to be its own file or artboard. Layer 1 (the front) usually has the biggest cutout – like a window or archway that frames the whole scene. Then each subsequent layer has progressively different cutouts that reveal the next layer behind it.
The trick is planning your scene from back to front. I literally sketch this out on paper first which probably sounds old school but it works. Like if you’re doing a forest scene, maybe the back layer is distant trees, then closer trees, then tree trunks, then bushes, then the front frame. Each layer adds detail and depth.
Oh and another thing – you need to include registration marks or alignment guides. I put little circles or crosses in the corners of each layer so people know where to line things up. Some customers are gonna ignore these and then complain their tunnel book looks wonky, but at least you tried.
This is where a lot of templates fail honestly. The accordion strips that connect all your layers need to be precisely measured. I create two strips per template – one for each side. Each strip needs score lines marked where it folds.
Here’s my formula: if you have 6 layers total and 1 inch spacing between each, you need accordion strips that are at least 7 inches long (5 spaces plus a bit extra on each end for gluing). I make mine 2 inches wide which gives enough surface area for glue without being bulky.
The score lines need to be marked super clearly. I use dashed lines and actually label them “fold here” because you’d be surprised how many people don’t understand accordion folds. Or maybe you wouldn’t be surprised, I dunno, after seven years of customer questions nothing surprises me anymore.
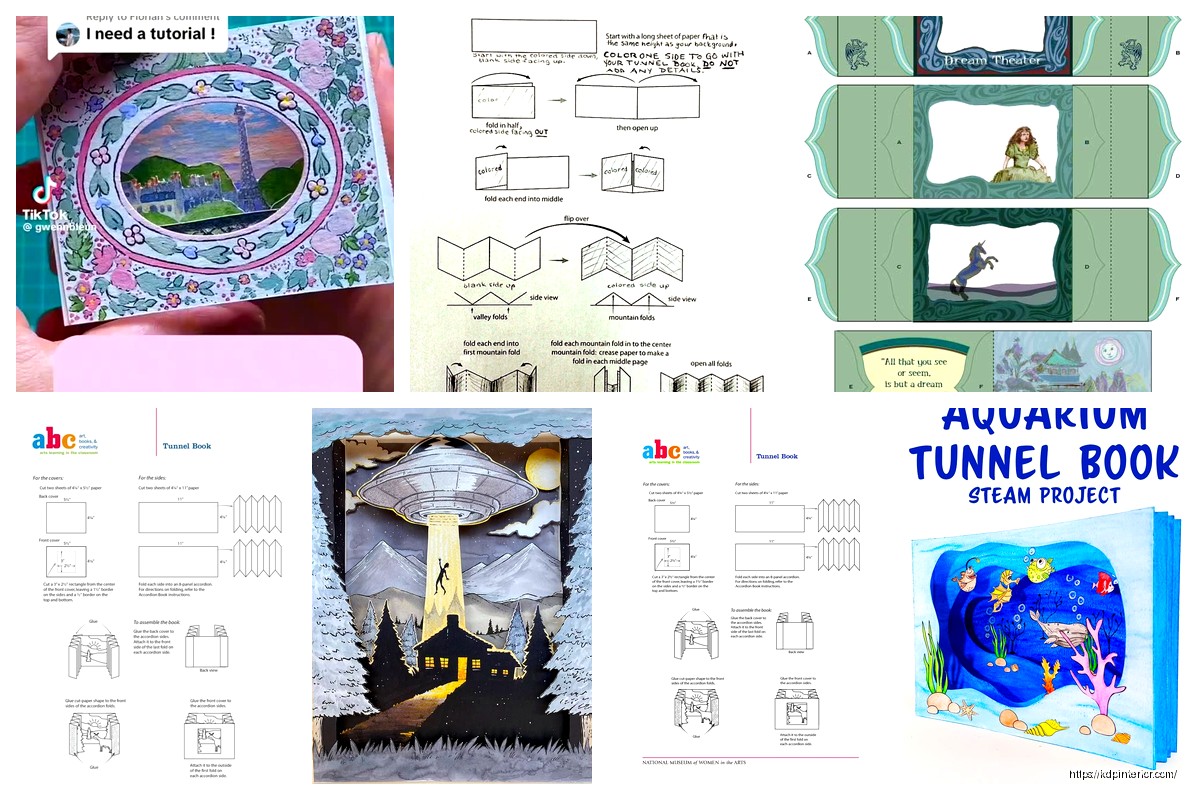
Okay so funny story – my best-selling tunnel book template is this super simple winter scene with like snowflakes and trees. I thought my elaborate fairy garden one would do better but nope. People want designs that look impressive but aren’t too difficult to cut out.
Avoid tiny intricate details. Seriously. Your design might look amazing on screen but if someone’s cutting it with scissors or even a craft knife, those tiny details become a nightmare. I keep most cutout elements at least 0.5 inches in their narrowest dimension.
Themes that sell well: seasons, holidays, nature scenes, fairy tales, cityscapes, underwater scenes. I’ve had weird success with space-themed ones too. My cat literally walked across my keyboard while I was designing a space one and I kept this random squiggle that ended up looking like a shooting star and people loved it.
You gotta provide multiple formats because everyone works differently. I include:
The instructions document is almost more important than the template itself. I include photos of each step, not just text. Show the accordion folding process, show how to align layers, show gluing techniques. My instructions PDF is usually 8-10 pages with photos and it cuts down on customer questions significantly.
I always create templates in at least two sizes – a standard 8.5 x 6 inch and a larger 11 x 8 inch version. Some people want to make mini versions too so sometimes I’ll include a 5 x 3.5 inch option. It’s literally just scaling everything proportionally but customers appreciate having options.
The accordion strips need to scale with the design which seems obvious but I’ve seen templates where someone forgot to scale those and then the whole thing doesn’t work. Don’t be that person.
This is gonna sound tedious but you absolutely need to print and assemble your template yourself at least twice. The first time you’ll catch obvious errors. The second time you’ll catch the subtle spacing issues or realize that one layer’s cutout is too close to the edge.
I usually have my sister test them too because she’s not crafty at all and if she can follow the instructions, most people can. She lives two states away so I just email her the files and wait for angry texts about confusing steps, which is actually super helpful feedback.
Oh wait I should mention paper weight recommendations. This is important and should be in your instructions. I recommend 65-80 lb cardstock for the layers. Regular printer paper is too flimsy, anything heavier than 80 lb gets hard to cut cleanly. The accordion strips can be slightly lighter weight, like 60 lb.
Not leaving enough margin space on the accordion strips – they need at least 0.25 inches from the edge to glue properly.
Making cutouts too close to layer edges – they need at least 0.5 inch border or the paper gets weak and tears.
Forgetting to flip symmetrical designs – if you want text or directional elements, remember people are looking INTO the tunnel book so plan accordingly.
Using colors that are too similar between adjacent layers – the depth effect gets lost if everything’s the same tone. You need contrast.
Not accounting for paper thickness in spacing calculations – this barely matters for thin cardstock but if someone uses thick chipboard it throws everything off.
I sell tunnel book templates on Etsy mostly, some on Creative Fabrica and my own site. They go for anywhere from $4-12 depending on complexity. A basic 5-layer design with simple cutouts might be $4-6. An elaborate 8-layer scene with detailed elements can go up to $12.
Bundle them by theme – I have a “Four Seasons Tunnel Book Collection” that sells way better than the individual ones did. People like feeling they’re getting a deal even though I only discount like 15% for the bundle.
The product photos matter a lot. Show the finished assembled tunnel book from multiple angles. Show the flat layers laid out. Show it with backlighting if possible because that really shows off the depth effect. I take photos with my phone honestly, just make sure the lighting is decent.
You gotta decide if you’re selling these for personal use only or including commercial use rights. I do both – personal use is the standard price, commercial use is double. Clearly state what commercial use means because people will ask. I define it as they can sell up to 50 physical tunnel books made from the template but can’t resell or redistribute the template files themselves.
Some designers get weird about this but honestly most people buying craft templates just want to make stuff for themselves or maybe an Etsy shop. The real money for you is in selling lots of templates, not trying to police what people do with them.
Positioning these as “mindful crafting” or “paper meditation” works surprisingly well. Also marketing them as gifts – like “make a personalized tunnel book for someone” resonates.
Seasonal timing is huge. I start promoting winter/Christmas designs in September, Halloween in July, spring designs in January. You gotta be ahead of the season by at least 2-3 months.
Pinterest drives a ton of traffic for these if you create good pins showing the finished product. Use keywords like “3D paper craft template,” “tunnel book DIY,” “layered paper art,” stuff like that.
Oh and another thing – video tutorials help sales a lot. I made a quick YouTube video showing how to assemble one of my templates and I link to it in all my product descriptions. It’s like 5 minutes long, nothing fancy, but it answers the “is this too hard for me” question people have.
Once you’ve got basic templates down you can add fancy elements. I’ve done ones with moveable parts using paper fasteners. Some have LED tea light spaces designed into the back layer so it lights up from behind.
Interactive elements sell well – like layers that slide or rotate. These require more complex instructions but you can charge more. I have a carousel-style tunnel book template that’s basically a rotating cylinder version and it sells for $15 because it’s unique.
Seasonal addon packs work too. Like I have a basic forest tunnel book and then sold separate “decoration packs” with different animals, flowers, or weather elements people can add to customize it. That was my girlfriend’s idea actually and it works pretty well for repeat customers.
The key with any template is making it clear enough that beginners can follow but interesting enough that experienced crafters don’t feel like it’s too basic. That balance is tricky and honestly you learn it through customer feedback and sales data more than anything else.
Anyway that’s basically everything I’ve figured out about tunnel book templates over the past few years. They’re not gonna make you rich but they’re a solid product line if you like paper crafts and design work.
DISCOVER OUR FREE BEST SELLING PRODUCTS
Editable Canva Lined Journal: Express Your Thoughts – KDP Template
Lined Pages Journal 120 pages Ready to Upload PDF Commercial Use KDP Template 6×9 8.5×11 5×8 for Notebooks, Diaries, Low Content
Lined Pages Journal 120 pages Ready to Upload PDF Commercial Use KDP Template 6×9 8.5×11 5×8 for Notebooks, Diaries, Low Content
Cute Dogs Coloring Book for Kids | Activity Book | KDP Ready-To-Upload
Daily Planner Diary : Diary Planners for Everyday Productivity, 120 pages, 6×9 Size | Amazon KDP Interior
Wolf Coloring KDP interior For Adults, Used as Low Content Book, PDF Template Ready To Upload COMMERCIAL Use 8.5×11"
Coloring Animals Head Book for Kids, Perfect for ages 2-4, 4-8 | 8.5×11 PDF
Printable Blank Comic Book Pages PDF : Create Your Own Comics – 3 Available Sizes
Notes KDP interior Ready To Upload, Sizes 8.5×11 6×9 5×8 inch PDF FILE Used as Amazon KDP Paperback Low Content Book, journal, Notebook, Planner, COMMERCIAL Use
Black Lined Journal: 120 Pages of Black Lined Paper Perfect for Journaling, KDP Notebook Template – 6×9
Student Planner Journal 120 pages Ready to Upload PDF Commercial Use KDP Template 6×9" 8.5×11" for Low Content book
Recipe Journal Template – Editable Recipe Book Template, 120 Pages – Amazon KDP Interior